1. Introducing Serenity
Serenity BDD is an open source library that aims to make the idea of living documentation a reality.
Serenity BDD helps you write cleaner and more maintainable automated acceptance and regression tests faster. Serenity also uses the test results to produce illustrated, narrative reports that document and describe what your application does and how it works. Serenity tells you not only what tests have been executed, but more importantly, what requirements have been tested.
One key advantage of using Serenity BDD is that you do not have to invest time in building and maintaining your own automation framework.
Serenity BDD provides strong support for automated web tests using Selenium 2, though it also works very effectively for non-web tests such as tests that exercise web services or even call application code directly.
The aim of Serenity is to make it easy to quickly write well-structured, maintainable automated acceptance criteria, using your favorite BDD or conventional testing library. You can work with Behavior-Driven-Development tools like Cucumber or JBehave, or simply use JUnit. You can integrate with requirements stored in an external source (such as JIRA or any other test cases mangement tool), or just use a simple directory-based approach to organize your requirements.
Up until November 2014, Serenity went by the name of Thucydides.
2. Basic Concepts
To get the most out of Serenity BDD, it is useful to understand some of the basic Serenity BDD behind Behaviour Driven Development and Automated Acceptance Testing. Serenity BDD is commonly used for both Automated Acceptance Tests and Regression Tests, and the principles discussed here apply, with minor variations, to both.
Behaviour Driven Development or BDD, is a development approach where team members explore, and build a shared understanding of application requirements through conversations around examples. In Agile teams practicing BDD, this is often done before or early on in a sprint, in a special meeting sometimes called "the three amigos" or "the three-way handshake", where (at least) a BA (Business Analyst, Product Owner/Manager), a developer and a tester get together to work through examples from the acceptance criteria. The examples being discussed are concrete illustrations of how the system should work, or how a user might use a feature. These examples help provoke discussion, uncovering assumptions and omissions that would have otherwise lead the development team into error further down the track.
Let’s look at an example. Suppose we are building the shopping cart component of an online craft sales site. In Agile terms, the corresponding user story might look like this:
In order to make the most appropriate purchase decisions
As a buyer
I want to be able to place items I want to buy in a virtual cart before placing my order
If we were implementing this story, we would typically define a set of acceptance criteria to flesh out and understand the requirements. For example, we might have the following criteria in our list of acceptance criteria:
-
Show total price for all items
-
Show line item prices
-
Show shipping costs
-
…
If we were using a Behaviour-Driven-Development approach, we might express these requirements in a more formal form, like the following:
Scenario: Show shipping cost for an item in the shopping cart
Given I have searched for 'docking station'
And I have selected a matching item
When I add it to the cart
Then the shipping cost should be included in the total price
This Given When Then format is widely used for acceptance tests in Agile projects.
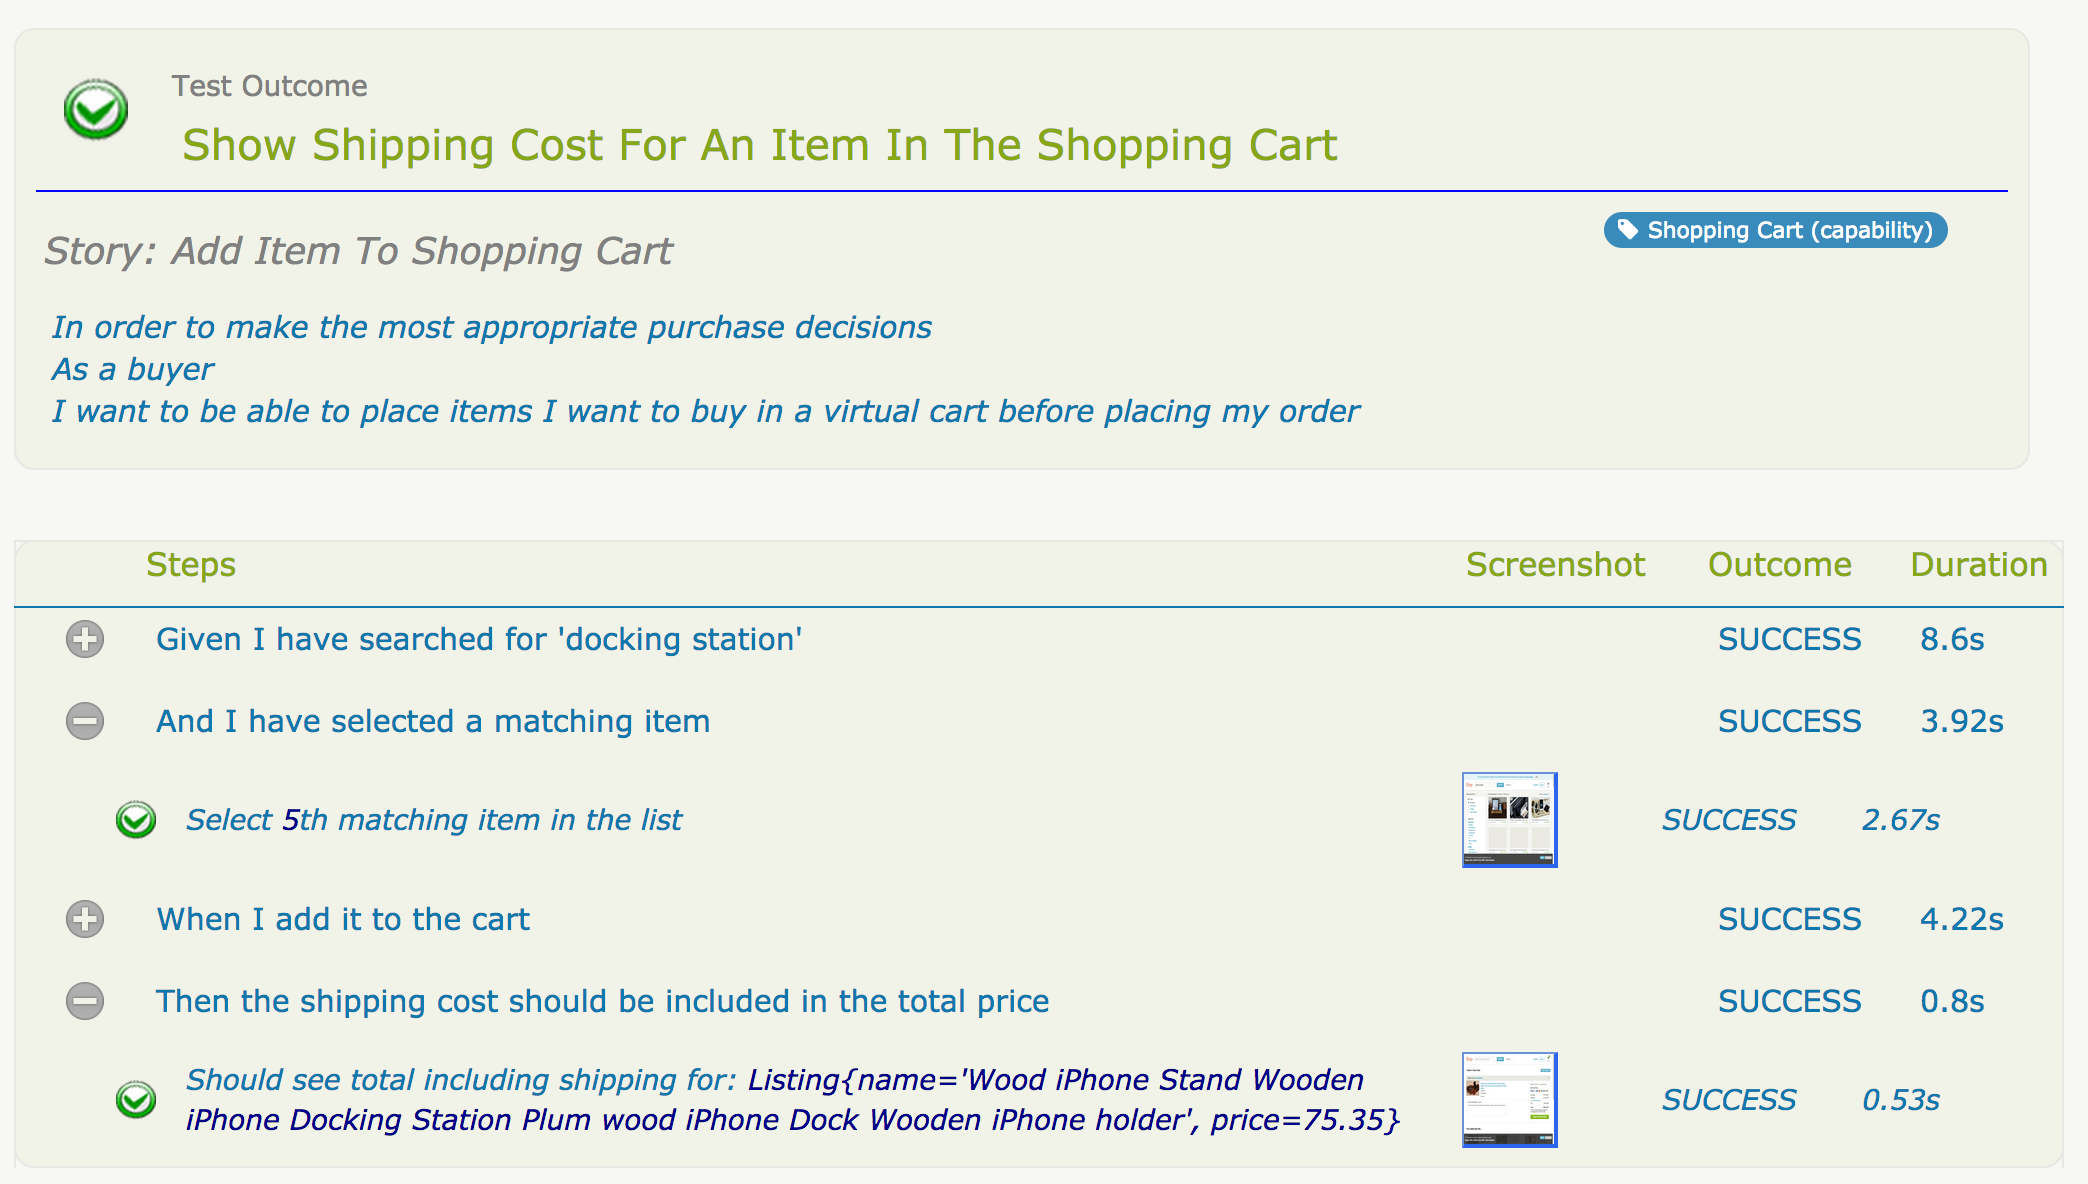
Note how this scenario is deliberately pitched at a fairly high level, in business terms, describing the business motivations behind the feature without committing to a particular implementation.
When a tester or a developer automates and executes this scenario, or a BA reviews the results, they will often want to see a bit more detail. For example, the tester will want to see how the screens played out (if it’s a web test), what test data was used and so on. And the BA might want to see what the screens look like for each step.
Serenity BDD does below for you
-
Makes it easy to write, execute, and report on automated acceptance tests in terms like this, that BAs and testers as well as developers can relate to.
-
Structure your automated acceptance tests into steps and sub-steps like the ones illustrated above. This tends to make the tests clearer, more flexible and easier to maintain.
-
When the tests are executed, Serenity produces illustrated, narrative-style reports like this:
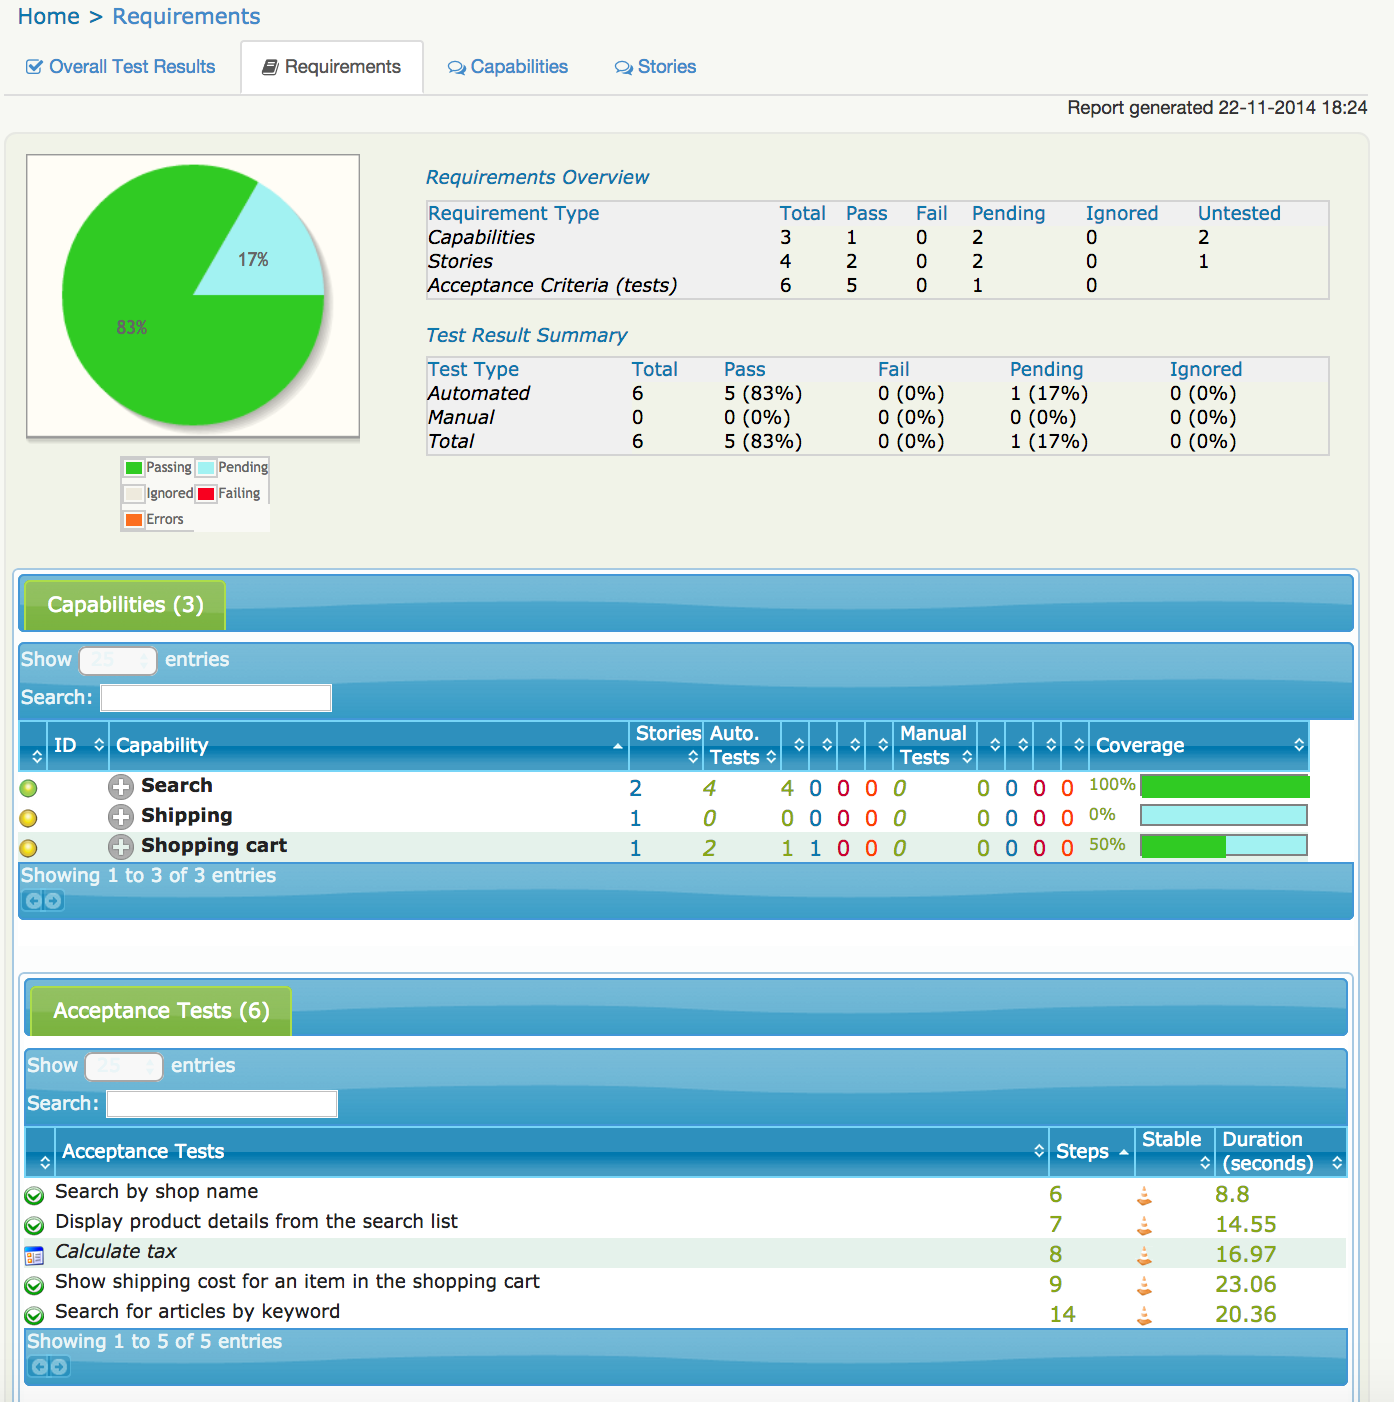
Serenity BDD also gives you a broader picture, helping you see where individual scenarios fit into the overall set of product requirements. It helps you see not only the current state of the tests, but also what requirements have been (and have not been) tested (see An aggregate report generated by Serenity).
Serenity BDD is also commonly used for automated Regression Tests. Whereas BDD Acceptance Tests are defined very early on in the piece, before development starts, Regression Tests involve an existing system. Other than that, the steps involved in defining and automating the tests are very similar.
When it comes to implementing the tests themselves, Serenity BDD also provides many features that make it easier, faster and cleaner to write clear, maintainable tests. This is particularly true for automated web tests using WebDriver, but Serenity BDD also caters for non-web tests as well. Serenity BDD plays well with JUnit as well as more specialized BDD frameworks such as Cucumber and JBehave.
2.1. Detailed description of aggregation reports
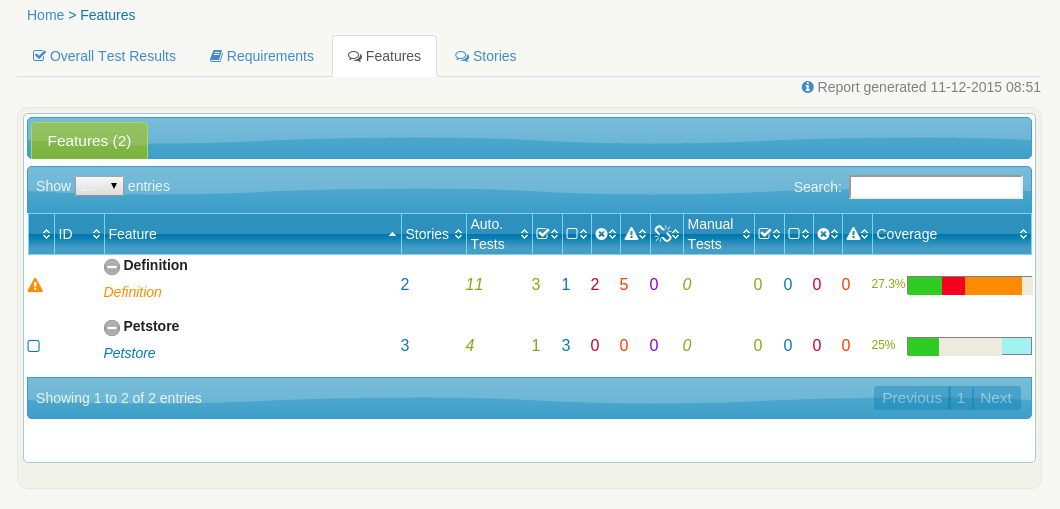
Serenity BDD aggregation report can be organised by using features, stories, steps, scenarios/tests. When you use different frameworks with Serenity BDD it is possible that the same things will have different definitions. For instance, examples in JBehave/Cucumber has almost same meaning as Test Data in Junit, or scenario in JBehave/Cucumber is the same as test in JUnit. Also Test is a synonym of Acceptance Criteria. Here is introduced some short example in order to describe Serenity BDD report. The way of creating and organising the whole test process you can find in next chapters.
Our example contains 2 features with a few stories. Each story can contain one or more scenarios, each scenario consists of one or more steps and some examples. The default amount of examples is 1.
Sample:
Feature:Definition
		Story: Look for definition
			Scenario (or Test, or Acceptance Criteria): Looking for definition: pass
                examples: 3
                steps: 3
			Scenario: Looking for definition with incorrect symbols: @Ignore
                examples: 4
                steps: 3
			Scenario: Looking for not existed definition: failed
                examples: 2
                steps: 3
		Story: Update a definition
			Scenario: Updating a definition: some internal error
                examples: 5
                steps: 3

Feature:Petstore
		Story: Remove a pet
			Scenario: Removing a pet: @Skip
			  	steps: 5
			Scenario: Removing multiple pets: @Pending
			  	steps: 6
		Story: Update a pet
			Scenario: Updating a pet: @Ignore
			  	steps: 4
		Story: Add a pet
			Scenario: Adding a pet: pass
			  	steps: 3
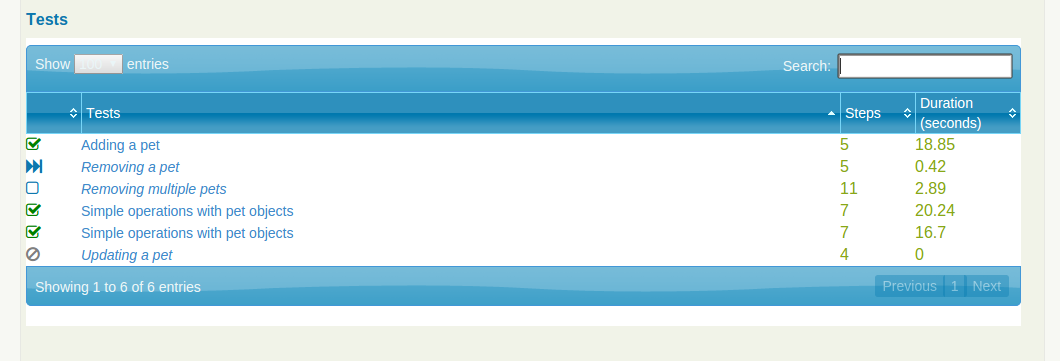
Scenarios Removing a pet, Removing multiple pets, Updating a pet, Adding a pet are defined without usage of any examples. Scenarios Looking for definition, Looking for definition with incorrect symbols, Looking for not existed definition, Updating a definition are defined with examples. Scenario Removing a pet is marked to be skipped. Scenarios Updating a pet, Looking for definition with incorrect symbols are marked to be ignored. Scenarios Looking for definition, Adding a pet should pass. Scenario Looking for not existed definition should not be passed. Scenario Updating a definition should throw unexpected exception during execution. Scenario Removing multiple pets is marked to be pending.
After running all these tests (doesn’t matter if you use JBehave, Cucumber or JUnit) you will receive aggregation report, that will look similar to the structure of tests:

Report contains test results of all executed scenarios, and consists of the next tabs:
- Overall Test Results
-
General info about provided features/components stories in this test. Also represents statistics of passed/ignored/skipped/failed tests based on their amount and examples.
- Requirements
-
Detailed info about statistics based on Features, Stories and Acceptance Criteria
- Features
-
Summary table of all Features
- Stories
-
Summary table with statistics of stories
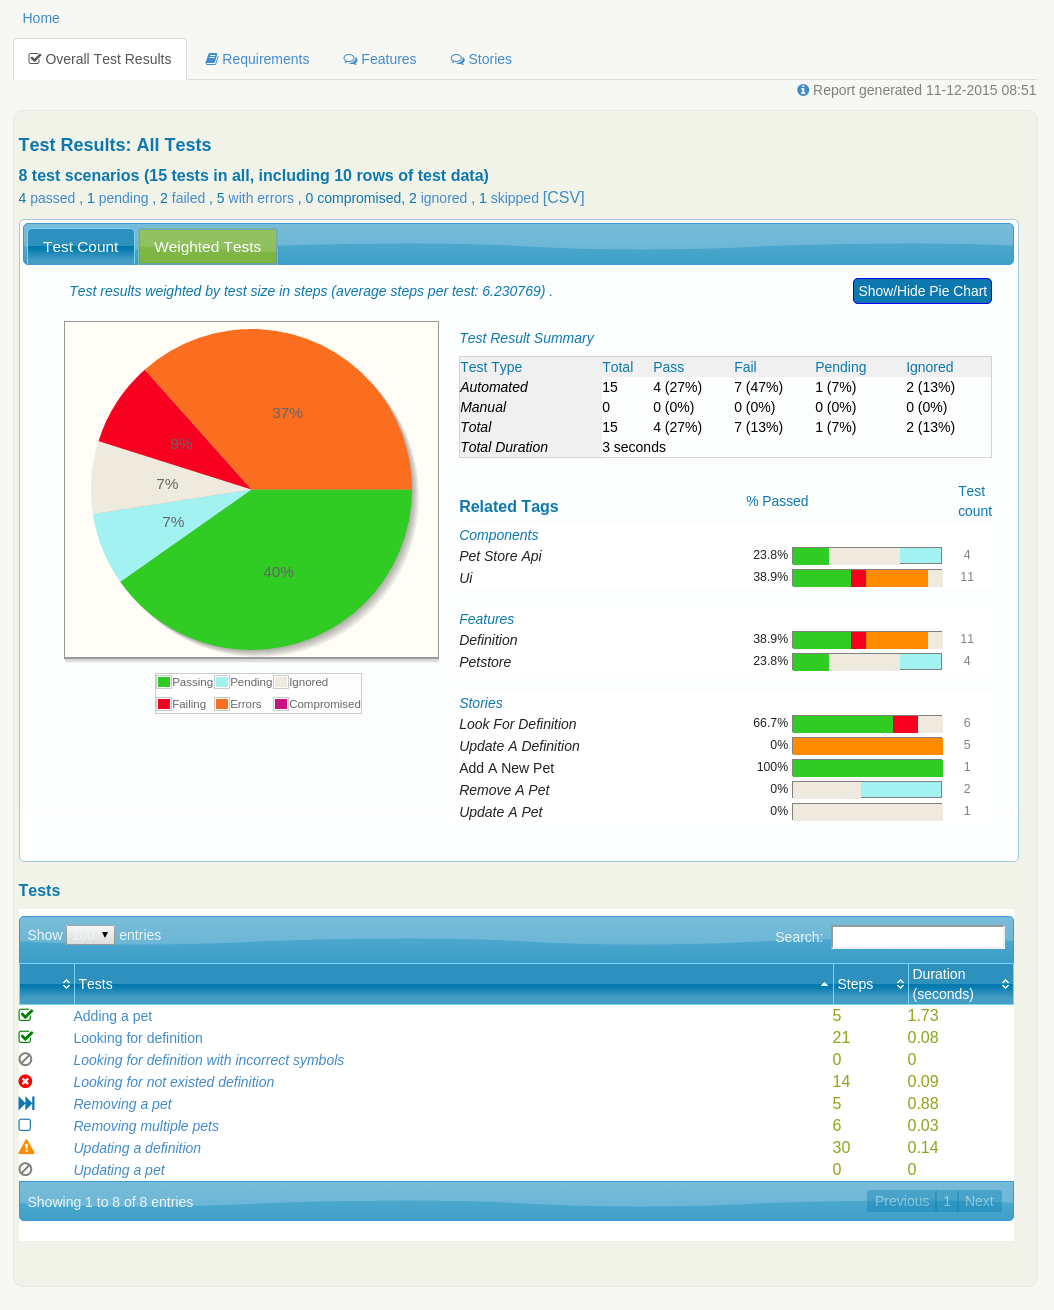
2.1.1. Tab Overall Test Results
Here you can find almost all information about executed tests. It consists of next sub-tabs:
- Test Count
-
Summary page of all general statistics and info, based on amount of scenarios and used examples.
- Weighted Tests
-
Summary page of all general statistics and info, weighted by scenarios size in steps.
There is also general information about executed tests:
8 test scenarios (15 tests in all, including 10 rows of test data)
4 passes, 1 pending, 2 failed, 5 with errors, 0 compromised, 2 ignored, 1 skipped
ignored = 2 - amount of all scenarios which are marked to be ignored. To get this number Serenity counts scenarios with @Ignored mark.
skipped = 1 - amount of all scenarios which are marked to be skipped. To get this number Serenity counts scenarios with @Skipped mark.
with errors = 5 - amount of all scenarios which throw some unexpected exception during execution. To get this number Serenity counts scenarios with Error mark or examples of those scenarios if provided.
failed = 2 - amount of all scenarios which fail. To get this number Serenity counts failed scenarios or examples of those scenarios if provided.
pending = 1 - amount of all scenarios which are marked to be pending. To get this number Serenity counts scenarios with @Pending mark or examples of those scenarios if provided.
passes = 4 - amount of all passed scenarios. To get this number Serenity counts passed scenarios or examples of those scenarios if provided.
rows of test data = 10 - amount of all examples from scenarios witch are used in this report, including skipped scenarios but without ignored scenarios. To get this number Serenity counts examples of those scenarios if provided. In our case there are 3 of such scenarios: with 2, 3 and 5 examples.
tests in all = 15 - sum of "ignored", "skipped", "with errors", "failed", "pending", "passes" values
test scenarios = 8 - amount of all scenarios in this test. In our sample there are 8 scenarios.
Sub-Tab Test Count
As you can see on Serenity BDD report for test structure on tab with Stories, it contains next elements: Pie Chart, Test Result Summary table, Related Tags table and Test table.
Test Result Summary. This table contains more detailed statistics than short summary above.
Row Automated contains automated tests.
-
Ignored - count of automated tests which are marked to be ignored.To get this number Serenity counts scenarios are marked as @Ignored.
-
Percent of ignored tests - percentage of Ignored tests to tests in all. In our case there are 2 such scenario, and it is 13% of 15.
-
Pending - amount of all scenarios are marked to be pending. To get this number Serenity counts @Pending scenarios or examples of those scenarios if provided.
-
Percent of pending tests - percentage of Pending tests to tests in all. In our case there is 1 such scenario, and it is 7% from 15.
-
Fail - amount of all scenarios which failed and scenarios with errors. In our case there is 1 failed scenario with 2 examples and 1 error scenario with 5 examples - 7 as a result.
-
Percent of fail tests - percentage of Fail tests to tests in all. In our case there are 7 scenarios/examples and it is 47% from 15.
-
Pass - amount of passed scenarios. In our case there are 2 such scenario: one without examples, and second with 3 examples - 4 as a result.
-
Percent of passed tests - percentage of Pass tests to tests in all. In our case there are 4 scenarios/examples and it is 27% from 15.
-
Total - equal to tests in all
Row Manual contains manual tests. In order to execute test manually you should use @Manual annotation, idea the same as for Automated row. Generally, it is possible to use it to mark scenarios (@Manual on scenario level) or all scenarios in story (@manual on Story level). The @Manual annotation is not designed to be defined for an individual step within a test, but only for the whole test.
Row Total should contains summary for each column.
2.1.2. Tab Requirements
On this tab all tests results are organized as requirements
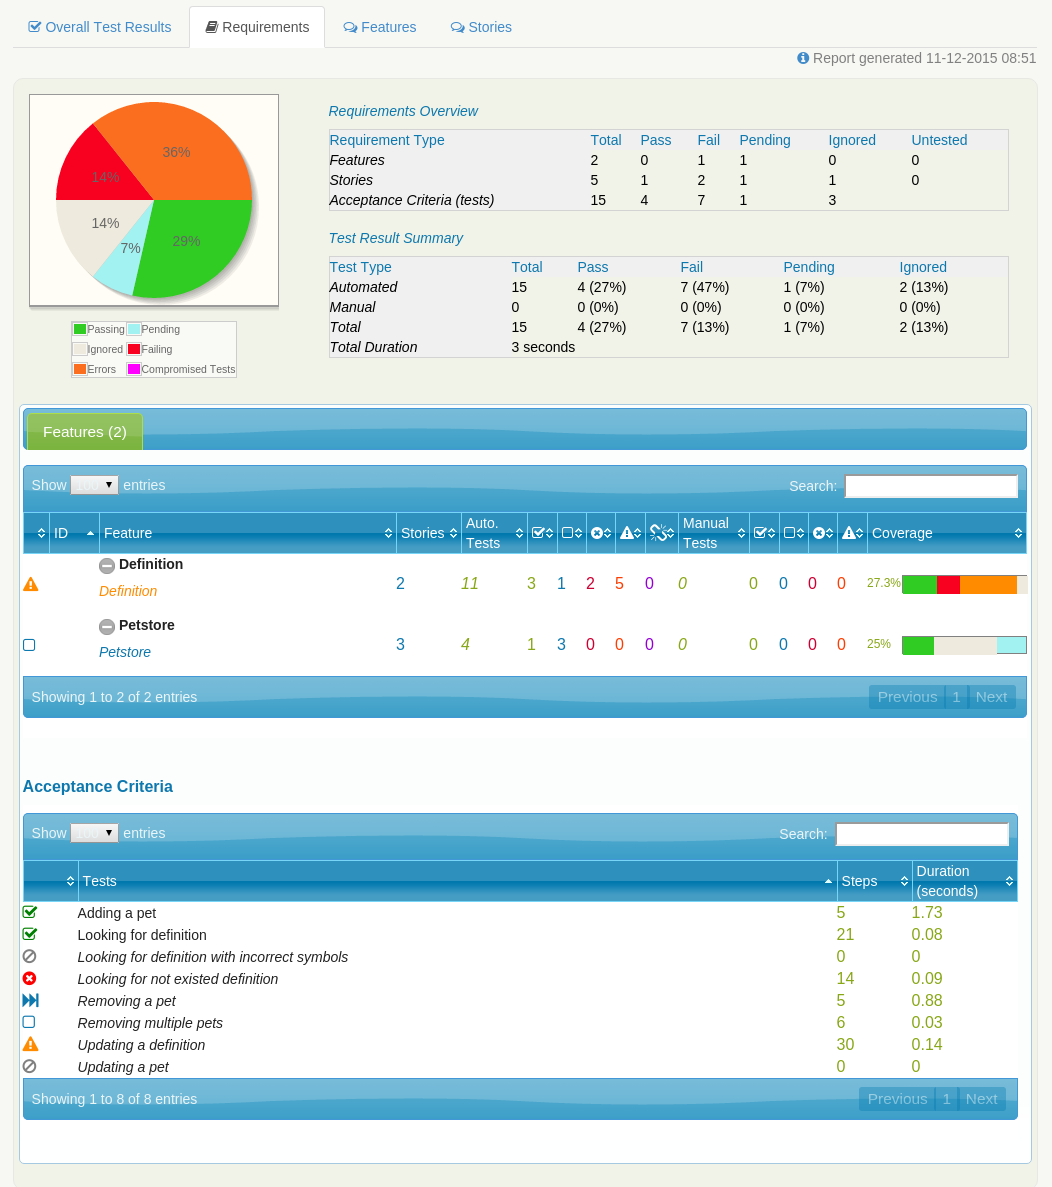
2.1.3. Tab Features
On this tab all tests results are organized as features. In our example we have 2 features
2.1.4. Tab Stories
There are stories on this tab. in our example - there are 5 stories.

2.1.5. Filtering in Serenity Reports
To provide a better user experience, there is available a filtering feature in Serenity BDD aggregated reports. It makes much easier to find particular subset of tests by names, features, etc.
For example you have next tests:
It is easy to filter some of them with starting typing its name in filter field:
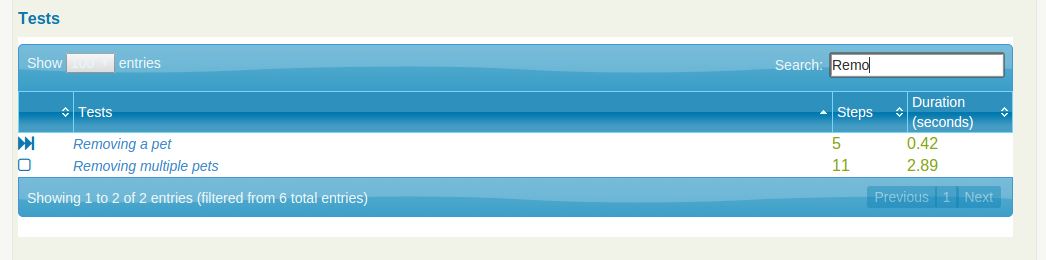
Filtering feature enabled for almost all main pages of serenity report.
3. First Steps with Serenity BDD
In this section we will show you how to get started with Serenity BDD using a simple project using JUnit and Gradle.
Serenity BDD projects can be built using Gradle, Maven or Ant. Configuring a Java or Groovy build to use Serenity BDD is generally just a matter of adding the right dependencies, and a task or plugin to generate the aggregated reports.
For example, a simple Gradle build for a Serenity BDD project could look like this:
repositories {
    mavenLocal()
    jcenter()
}

buildscript {
    repositories {
        mavenLocal()
        jcenter()
    }
    dependencies {
        classpath("net.serenity-bdd:serenity-gradle-plugin:1.1.1")     (1)
    }
}

apply plugin: 'java'
apply plugin: 'eclipse'
apply plugin: 'idea'
apply plugin: 'net.serenity-bdd.aggregator'                             (2)

dependencies {
    testCompile 'net.serenity-bdd:serenity-core:1.1.1'                  (3)
    testCompile 'net.serenity-bdd:serenity-junit:1.1.1'                (4)
    testCompile('junit:junit:4.12')
    testCompile('org.assertj:assertj-core:1.7.0')
    testCompile('org.slf4j:slf4j-simple:1.7.7')
}| 1 | Add the Serenity plugin to the Gradle build path |
| 2 | Adds the aggregate and check tasks to the Gradle build |
| 3 | The core Serenity BDD classes |
| 4 | The Serenity BDD JUnit integration |
Next, you would write a JUnit test to express the acceptance criteria that you want to automate. Suppose you are working on a Frequent Flyer website for an airline. You are implementing the feature that lets Frequent Flyer members earn points when they travel. The first acceptance criteria you need to cater for is the following: - Frequent Flyer members earn 100 points for every 1000 km travelled.
Using Serenity BDD, you could write a unit test like the following:
@RunWith(SerenityRunner.class)                                                          (1)
public class WhenCalculatingFrequentFlyerPoints {

    @Steps                                                                              (2)
    TravellerSteps travellerSteps;

    @Test
    public void shouldCalculatePointsBasedOnDistance() {
        // GIVEN
        travellerSteps.a_traveller_has_a_frequent_flyer_account_with_balance(10000);    (3)

        // WHEN
        travellerSteps.the_traveller_flies(1000);                                       (3)

        // THEN
        travellerSteps.traveller_should_have_a_balance_of(10100);                       (3)

    }
}| 1 | You run the JUnit test using the Serenity test runner |
| 2 | The @Steps annotation marks a Serenity step library |
| 3 | The unit test is composed of logical steps, each of which will appear in the reports |
When you write acceptance tests this way, the JUnit test mainly orchestrates the order of the steps: the bulk of the testing logic goes in the step library methods themselves.
public class TravellerSteps {

    FrequentFlyer frequentFlyer;                                                        (1)

    @Step("Given a traveller has a frequent flyer account with {0} points")             (2)
    public void a_traveller_has_a_frequent_flyer_account_with_balance(int initialBalance) {
        frequentFlyer = FrequentFlyer.withInitialBalanceOf(initialBalance);             (3)
    }

    @Step("When the traveller flies {0} km")
    public void the_traveller_flies(int distance) {
        frequentFlyer.flies(distance).kilometers();                                     (4)

    }

    @Step("Then the traveller should have a balance of {0} points")
    public void traveller_should_have_a_balance_of(int expectedBalance ) {
        assertThat(frequentFlyer.getBalance()).isEqualTo(expectedBalance);              (5)
    }

    @Step
    public void a_traveller_joins_the_frequent_flyer_program() {
        frequentFlyer = FrequentFlyer.withInitialBalanceOf(0);
    }

    @Step
    public void traveller_should_have_a_status_of(Status expectedStatus) {
        assertThat(frequentFlyer.getStatus()).isEqualTo(expectedStatus);
    }
}| 1 | This is the object under test. |
| 2 | The @Step annotation marks this as a method that will be recorded and will appear in the test report |
| 3 | Prepare the test data |
| 4 | The action under test |
| 5 | Check the outcome |
Note that, at this point, the FrequentFlyer class and the flies() method may not exist: you are using the acceptance test implementation to discover the services you need from your application code. This is very typical of a BDD/TDD approach to writing software, and as a result the acceptance tests not only test the application, they also illustrate how the application code is meant to work.
These tests would initially fail, because the FrequentFlyer.flies() method hasn’t been written. But once you have correctly implemented this method, you can run the tests and generate the reports from the command line like this:
$ gradle clean test aggregateThis will produce a report like the one below in the target/site/serenity directory.
@Step methods appear as lines in the test report4. Different Ways of Building your Project
Serenity tries to fit into your current build practices, whether you are using Maven, Gradle or even Ant. We assume you have some background in Java build tools, but if you are curious here is a rundown of all three.
4.1. Building Serenity projects in Gradle
Serenity BDD is easy to integrate with Gradle, using the serenity-gradle-plugin.
A simple example is shown here:
repositories {
    mavenLocal()
    jcenter()
}

buildscript {
    repositories {
        mavenLocal()
        jcenter()
    }
    dependencies {
        classpath("net.serenity-bdd:serenity-gradle-plugin:1.1.1")     (1)
    }
}

apply plugin: 'java'
apply plugin: 'eclipse'
apply plugin: 'idea'
apply plugin: 'net.serenity-bdd.aggregator'                             (2)

dependencies {
    testCompile 'net.serenity-bdd:serenity-core:1.1.1'                  (3)
    testCompile 'net.serenity-bdd:serenity-junit:1.1.1'                (4)
    testCompile('junit:junit:4.12')
    testCompile('org.assertj:assertj-core:1.7.0')
    testCompile('org.slf4j:slf4j-simple:1.7.7')
}
gradle.startParameter.continueOnFailure = true (5)| 1 | Add the Serenity plugin to the Gradle build path |
| 2 | Adds the aggregate and check tasks to the Gradle build |
| 3 | The core Serenity BDD classes |
| 4 | The Serenity BDD JUnit integration |
| 5 | Ensure that the Gradle build does not stop at the first test failure, but goes on to generate the Serenity reports |
First of all, add the Serenity BDD plugin entry to the Gradle build path in the buildscript section (1). This enables Gradle to find and apply the plugin to your project. You can check the latest version numbers on Bintray.
Next, you need to apply this plugin to your project (2) and add the Serenity BDD dependencies to your project. You will typically add core (3) and another dependency that correpsonds to the testing library you are using (JUnit in this example: (4)).
The serenity-gradle-plugin adds below two tasks to your project:
- aggregate
-
Generates the Serenity aggregate reports from the JSON test results produced when you run the Serenity BDD tests.
- checkOutcomes
-
Check the test results in the output directory, and fail the build if there are errors or failures.
A typical use case is to run the tests and to always produce the aggregate report, no matter what the test results are. To do this in one line, you need to tell Gradle not to stop if the tests fail. You can do this by setting gradle.startParameter.continueOnFailure to true, and then running the following:
gradle test aggregateThis will run the tests and generate an aggregate report in the target/site/thucydides directory.
4.2. Building Serenity projects in Maven
Serenity BDD integrates with Maven via the serenity-maven-plugin.
An example of a pom.xml file using Serenity BDD is shown here:
<?xml version="1.0" encoding="UTF-8"?>
<project xmlns="http://maven.apache.org/POM/4.0.0" xmlns:xsi="http://www.w3.org/2001/XMLSchema-instance"
         xsi:schemaLocation="http://maven.apache.org/POM/4.0.0 http://maven.apache.org/xsd/maven-4.0.0.xsd">
    <modelVersion>4.0.0</modelVersion>

    <groupId>net.serenity_bdd.samples.junit</groupId>
    <artifactId>junit-quick-start</artifactId>
    <version>0.0.1-SNAPSHOT</version>
    <packaging>jar</packaging>

    <name>Serenity JUnit Quick Start Project</name>

    <properties>
        <project.build.sourceEncoding>UTF-8</project.build.sourceEncoding>
        <serenity.version>1.0.47</serenity.version>
        <serenity.maven.version>1.0.47</serenity.maven.version>
        <webdriver.driver>firefox</webdriver.driver>
    </properties>

    <dependencies>
        <dependency>
            <groupId>net.serenity-bdd</groupId>     (1)
            <artifactId>core</artifactId>
            <version>${serenity.version}</version>
        </dependency>
        <dependency>
            <groupId>net.serenity-bdd</groupId>     (2)
            <artifactId>serenity-junit</artifactId>
            <version>${serenity.version}</version>
        </dependency>
        <dependency>
            <groupId>org.slf4j</groupId>
            <artifactId>slf4j-simple</artifactId>
            <version>1.6.1</version>
        </dependency>
        <dependency>
            <groupId>junit</groupId>
            <artifactId>junit</artifactId>
            <version>4.11</version>
            <scope>test</scope>
        </dependency>
        <dependency>
            <groupId>org.assertj</groupId>
            <artifactId>assertj-core</artifactId>
            <version>1.7.0</version>
            <scope>test</scope>
        </dependency>
    </dependencies>
    <build>
        <plugins>
            <plugin>
                <artifactId>maven-failsafe-plugin</artifactId>                  (3)
                <version>2.18</version>
                <configuration>
                    <includes>
                        <include>**/features/**/When*.java</include>                  (4)
                    </includes>
                    <systemProperties>
                        <webdriver.driver>${webdriver.driver}</webdriver.driver> (8)
                        <surefire.rerunFailingTestsCount>${surefire.rerunFailingTestsCount}</surefire.rerunFailingTestsCount>
                        <surefire.rerunFailingTestsCount>${surefire.rerunFailingTestsCount}</surefire.rerunFailingTestsCount>
                    </systemProperties>
                </configuration>
            </plugin>
            <plugin>
                <groupId>net.serenity-bdd.maven.plugins</groupId>       (5)
                <artifactId>serenity-maven-plugin</artifactId>
                <version>${serenity.maven.version}</version>
                <dependencies>
                     <dependency>
                        <groupId>net.serenity-bdd</groupId>
                        <artifactId>core</artifactId>
                        <version>${serenity.version}</version>
                    </dependency>
                </dependencies>
                <executions>
                    <execution>
                        <id>serenity-reports</id>
                        <phase>post-integration-test</phase>             (6)
                        <goals>
                            <goal>aggregate</goal>                       (7)
                        </goals>
                    </execution>
                </executions>
            </plugin>
        </plugins>
    </build>
</project>| 1 | Core Serenity dependency |
| 2 | JUnit Serenity dependency |
| 3 | The Maven Failsafe plugin |
| 4 | Include only tests in the junit directory |
| 5 | The Serenity Maven Plugin |
| 6 | Generate the aggregate reports during the post-integration test phase |
| 7 | Call the aggregate goal to generate them |
| 8 | Pass the webdriver.driver system property to the tests. |
First, you need to add the Serenity BDD dependencies to your project. You will typically add core and another dependency that correpsonds to the testing library you are using (JUnit in this example). Other supported testing libraries include JBehave and Cucumber.
You typically want the Serenity tests to run as integration tests (that is, during the integration-test phase of the Maven build) rather than as unit tests. You also want the build not to immediately fail when a test fails, but to continue until it has generated the Serenity aggregate reports before failing at the end of the build. To do this, we use the maven-failsafe-plugin (3). This plugin runs your integration test in the integration-test phase without immediately failing the build when a test fails. Build failure is triggered later in the lifecycle, during the verify phase. Also it is good idea turn off failing build if some test was failed - just to allow maven execute all tests.
<plugin>
   <groupId>org.apache.maven.plugins</groupId>
   <artifactId>maven-surefire-plugin</artifactId>
   <version>xxxx</version>
   <configuration>
      <testFailureIgnore>true</testFailureIgnore>
   </configuration>
</plugin>
Normal JUnit tests run from Maven need to start or end with Test. But for acceptance tests, a more flexible strategy is better, as it makes it easier to name test cases after scenarios or stories. In the pom.xml file shown above, we configure the maven-failsafe-plugin to run all of the tests in the junit directory, regardless of how they are named (4).
Next, you need to add and configure the serenity-maven-plugin.Pt. 5 A useful technique is to bind the aggregate goal plugin to the post-integration-test phase. Pt.6 and Pt.7 This way, to run the tests and to generate the reports, you would run the following:
mvn verifyThis will run the tests and generate an aggregate report in the target/site/serenity directory.
Like the surefire plugin the maven-failsafe-plugin starts a new JVM instance to run the tests. For this reason, if you need to pass system parameters to the tests (for example, the webdriver.driver property shown here), you need to use the <systemProperties> section
Tip: It is possible to use a Junit Run Configuration to run a Serenity Testrunner. This will not generate an aggregate report. If you find your index.html file is missing, check that you are using a Maven build Run Configuration with goal verify to run your test and get the aggregate report.
5. Writing Serenity Step Libraries
In Serenity, tests are broken down into reusable steps. An important principle behind Serenity is the idea that it is easier to maintain a test that uses several layers of abstraction to hide the complexity behind different parts of a test.
In an automated web test, test steps represent the level of abstraction between your Page Objects (which are designed in terms of actions that you perform on a given page) and higher-level stories (sequences of more business-focused actions that illustrate how a given user story has been implemented). If your automated test is not UI-oriented (for example, if it calls a web service), steps orchestrate other more technical components such as REST clients. Steps can contain other steps, and are included in the Serenity reports. Whenever a step is executed, a screenshot is stored and displayed in the report.
For example, the first test in the following sample is broken into two steps:
-
Create a new Frequent Flyer member
-
Check that the member has a status of Bronze
The second is broken into three steps:
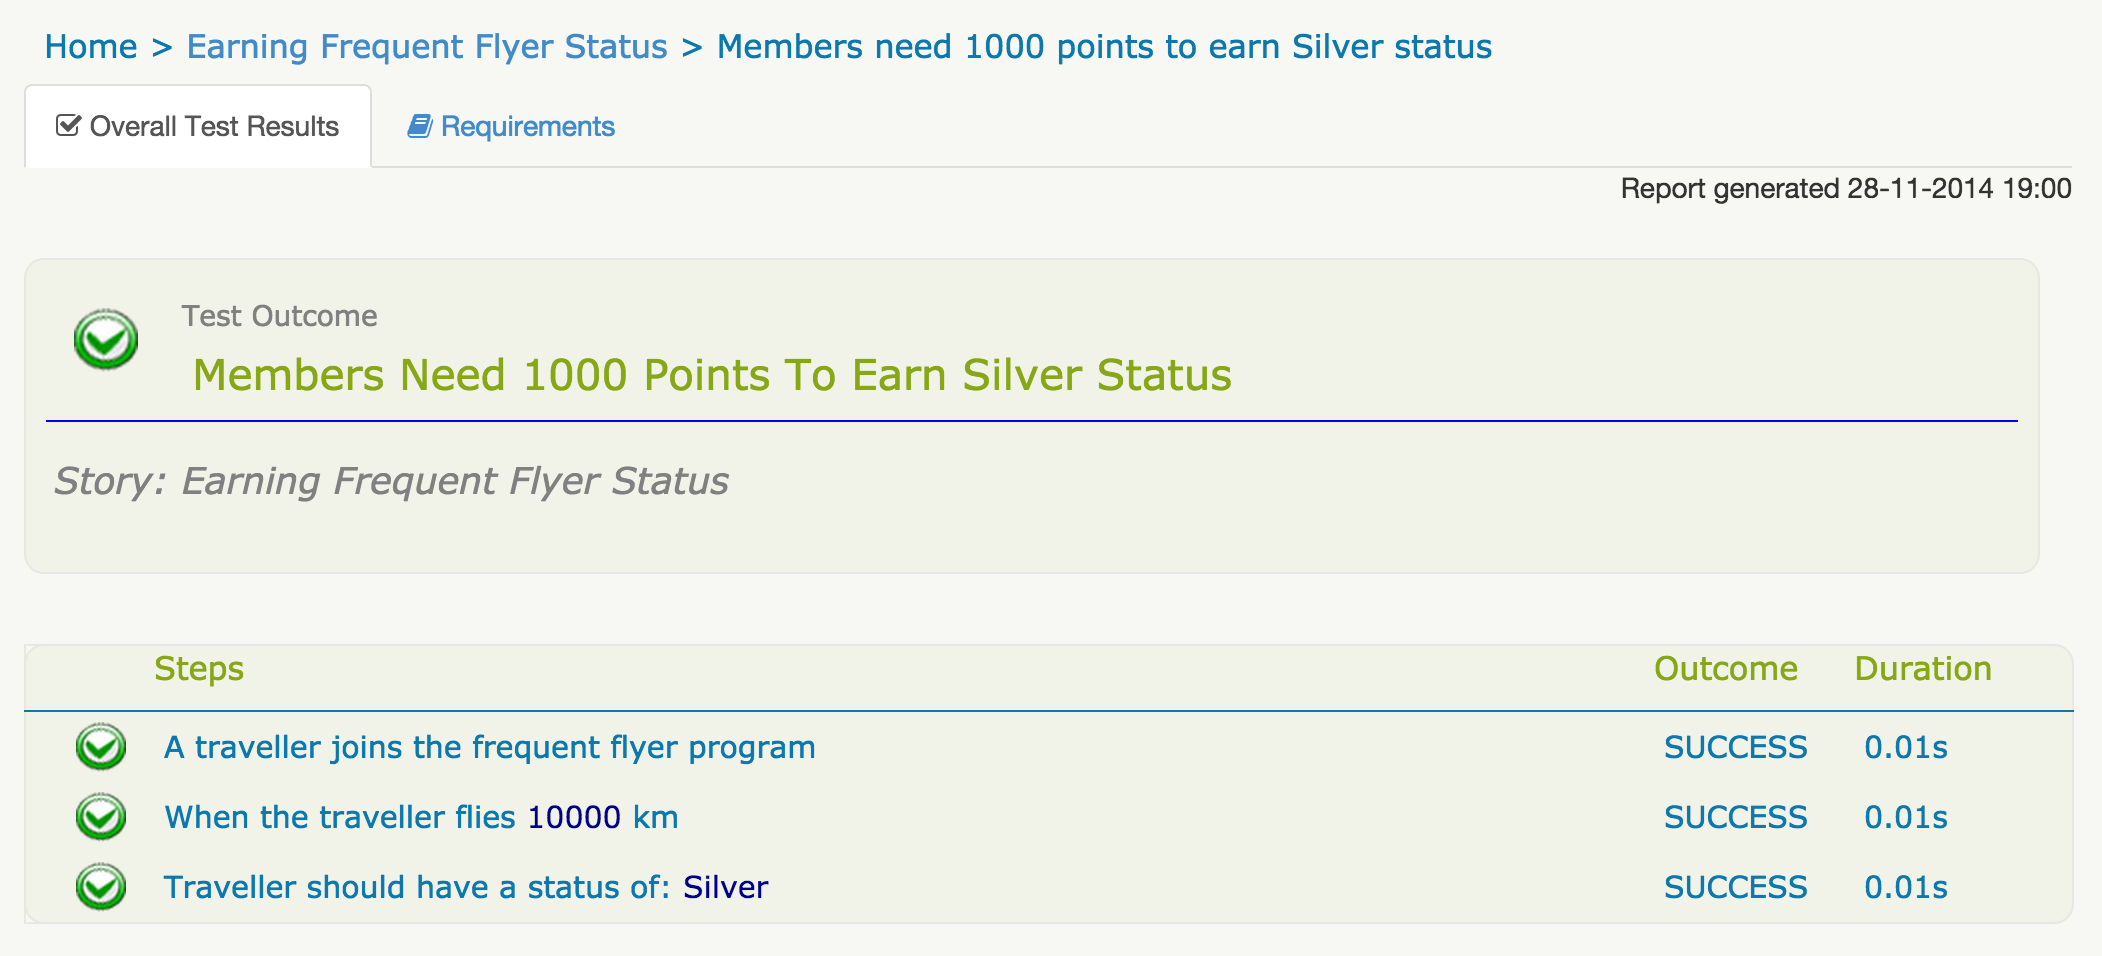
Verify passenger can be enrolled into Frequent Flyer Member programme and gets upgraded to Silver membership status after flying 10K km
-
Create a new Frequent Flyer member
-
Make the member fly 10000 km
-
Check that the member has a status of Silver
@RunWith(SerenityRunner.class)
public class WhenEarningFrequentFlyerStatus {

    @Steps
    TravellerStatusSteps travellerSteps;

    @Test
    public void membersShouldStartWithBronzeStatus() {
        // GIVEN
        travellerSteps.a_traveller_joins_the_frequent_flyer_program();

        // THEN
        travellerSteps.traveller_should_have_a_status_of(Bronze);
    }

    @Test
    public void earnSilverAfter1000Points() {
        // GIVEN
        travellerSteps.a_traveller_joins_the_frequent_flyer_program();

        // WHEN
        travellerSteps.the_traveller_flies(10000);

        // THEN
        travellerSteps.traveller_should_have_a_status_of(Silver);
    }
}
Notice how the second test reuses step methods used in the first to perform a slightly different test. This is a typical example of the way we reuse steps in similar tests, in order to avoid duplicated code and make the code easier to maintain.
Also notice how we did not need to instantiate the Steps class TravellerStatusSteps. When you annotated a member variable of this class with the @Steps annotation, Serenity BDD will automatically instantiate it for you.
Step methods are annotated with the @Step annotation:
public class TravellerStatusSteps extends TravellerSteps {                  (1)

    @Step                                                                   (2)
    public void a_traveller_joins_the_frequent_flyer_program() {
        frequentFlyer = FrequentFlyer.withInitialBalanceOf(0);
    }

    @Step("The traveller should have {0} status")                           (3)
    public void traveller_should_have_a_status_of(Status expectedStatus) {
        assertThat(frequentFlyer.getStatus()).isEqualTo(expectedStatus);
    }
}| 1 | Steps classes can extend any class, or none |
| 2 | The @Step annotation denotes a Serenity step method |
| 3 | The @Step can take a String value to override the default step name |
By default, the name of a step is derived from the method name. If you want something more readable, you can add a String parameter to the @Step annotation. If you put references to variables in the string ({0}, {1} etc.), Serenity will inject the method parameters into the string. So suppose you define a @Step method like this:
@Step("The traveller should have {0} status")
public void traveller_should_have_a_status_of(Status expectedStatus) {
    ...
}
When you call this method with a given parameter:
travellerSteps.traveller_should_have_a_status_of(Bronze);Then the step title will be the following:
"The traveller should have Bronze status"
Serenity step methods also play an important role in the reporting. When the reports are generated, methods annotated with the @Step annotation will appear as lines in the report.
@Step method appears as a line in the test report5.1. Storing data between steps
Sometimes it is useful to be able to pass information between steps. For example, you might need to check that client detailed entered on a registration appears correctly on a confirmation page later on.
You can do this by setting member variables in the step definition classes. In the following code, the frequentFlyer member variable is set in the first @Step method, and then reused in the subsequent steps.
public class TravellerSteps {

    FrequentFlyer frequentFlyer;                                                        (1)

    @Step("Given a traveller has a frequent flyer account with {0} points")             (2)
    public void a_traveller_has_a_frequent_flyer_account_with_balance(int initialBalance) {
        frequentFlyer = FrequentFlyer.withInitialBalanceOf(initialBalance);             (3)
    }

    @Step("When the traveller flies {0} km")
    public void the_traveller_flies(int distance) {
        frequentFlyer.flies(distance).kilometers();                                     (4)

    }

    @Step("Then the traveller should have a balance of {0} points")
    public void traveller_should_have_a_balance_of(int expectedBalance ) {
        assertThat(frequentFlyer.getBalance()).isEqualTo(expectedBalance);              (5)
    }

    @Step
    public void a_traveller_joins_the_frequent_flyer_program() {
        frequentFlyer = FrequentFlyer.withInitialBalanceOf(0);
    }

    @Step
    public void traveller_should_have_a_status_of(Status expectedStatus) {
        assertThat(frequentFlyer.getStatus()).isEqualTo(expectedStatus);
    }
}
A third approach is to use the Serenity test session, which is essentially a hash map where you can store variables for the duration of a single test. Variables in the Serenity test session are available in any step definition class.
The following example shows a simple web test:
@RunWith(SerenityRunner.class)
public class WhenSearchingFlights {

    @Managed(driver = "chrome")
    WebDriver driver;

    @Steps
    FlightSearchSteps theCustomer;

    @Test
    public void should_display_selected_flight_details() {
        // GIVEN
        theCustomer.searches_for_flights_between("Sydney", "London");
        // WHEN
        theCustomer.view_flight_details_for_flight(1);
        // THEN
        theCustomer.should_see_the_destination_city_in_the_summary();
    }
}
We need to store the destination city in the first step to be used in the last step. We could do this using the Serenity session as shown here:
public class FlightSearchSteps extends ScenarioSteps {

    FlightSearchPage flightSearchPage;
    FlightSearchResultsPage flightSearchResultsPage;
    FlightDetailsPage flightDetailsPage;

    @Step("A customer searchers for flights between {0} and {1}")
    public void searches_for_flights_between(String departure, String destination) {
        Serenity.setSessionVariable("destinationCity").to(destination); (1)

        flightSearchPage.searchForFlightsFrom(departure).to(destination);
    }

    @Step
    public void view_flight_details_for_flight(int flightNumber) {
        flightSearchResultsPage.selectFlightNumber(flightNumber);
    }

    @Step
    public void should_see_the_destination_city_in_the_summary() {
        String expectedDestinationCity
                = Serenity.sessionVariableCalled("destinationCity").toString(); (2)

        assertThat(flightDetailsPage.getDestinationCity()).isEqualTo(expectedDestinationCity);
    }
}| 1 | Store the departure city in a session variable |
| 2 | Retrieve the session variable in another step |
Note that step methods can take parameters. The parameters that are passed into a step method will be recorded and reported in the Serenity reports, making this an excellent technique to make your tests more maintainable and more modular.
Steps can also call other steps, which is very useful for more complicated test scenarios.
6. Serenity with different BDD Frameworks
Serenity provide integration with Behavior-Driven-Development tools like Cucumber or JBehave.
6.1. Serenity with JBehave
JBehave is an open source BDD framework originally written by Dan North, the inventor of BDD. It is strongly integrated into the JVM world, and widely used by Java development teams wanting to implement BDD practices in their projects.
In JBehave, you write automate your acceptance criteria by writing test stories and scenarios using the familiar BDD "given-when-then" notation, as shown in the following example:
Searching by keyword

Meta:
@tag product:search

Narrative:
  In order to find items that I would like to purchase
  As a potential buyer
  I want to be able to search for items containing certain words

Scenario: Should list items related to a specified keyword
Given I want to buy a wool scarf
When I search for items containing 'wool'
Then I should only see items related to 'wool'

Scenario: Should be able to filter search results by item type
Given I have searched for items containing 'wool'
When I filter results by type 'Handmade'
Then I should only see items containing 'wool' of type 'Handmade'
Scenarios like this go in .story files: a story file is designed to contain all the scenarios (acceptence criteria) of a given user story. A story file can also have a narrative section at the top, which gives some background and context about the story being tested:
You usually implement a JBehave story using classes and methods written in Java, Groovy or Scala. You implement the story steps using annotated methods to represent the steps in the text scenarios, as shown in the following example:
public class SearchByKeywordStepDefinitions {
    @Steps
    BuyerSteps buyer;

    @Given("I want to buy $article")
    public void buyerWantsToBuy(String article) {
        buyer.opens_etsy_home_page();
    }

    @When("I search for items containing '$keyword'")
    public void searchByKeyword(String keyword) {
        buyer.searches_for_items_containing(keyword);
        buyer.filters_results_to_local_region();
    }


    @When("I search for local items containing '$keyword'")
    public void localSearchByKeyword(String keyword) {
        buyer.searches_for_items_containing(keyword);
    }

    @Then("I should only see items related to '$keyword'")
    public void resultsForACategoryAndKeywordInARegion(String keyword) {
        buyer.should_see_items_related_to(keyword);
    }
}
6.1.1. Working with JBehave and Serenity
Serenity and JBehave work well together. Serenity uses simple conventions to make it easier to get started writing and implementing Serenity stories, and reports on both JBehave and Serenity steps, which can be seamlessly combined in the same class, or placed in separate classes, depending on your preferences.
To get started, you will need to add the Serenity JBehave plugin to your project. In Maven, just add the following dependencies to your pom.xml file:
        <dependency>
            <groupId>net.serenity-bdd</groupId>
            <artifactId>core</artifactId>
            <version>${serenity.version}</version>
        </dependency>
        <dependency>
            <groupId>net.serenity-bdd</groupId>
            <artifactId>serenity-jbehave</artifactId>
            <version>${serenity.jbehave.version}</version>
        </dependency>
The equivalent in Gradle is:
    testCompile 'net.serenity-bdd:core:1.0.47'
    testCompile 'net.serenity-bdd:serenity-jbehave:1.0.21'
New versions come out regularly, so be sure to check the Maven Central repository (http://search.maven.org) to know the latest version numbers for each dependency.
6.1.2. Setting up your project and organizing your directory structure
JBehave is a highly flexible tool. The downside of this is that, out of the box, JBehave requires quite a bit of bootstrap code to get started. Serenity tries to simplify this process by using a convention-over-configuration approach, which significantly reduces the amount of work needed to get started with your acceptance tests. In fact, you can get away with as little as an empty JUnit test case and a sensibly-organized directory structure for your JBehave stories.
The JUnit test runner
The JBehave tests are run via a JUnit runner. This makes it easier to run the tests both from within an IDE or as part of the build process. All you need to do is to extend the SerenityStories, as shown here:
package net.serenitybdd.samples.etsy;

import net.serenitybdd.jbehave.SerenityStories;

public class AcceptanceTests extends SerenityStories {}
When you run this test, Serenity will run any JBehave stories that it finds in the default directory location. By convention, it will look for a stories folder on your classpath, so ‘src/test/resources/stories’ is a good place to put your story files.
Organizing your requirements
Placing all of your JBehave stories in one directory does not scale well; it is generally better to organize them in a directory structure that groups them in some logical way. In addition, if you structure your requirements well, Serenity will be able to provide much more meaningful reporting on the test results.
By default, Serenity supports a simple directory-based convention for organizing your requirements. The standard structure uses three levels: capabilities, features and stories. A story is represented by a JBehave .story file so two directory levels underneath the stories directory will do the trick. An example of this structure is shown below:
+ src
  + test
    + resources
      + stories
        + grow_potatoes                     [a capability]
          + grow_organic_potatoes           [a feature]
            - plant_organic_potatoes.story  [a story]
            - dig_up_organic_potatoes.story [another story]
          + grow_sweet_potatoes             [another feature]
          ...
If you prefer another hierarchy, you can use the serenity.requirement.types system property to override the default convention. For example. if you prefer to organize your requirements in a hierachy consisting of epics, theme and stories, you could set the serenity.requirement.types property to epic,theme (the story level is represented by the .story file).
When you start a project, you will typically have a good idea of the high level capabilities you intent to implement, and probably some of the main features. If you simply store your .story files in the right directory structure, the Serenity reports will reflect these requirements, even if no tests have yet been specified for them. This is an excellent way to keep track of project progress. At the start of an iteration, the reports will show all of the requirements to be implemented, even those with no tests defined or implemented yet. As the iteration progresses, more and more acceptance criteria will be implemented, until acceptance criteria have been defined and implemented for all of the requirements that need to be developed.
An optional but useful feature of the JBehave story format is the narrative section that can be placed at the start of a story to help provide some more context about that story and the scenarios it contains. This narrative will appear in the Serenity reports, to help give product owners, testers and other team members more information about the background and motivations behind each story. For example, if you are working on an online classifieds website, you might want users to be able to search ads using keywords. You could describe this functionality with a textual description like this one from the locating_a_customer.story story file:
Narrative:
In order to provide assistance to customers more quickly
As a financial adviser
I want to be able to locate a customer using a variety of different criteria
However to make the reports more useful still, it is a good idea to document not only the stories, but to also do the same for your higher level requirements (Capabilities, Themes). In Serenity, you can do this by placing a text file called narrative.txt in each of the requirements directories you want to document (see below). These files follow the JBehave convention for writing narratives, with an optional title on the first line, followed by a narrative section started by the keyword Narrative:. When a title is provided it will replace the directory name in the reports. For example, for a search feature for an online classifieds web site, you might have a description along the following lines:
Search for online ads

Narrative:
In order to increase sales of advertised articles
As a seller
I want potential buyers to be able to display only the ads for
articles that they might be interested in purchasing.
When you run these stories (without having implemented any actual tests), you will get a report containing lots of pending tests, but more interestingly, a list of the requirements that need to be implemented, even if there are no tests or stories associated with them yet. This makes it easier to plan an iteration: you will initially have a set of requirements with only a few tests, but as the iteration moves forward, you will typically see the requirements fill out with pending and passing acceptance criteria as work progresses.
Narrative in asciidoc format
Narratives can be written in Asciidoc for richer formatting. Set the narrative.format property to asciidoc to allow Serenity to parse the narrative in asciidoc format.
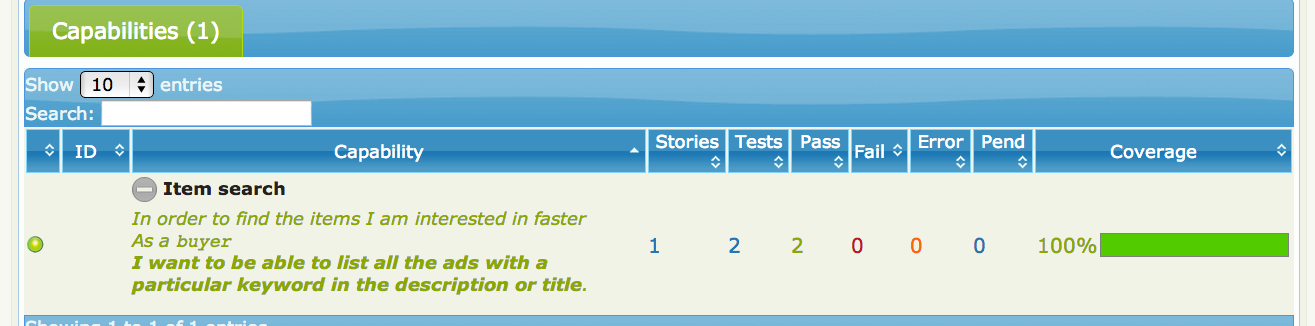
For example, the following narrative:
Item search

Narrative:
In order to find the items I am interested in faster
As a +buyer+
*I want to be able to list all the ads with a particular keyword in the description or title*
will be rendered on the report as shown below.
With Cucumber a Narrative.txt file can also be placed in any requirement directory and will be included in the Serenity reports just like with JBehave.
Customizing the requirements module
You can also easily extend the Serenity requirements support so that it fits in to your own system. This is a two-step process. First, you need to write an implementation of the RequirementsTagProvider interface.
package com.acme.tests

public class MyRequirementsTagProvider implements RequirementsTagProvider {
    @Override
    public List<Requirement> getRequirements() {
        // Return the full list of available requirements from your system
    }

    @Override
    public Optional<Requirement> getParentRequirementOf(TestOutcome testOutcome) {
        // Return the requirement, if any, associated with a particular test result
    }

    @Override
    public Set<TestTag> getTagsFor(TestOutcome testOutcome) {
        // Return all the requirements, and other tags, associated with a particular test result
    }
}
Next, create a text file in your src/main/resources/META-INF/services directory called net.thucydides.core.statistics.service.TagProvider, and put the fullly qualified name of your RequirementsTagProvider implementation.
Story meta-data
You can use the JBehave Meta tag to provide additional information to Serenity about the test. The @driver annotation lets you specify what WebDriver driver to use, eg.
Adding items to the shopping cart

Meta:
@driver phantomjs

Narrative:
  In order to buy multiple items at the same time
  As a buyer
  I want to be able to add multiple items to the shopping cart

Scenario: Should see total price including tax
Given I have searched for local items containing 'wool'
And I have selected an item
When I add the item to the shopping cart
Then the item should appear in the cart
And the shipping cost should be included in the total price
You can also use the @issue annotation to link scenarios with issues, more information can be found under Linking scenarios/tests with issues.
You can also attribute tags to the story as a whole, or to individual scenarios:
Meta:
@tag capability:a capability

Scenario: A scenario that works
Meta:
@tags domain:a domain, iteration: iteration 1

Given I have an implemented JBehave scenario
And the scenario works
When I run the scenario
Then I should get a successful result
Implementing the tests
If you want your tests to actually do anything, you will also need classes in which you place your JBehave step implementations. If you place these in any package at or below the package of your main JUnit test, JBehave will find them with no extra configuration.
Serenity makes no distinction between the JBehave-style @Given, @When and @Then annotations, and the Serenity-style @Step annotations: both will appear in the test reports. However you need to start with the @Given, @When and @Then-annotated methods so that JBehave can find the correct methods to call for your stories. A method annotated with @Given, @When or @Then can call Serenity @Step methods, or call page objects directly (though the extra level of abstraction provided by the @Step methods tends to make the tests more reusable and maintainable on larger projects).
A typical example is shown below. In this implementation of one of the scenarios we saw above, the high-level steps are defined using methods annotated with the JBehave @Given, @When and @Then annotations. These methods, in turn, use steps that are implemented in the BuyerSteps class, which contains a set of Serenity @Step methods. The advantage of using this two-leveled approach is that it helps maintain a degree of separation between the definition of what is being done in a test, and how it is being implemented. This tends to make the tests easier to understand and easier to maintain.
package net.serenitybdd.samples.etsy.features.steps;

import net.serenitybdd.samples.etsy.features.model.ListingItem;
import net.serenitybdd.samples.etsy.features.steps.serenity.BuyerSteps;
import net.serenitybdd.core.Serenity;
import net.serenitybdd.samples.etsy.features.model.SessionVariables;
import net.thucydides.core.annotations.Steps;
import org.jbehave.core.annotations.Given;
import org.jbehave.core.annotations.Then;
import org.jbehave.core.annotations.When;

public class ShoppingCartStepDefinitions {
    @Steps
    BuyerSteps buyer;

    @Given("I have selected an item")
    @When("I select an item")
    public void selectsAnItem() {
        buyer.selects_item_number(1);
    }

    @When("I add the item to the shopping cart")
    public void addCurrentItemToShoppingCart() {
        buyer.selects_any_product_variations();
        buyer.adds_current_item_to_shopping_cart();
    }

    @Then("the item should appear in the cart")
    public void shouldSeeSelectedItemInCart() {
        ListingItem selectedItem = (ListingItem) Serenity.sessionVariableCalled(SessionVariables.SELECTED_LISTING);
        buyer.should_see_item_in_cart(selectedItem);
    }

    @Then("the shipping cost should be included in the total price")
    public void shouldIncludeShippingCost() {
        ListingItem selectedItem = (ListingItem) Serenity.sessionVariableCalled(SessionVariables.SELECTED_LISTING);
        buyer.should_see_total_including_shipping_for(selectedItem);
    }
}
The Serenity steps can be found in the BuyerSteps class. This class in turn uses Page Objects to interact with the actual web application, as illustrated here:
package net.serenitybdd.samples.etsy.features.steps.serenity;

import com.google.common.base.Optional;
import net.serenitybdd.core.Serenity;
import net.serenitybdd.samples.etsy.features.model.ListingItem;
import net.serenitybdd.samples.etsy.features.model.OrderCostSummary;
import net.serenitybdd.samples.etsy.features.model.SessionVariables;
import net.serenitybdd.samples.etsy.pages.CartPage;
import net.serenitybdd.samples.etsy.pages.HomePage;
import net.serenitybdd.samples.etsy.pages.ItemDetailsPage;
import net.serenitybdd.samples.etsy.pages.SearchResultsPage;
import net.thucydides.core.annotations.Step;
import org.assertj.core.data.Offset;
import org.hamcrest.Matcher;

import java.util.List;

import static org.assertj.core.api.Assertions.assertThat;

// tag::header[]
public class BuyerSteps {
// end::header[]
// tag::searchByKeywordSteps[]

    HomePage homePage;                                          (1)
    SearchResultsPage searchResultsPage;

    @Step                                                       (2)
    public void opens_etsy_home_page() {
        homePage.open();
    }

    @Step
    public void searches_for_items_containing(String keywords) {
        homePage.searchFor(keywords);
    }

    @Step
    public void should_see_items_related_to(String keywords) {
        List<String> resultTitles = searchResultsPage.getResultTitles();
        resultTitles.stream().forEach(title -> assertThat(title.contains(keywords)));
    }
// end::searchByKeywordSteps[]
// tag::filterByType[]
    @Step
    public void filters_results_by_type(String type) {
        searchResultsPage.filterByType(type);
    }

    public int get_matching_item_count() {
        return searchResultsPage.getItemCount();
    }

    @Step
    public void should_see_item_count(Matcher<Integer> itemCountMatcher) {
        itemCountMatcher.matches(searchResultsPage.getItemCount());
    }
// end::filterByType[]

    @Step
    public void selects_item_number(int number) {
        ListingItem selectedItem = searchResultsPage.selectItem(number);
        Serenity.setSessionVariable(SessionVariables.SELECTED_LISTING).to(selectedItem);
    }

    @Step
    public void should_see_matching_details(String searchTerm) {
        String itemName = detailsPage.getItemName();
        assertThat(itemName.toLowerCase()).contains(searchTerm);
    }

    @Step
    public void should_see_items_of_type(String type) {
        Optional<String> selectedType = searchResultsPage.getSelectedType();
        assertThat(selectedType.isPresent()).describedAs("No item type was selected").isTrue();
        assertThat(selectedType.get()).isEqualTo(type);
    }

    // tag::shoppingCartSteps[]

    ItemDetailsPage detailsPage;
    CartPage cartPage;

    @Step
    public void selects_any_product_variations() {
        detailsPage.getProductVariationIds().stream()
                .forEach(id -> detailsPage.selectVariation(id,2));
    }

    @Step
    public void adds_current_item_to_shopping_cart() {
        detailsPage.addToCart();
    }

    @Step
    public void should_see_item_in_cart(ListingItem selectedItem) {
        assertThat(cartPage.getOrderCostSummaries()
                        .stream().anyMatch(order -> order.getName().equals(selectedItem.getName()))).isTrue();
    }

    @Step
    public void should_see_total_including_shipping_for(ListingItem selectedItem) {
        OrderCostSummary orderCostSummary
                = cartPage.getOrderCostSummaryFor(selectedItem).get();

        double itemTotal = orderCostSummary.getItemTotal();
        double shipping = orderCostSummary.getShipping();
        double totalCost = orderCostSummary.getTotalCost();

        assertThat(itemTotal).isEqualTo(selectedItem.getPrice());
        assertThat(shipping).isGreaterThan(0.0);
        assertThat(totalCost).isCloseTo(itemTotal + shipping, Offset.offset(0.001));
    }

    @Step
    public void filters_results_to_local_region() {
        searchResultsPage.filterByLocalRegion();
    }
    // end::shoppingCartSteps[]

// tag::tail[]
}
//end:tail
The Page Objects are similar to those you would find in any Serenity project, as well as most WebDriver projects. An example is listed below:
package net.serenitybdd.samples.etsy.pages;

import net.serenitybdd.core.pages.PageObject;
import net.serenitybdd.core.annotations.findby.By;
import org.openqa.selenium.WebDriver;
import org.openqa.selenium.WebElement;
import org.openqa.selenium.interactions.Actions;
import org.openqa.selenium.support.FindAll;
import org.openqa.selenium.support.FindBy;
import org.openqa.selenium.support.FindBys;
import org.openqa.selenium.support.ui.ExpectedConditions;
import org.openqa.selenium.support.ui.Wait;
import org.openqa.selenium.support.ui.WebDriverWait;

import java.util.List;

import static java.util.stream.Collectors.toList;
import static net.serenitybdd.samples.etsy.pages.Spinners.noSpinnerToBeVisible;

public class ItemDetailsPage extends PageObject {

    @FindBys({@FindBy(id="listing-page-cart"), @FindBy(tagName = "h1")})
    WebElement itemName;

    public String getItemName() {
        return itemName.getText();
    }

    public String getItemDescription() {
        return $("#description-text").getText();
    }

    public void addToCart() {
        withAction().moveToElement($("#item-tabs")).perform();
        $(".buy-button button").click();
    }

    public List<String> getProductVariationIds() {
        return findAll(".variation")
                .stream()
                .map(elt -> elt.getAttribute("id"))
                .filter(id -> !id.isEmpty())
                .collect(toList());
    }

    public void selectVariation(String variationId, int optionIndex) {
        find(By.id(variationId)).selectByIndex(optionIndex);
        if (spinnerIsVisible()) {
            waitFor(noSpinnerToBeVisible());
        }
    }

    private boolean spinnerIsVisible() {
        return containsElements(".spinner-small");
    }
}
When these tests are executed, the JBehave steps combine with the Serenity steps to create a narrative report of the test results.
6.1.3. Comments in scenario
In case if you use comments in scenario, Serenity will ignore a commented condition, but it will be displayed in the generated report like this:
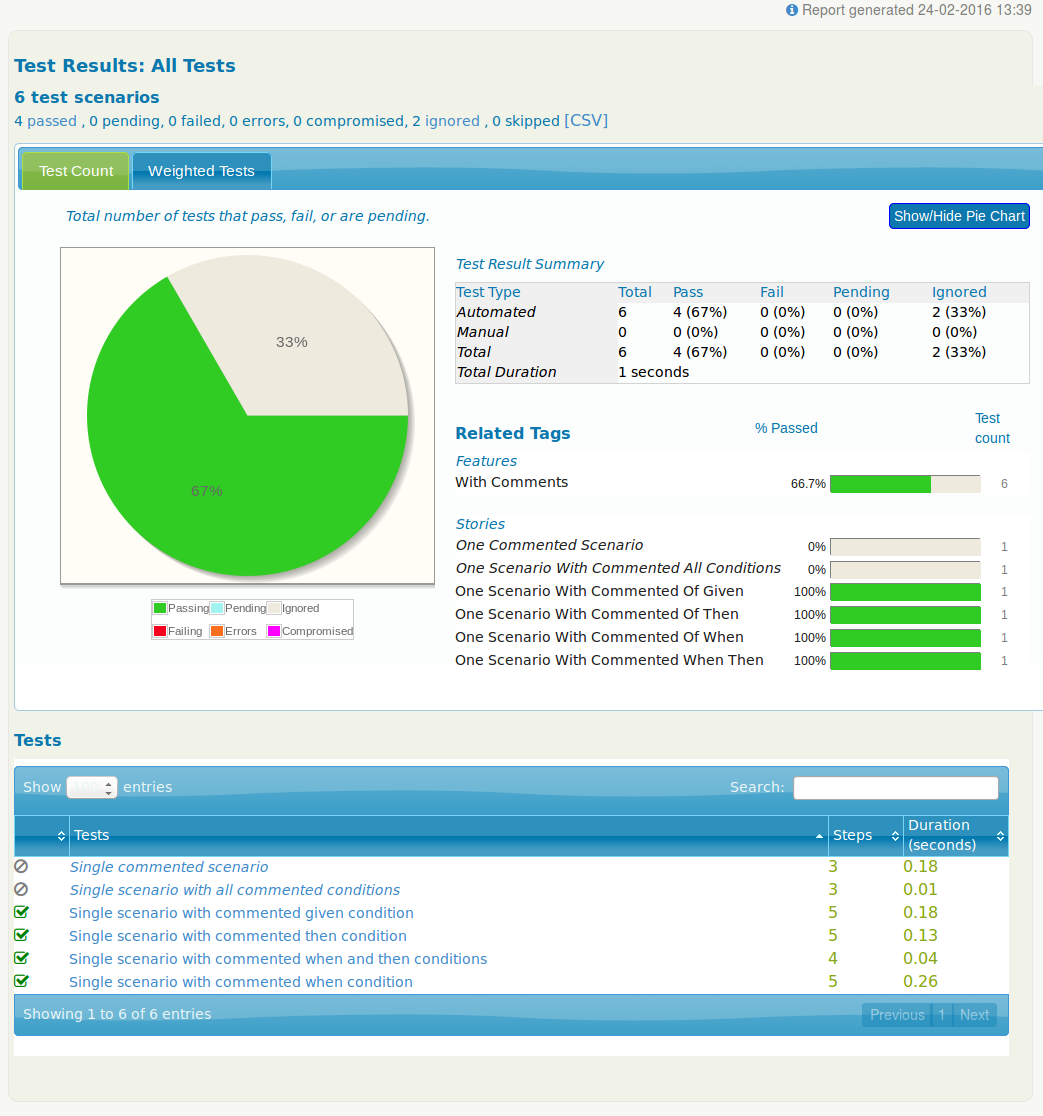
You can comment particular conditions or the whole scenario. Here are some examples for different cases.
Commenting one condition:
Narrative:
In order to provide some business value
As a user
I want to perform some simple action, but I commented then condition

Scenario: Single scenario with commented then condition
Given I have prepared environment for simple action one
When I perform "simple action one"
!-- Then I expect result for "simple action one" should be "success"
Report:

Commenting all conditions:
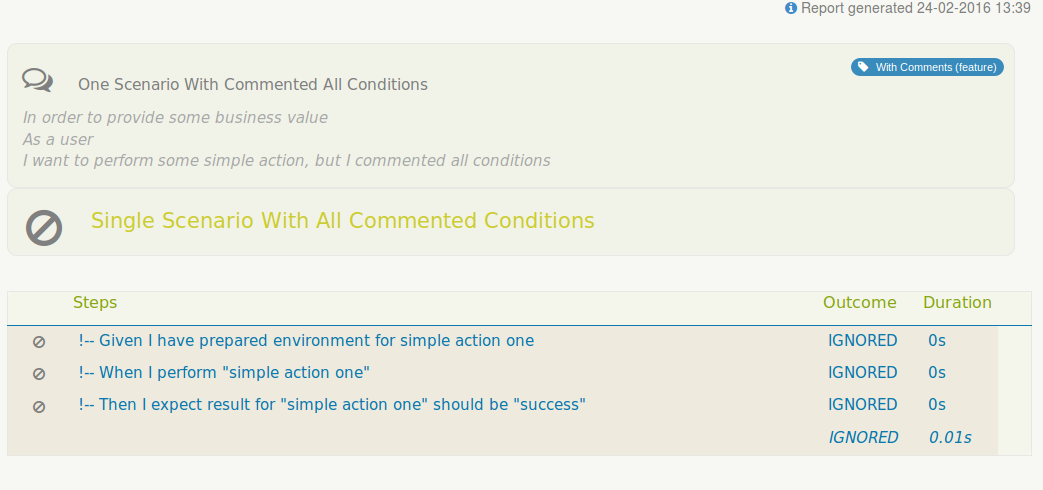
Narrative:
In order to provide some business value
As a user
I want to perform some simple action, but I commented all conditions

Scenario: Single scenario with all commented conditions
!-- Given I have prepared environment for simple action one
!-- When I perform "simple action one"
!-- Then I expect result for "simple action one" should be "success"
Report:
Commenting a whole scenario:
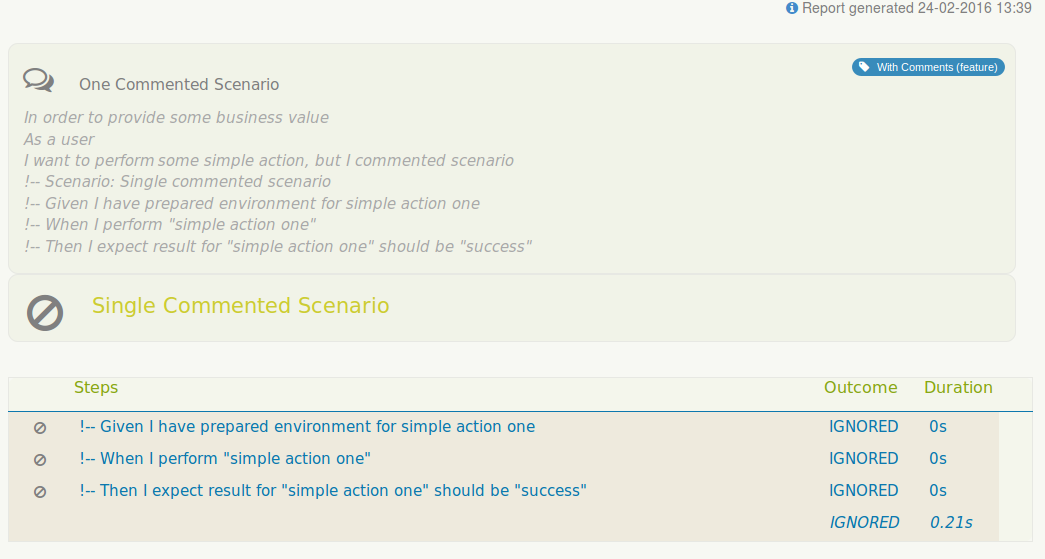
Narrative:
In order to provide some business value
As a user
I want to perform some simple action, but I commented scenario

!-- Scenario: Single commented scenario
!-- Given I have prepared environment for simple action one
!-- When I perform "simple action one"
!-- Then I expect result for "simple action one" should be "success"
Report:
6.1.4. JBehave Maven Archetype
A jBehave archetype is availble to help you jumpstart a new project. As usual, you can run mvn archetype:generate from the command line and then select the net.thucydides.thucydides-jbehave-archetype archetype from the proposed list of archetypes. Or you can use your favorite IDE to generate a new Maven project using an archetype.
This archetype creates a project directory structure similar to the one shown here:
+ main
    + java
       + SampleJBehave
           + pages
               - DictionaryPage.java
           + steps
               - EndUserSteps.java
+ test
    + java
       + SampleJBehave
           + jbehave
               - AcceptanceTestSuite.java
               - DefinitionSteps.java
    + resources
        + SampleJBehave
            + stories
                + consult_dictionary
                    - LookupADefinition.story
6.1.5. Running all tests in a single browser window
All web tests for one story can be run in a single browser window using either by setting the restart.browser.each.scenario system property or programmatically using runSerenity().inASingleSession() inside the JUnit runner. It is default behaving - to run all scenarios in same story in one browser.
import net.serenitybdd.jbehave.SerenityStories;

public class JBehaveTestCase extends SerenityStories {
    public JBehaveTestCase() {
      runSerenity().inASingleSession();
    }
}
6.2. Serenity with Cucumber
Cucumber is a popular BDD test automation tool. Cucumber-JVM is the Java implementation of Cucumber, and is what we will be focusing on in this article. In Cucumber, you express acceptance criteria in a natural, human-readable form. For example, we could write the "wool scarf" example mentioned above like this:
 Given I want to buy a wool scarf
 When I search for items containing 'wool'
 Then I should only see items related to 'wool'
This format is known as Gherkin, and is widely used in Cucumber and other Cucumber-based BDD tools such as SpecFlow (for .NET) and Behave (for Python). Gherkin is a flexible, highly readable format that can be written collaboratively with product owners to ensure that everyone . The loosely-structured Given-When-Then format helps people focus on what they are trying to achieve, and how they will know when they get it.
Sometimes tables can be used to summarize several different examples of the same scenario. In Gherkin, you can use example tables to do this. For instance, the following scenario illustrates how you can search for different types of products made of different materials:
  Scenario Outline: Filter by different item types
    Given I have searched for items containing '<material>'
    When I filter results by type '<type>'
    Then I should only see items containing '<material>' of type '<type>'
  Examples:
    | material | type           |
    | silk     | Handmade       |
    | bronze   | Vintage        |
    | wool     | Craft Supplies |
6.2.1. Writing executable specifications with Cucumber and Serenity
In Cucumber, scenarios are stored in Feature Files, which contain an overall description of a feature as well as a number of scenarios. The Feature File for the example above is called search_by_keyword.feature, and looks something like this like this:
Feature: Searching by keyword

  In order to find items that I would like to purchase
  As a potential buyer
  I want to be able to search for items containing certain words

  Scenario: Should list items related to a specified keyword
    Given I want to buy a wool scarf
    When I search for items containing 'wool'
    Then I should only see items related to 'wool'
These feature files can be placed in different locations, but you can reduce the amount of configuration you need to do with Serenity if you put them in the src/test/resources/features directory.
You typically organize the feature files in sub-directories that reflect the higher-level requirements. In the following directory structure, for example, we have feature definitions for several higher-level features: search and shopping_cart:
|----src
| |----test
| | |----resources
| | | |----features
| | | | |----search
| | | | | |----search_by_keyword.feature
| | | | |----shopping_cart
| | | | | |----adding_items_to_the_shopping_cart.feature
Another option is to place them in src/test/resources', but underneath the same package name as your scenario runner class (see below). This requires slightly less configuration of the scenario runner class. However in this case, you need to specify the `thucydides.requirements.dir property in your serenity.properties (or thucydides.properties) file to point to the root requirements directory:
thucydides.requirements.dir=src/test/resources/net/serenity_bdd/samples/etsy/features
6.2.2. The Scenario Runner
Cucumber runs the feature files via JUnit, and needs a dedicated test runner class to actually run the feature files. When you run the tests with Serenity, you use the CucumberWithSerenity test runner. If the feature files are not in the same package as the test runner class, you also need to use the @CucumberOptions class to provide the root directory where the feature files can be found. A simple test runner looks like this:
package net.serenity_bdd.samples.etsy.features;

import cucumber.api.CucumberOptions;
import net.serenitybdd.cucumber.CucumberWithSerenity;
import org.junit.runner.RunWith;

@RunWith(CucumberWithSerenity.class)
@CucumberOptions(features="src/test/resources/features/search/search_by_keyword.feature")
public class SearchByKeyword {}
If your feature files are stored in or under the same package as your scenario runner class (in src/test/resources) as discussed in the previous section, then you don’t need to use @CucumberOptions to provide the root directory.
6.2.3. Step definitions
In Cucumber, each line of the Gherkin scenario maps to a method in a Java class, known as a Step Definition. These use annotations like @Given, @When and @Then match lines in the scenario to Java methods. You define simple regular expressions to indicate parameters that will be passed into the methods:
public class SearchByKeywordStepDefinitions {
    @Steps
    BuyerSteps buyer;

    @Given("I want to buy (.*)")
    public void buyerWantsToBuy(String article) {
        buyer.opens_etsy_home_page();
    }

    @When("I search for items containing '(.*)'")
    public void searchByKeyword(String keyword) {
        buyer.searches_for_items_containing(keyword);
    }

    @Then("I should only see items related to '(.*)'")
    public void resultsForACategoryAndKeywordInARegion(String keyword) {
        buyer.should_see_items_related_to(keyword);
    }
}
These step definitions use Serenity to organize the step definition code into more reusable components. The @Steps annotation tells Serenity that this variable is a Step Library. In Serenity, we use Step Libraries to add a layer of abstraction between the "what" and the "how" of our acceptance tests. The Cucumber step definitions describe "what" the acceptance test is doing, in fairly implementation-neutral, business-friendly terms. So we say "searches for items containing 'wool", not "enters 'wool' into the search field and clicks on the search button". This layered approach makes the tests both easier to understand and to maintain, and helps build up a great library of reusable business-level steps that we can use in other tests. Without this kind of layered approach, step definitions tend to become very technical very quickly, which limits reuse and makes them harder to understand and maintain.
Step definition files need to go in or underneath the package containing the scenario runners:
|----src
| |----test
| | |----java
| | | |----net
| | | | |----serenity_bdd
| | | | | |----samples
| | | | | | |----etsy
| | | | | | | |----features                                    (1)
| | | | | | | | |----AcceptanceTests.java                      (2)
| | | | | | | | |----steps                                     (3)
| | | | | | | | | |----SearchByKeywordStepDefinitions.java
| | | | | | | | | |----serenity                                (4)
| | | | | | | | | | |----BuyerSteps.java
| 1 | The scenario runner package |
| 2 | A scenario runner |
| 3 | Step definitions for the scenario runners |
| 4 | Serenity Step Libraries are placed in a different sub-package |
7. Serenity with JUnit
In this section we will look at how to run your Serenity tests using JUnit in more detail.
7.1. Basic JUnit integration
We have already seen a simple example of a JUnit Serenity test shown earlier on (First Steps with Serenity BDD):
@RunWith(SerenityRunner.class)                                                          (1)
public class WhenCalculatingFrequentFlyerPoints {

    @Steps                                                                              (2)
    TravellerSteps travellerSteps;

    @Test
    public void shouldCalculatePointsBasedOnDistance() {
        // GIVEN
        travellerSteps.a_traveller_has_a_frequent_flyer_account_with_balance(10000);    (3)

        // WHEN
        travellerSteps.the_traveller_flies(1000);                                       (3)

        // THEN
        travellerSteps.traveller_should_have_a_balance_of(10100);                       (3)

    }
}| 1 | You run the JUnit test using the Serenity test runner |
| 2 | The @Steps annotation marks a Serenity step library |
The most important thing here is the SerenityRunner test runner. This class instruments any step libraries in your class, and ensures that the test results will be recorded and reported on by the Serenity reporters.
7.2. Human-readable method titles
By default, Serenity will convert the test method names into a readable form in the reports. This will convert both camelCasedMethods and methods_with_underscores into a form with spaces. So both shouldCalculateCorrectOutcome() and should_calculate_correct_outcome() will appear as "Should calculate correct outcome" in the test reports.
You can override this convention by adding a @Title annotation onto the test method, as shown here:
@RunWith(SerenityRunner.class)
public class WhenEarningFrequentFlyerStatus {

    @Steps
    TravellerStatusSteps travellerSteps;

    @Test
    @Title("Members earn Gold status after 5000 points (50000 km)")         (1)
    public void earnGoldAfter5000Points() {
        // GIVEN
        travellerSteps.a_traveller_joins_the_frequent_flyer_program();

        // WHEN
        travellerSteps.the_traveller_flies(50000);

        // THEN
        travellerSteps.traveller_should_have_a_status_of(Gold);
    }
}| 1 | The @Title annotation lets you provide your own title for this test in the test reports |
Also @Title can be used for providing information about issues for this test, you can find more info in Linking scenarios/tests with issues
7.3. Serenity WebDriver support in JUnit
Serenity BDD also provides strong support for Selenium WebDriver and the Page Objects model. We will look at these features in detail later on. But while we are on the topic of JUnit integration, let’s look at how this integration fits in with a JUnit Serenity test.
Serenity will manage your WebDriver instance, including opening the appropriate driver at the start of each test, and shutting it down when the test is finished. You just need to provide a WebDriver variable in your test, as shown here:
@RunWith(SerenityRunner.class)
public class WhenSearchingOnGoogle {

    @Managed                                                                (1)
    WebDriver driver;

    @Test
    public void shouldInstantiateAWebDriverInstanceForAWebTest() {
        driver.get("http://www.google.com");                                (2)

        driver.findElement(By.name("q")).sendKeys("firefly", Keys.ENTER);

        new WebDriverWait(driver,5).until(titleContains("Google Search"));

        assertThat(driver.getTitle()).isEqualTo("firefly - Google Search");
    }
}| 1 | Declare a WebDriver instance that will be managed by Serenity |
| 2 | The WebDriver instance will be initialized automatically |
The @Managed annotation also provides several useful parameters. The driver parameter lets you define what WebDriver driver you want to run these tests in. Possible values include firefox, chrome,iexplorer,phantomjs, and htmlunit:
@Managed(driver="chrome")Default value for driver is "", and Serenity BDD will use Firefox in this case. List of supported drivers by this annotation: Firefox, Chrome, Opera, HtmlUnit, PhantomJS, IExplorer, Edge, Safari, Appium.
You can also get Serenity to open the browser at the start of the tests, and leave it open until all of the tests in this test case have been executed, using the uniqueSession parameter:
@Managed(uniqueSession=true)Default value for uniqueSession is false
To make Serenity BDD clear cookies for each test or never clear cookies you can use property clearCookies:
@Managed(clearCookies=BeforeEachTest)Default value for clearCookies is BeforeEachTest, possible values are: BeforeEachTest, Never.
7.4. Serenity PageObjects in JUnit
The WebDriver test in the previous example will work, but it is poorly written for a number of reasons as below:
-
In particular, it exposes too much WebDriver-specific details about how the test is executed, which as a result obscures the intent of the test
-
It will also be harder to maintain, as it contains WebDriver logic that would be repeated and maintained in other tests
A better approach is to hide the WebDriver logic in "Page Objects". Serenity provides excellent built-in support for Page Objects, as we will learn in the chapter dedicated to Serenity WebDriver support (Writing Serenity Page Objects).
The JUnit Serenity integration provides some special support for Serenity Page Objects. In particular, Serenity will automatically instantiate any PageObject fields in your JUnit test. For example, the following Page Object would perform the same operations as the test shown above:
package net.serenitybdd.samples.junit.pages;

import net.thucydides.core.annotations.DefaultUrl;
import net.thucydides.core.pages.PageObject;
import org.openqa.selenium.Keys;
import org.openqa.selenium.WebElement;
import org.openqa.selenium.support.FindBy;

import static org.openqa.selenium.support.ui.ExpectedConditions.titleContains;

@DefaultUrl("http://www.google.com")
public class GooglePage extends PageObject {

    @FindBy(name="q")
    WebElement search;

    public void searchFor(String keywords) {
        search.sendKeys(keywords, Keys.ENTER);
        waitFor(titleContains("Google Search"));
    }
}
Now, when you declare a field of type GooglePage in your test, Serenity will instatiate it for you:
@RunWith(SerenityRunner.class)
public class WhenSearchingOnGoogle {

    @Managed                                                                (1)
    WebDriver driver;

    GooglePage googlePage;

    @Test
    public void shouldInstantiatedPageObjectsForAWebTest() {

        googlePage.open();

        googlePage.searchFor("firefly");

        assertThat(googlePage.getTitle()).isEqualTo("firefly - Google Search");
    }
}
7.5. Skipping tests
Sometimes it can be useful to flag a test as "work-in-progress". In Serenity, you use the @Pending annotation, either for a test or for a @Step-annotated method, to incidate that the scenario is still being implemented and that the results should. These tests appear as Pending (shown in blue) in the test reports.
@RunWith(SerenityRunner.class)
public class WhenEarningFrequentFlyerStatus {

    @Steps
    TravellerStatusSteps travellerSteps;

    @Test
    @Pending
    public void dropsBackToSilverIfLessThan8000PointsEarnedInAYear() {
    }

    @Test
    @Ignore
    public void earnPlatinumAfter10000Points() {
        // GIVEN
        travellerSteps.a_traveller_joins_the_frequent_flyer_program();

        // WHEN
        travellerSteps.the_traveller_flies(500000);

        // THEN
        travellerSteps.traveller_should_have_a_status_of(Platinum);
    }
}
As can be seen here, Serenity also honors the JUnit @Ignore annotation. Tests marked with @Ignore will appear as Ignored (shown in grey) in the test reports.
7.6. Handling failing assumptions
Sometimes it can be useful to define a pre-condition for a test. For example, suppose a series of integration tests depend on a mainframe server being running. If the mainframe is unavailable (for example, if it only runs during office hours), you may want to ignore these tests entirely. The test might look like this:
@RunWith(SerenityRunner.class)
public class WhenUpdatingMemberAccounts {

    @Steps
    TravellerHistorySteps travellerSteps;

    @Test
    public void shouldFetchFlightHistoryFromMainframe() {
        // ASSUMPTION
        travellerSteps.assuming_the_mainframe_is_available();

        // WHEN
        travellerSteps.we_fetch_the_latest_flight_history_for_a_traveller();

        // THEN
        travellerSteps.traveller_should_see_the_latest_flights();
    }
}
The assumption is encapsulated in the assuming_the_mainframe_is_available() method:
import static org.hamcrest.Matchers.is;
import static org.junit.Assume.assumeThat;

public class TravellerHistorySteps extends ScenarioSteps {
    @Step
    public void assuming_the_mainframe_is_available() {
        assumeThat(mainframe(), is(ONLINE));                        (1)
    }

    private MainframeStatus mainframe() {
        return OFFLINE;                                             (2)
}| 1 | Ensure that the mainframe is available |
| 2 | Do whatever needs to be done to check the availability of the mainframe |
The assuming_the_mainframe_is_available() method uses the JUnit Assume class, which behaves in a very similar way to Hamcrest matchers. If this check fails, the test will not be executed, and the test result will be reported as Ignored.
7.7. Data-driven tests
Serenity provides some features to support simplified Data-Driven testing. In JUnit 4, you can use the Parameterized test runner to perform data-driven tests. In Serenity, you use the SerenityParameterizedRunner. This runner is very similar to the JUnit Parameterized test runner, except that you use the @TestData annotation to provide test data, and you can use all of the other Serenity annotations (@Managed, @Steps and so on). This test runner will also generate proper serenity reports for the executed tests.
An example of a data-driven Serenity test is shown below. In this test, we check the number of status points a Frequent Flyer member needs to obtain a new status. To test this, we use several combinations of points and status levels, specified by the testData() method. These values are represented as instance variables in the test class, and instantiated via the constructor.
@RunWith(SerenityParameterizedRunner.class)
public class WhenEarningFrequentFlyerStatusUpgrades {

    @TestData                                                   (1)
    public static Collection<Object[]> testData(){
        return Arrays.asList(new Object[][]{
                {0,     Bronze},
                {9999,  Bronze},
                {10000, Silver},
                {49999, Silver},
                {50000, Gold}
        });
    }

    private final int kilometersTravelled;                      (2)
    private final Status expectedStatus;                        (2)

    public WhenEarningFrequentFlyerStatusUpgrades(int kilometersTravelled, (3)
                                                  Status expectedStatus) { (3)
        this.kilometersTravelled = kilometersTravelled;
        this.expectedStatus = expectedStatus;
    }

    @Steps
    TravellerStatusSteps travellerSteps;

    @Test
    public void shouldEarnNextStatusWithEnoughPoints() {                (4)
        // GIVEN
        travellerSteps.a_traveller_joins_the_frequent_flyer_program();

        // WHEN
        travellerSteps.the_traveller_flies(kilometersTravelled);

        // THEN
        travellerSteps.traveller_should_have_a_status_of(expectedStatus);
    }
}| 1 | Test data |
| 2 | The test data is injected into these member variables |
| 3 | You need a constructor with the parameters in the correct order for this to work. |
| 4 | Then use these member variables to perform your test |
For slow-running tests, you may be able to speed up your tests using the @Concurrent annotation, as shown here:
@RunWith(SerenityParameterizedRunner.class)
@Concurrent                                                 (1)
public class WhenSearchingForDifferentTermsOnGoogle {

    @Managed(driver = "chrome")
    WebDriver driver;

    GooglePage googlePage;

    @TestData                                               (2)
    public static Collection<Object[]> testData(){
        return Arrays.asList(new Object[][]{
                {"cats"},
                {"dogs"},
                {"ferrets"},
                {"rabbits"},
                {"canaries"}
        });
    }

    private final String searchTerm;                        (3)

    public WhenSearchingForDifferentTermsOnGoogle(String searchTerm) {
        this.searchTerm = searchTerm;
    }

    @Test
    public void shouldInstantiatedPageObjectsForADataDrivenWebTest() {

        googlePage.open();

        googlePage.searchFor(searchTerm);

        assertThat(googlePage.getTitle()).isEqualTo(searchTerm + " - Google Search");
    }
}| 1 | Run these tests in parallel |
| 2 | Use test data from this method |
| 3 | Inject test data into this field through the constructor |
By default, this will run your tests concurrently, by default using two threads per CPU core. If you want to fine-tune the number of threads to be used, you can specify the threads annotation property.
@RunWith(SerenityParameterizedRunner.class)
@Concurrent(threads="4")
You can also express this as a value relative to the number of available processors. For example, to run 4 threads per CPU, you could specify the following:
@RunWith(SerenityParameterizedRunner.class)
@Concurrent(threads="4x")
7.8. Using test data from CSV files
Serenity lets you perform data-driven testing using test data in a CSV file. You store your test data in a CSV file (by default with columns separated by commas), with the first column acting as a header:
KILOMETERS TRAVELLED,   EXPECTED STATUS
0,                      Bronze
9999,                   Bronze
10000,                  Silver
49999,                  Silver
50000,                  Gold
Next, create a test class containing properties that match the columns in the test data, as you did for the data-driven test in the previous example. The test class will typically contain one or more tests that use these properties as parameters to the test step or Page Object methods.
The class will also contain the @UseTestDataFrom annotation to indicate where to find the CSV file (this can either be a file on the classpath or a relative or absolute file path - putting the data set on the class path (e.g. in src/test/resources) makes the tests more portable).
An example of a test running against the CSV data listed above is shown here:
@RunWith(SerenityParameterizedRunner.class)
@UseTestDataFrom(value="testdata/status-levels.csv")                (1)
public class WhenEarningFrequentFlyerStatusUpgradesUsingCSV {

    private int kilometersTravelled;
    private Status expectedStatus;

    public void setKilometersTravelled(int kilometersTravelled) {
        this.kilometersTravelled = kilometersTravelled;
    }

    public void setExpectedStatus(String expectedStatus) {
        this.expectedStatus = Status.valueOf(expectedStatus);
    }

    @Qualifier
    public String qualifier() {
        return kilometersTravelled + "=>" + expectedStatus;
    }
    @Steps
    TravellerStatusSteps travellerSteps;

    @Test
    public void reallyhouldEarnNextStatusWithEnoughPoints() {
        // GIVEN
        travellerSteps.a_traveller_joins_the_frequent_flyer_program();

        // WHEN
        travellerSteps.the_traveller_flies(kilometersTravelled);

        // THEN
        travellerSteps.traveller_should_have_a_status_of(expectedStatus);
    }
}
You can also specify multiple file paths separated by path separators – colon, semi-colon or comma. For example:
@UseTestDataFrom("test-data/simple-data.csv,test-data-subfolder/simple-data.csv")You can also configure an arbitrary directory using system property serenity.data.dir and then refer to it as $DATADIR variable in the annotation.
@UseTestDataFrom("$DATADIR/simple-data.csv")Each row of test data needs to be distinguished in the generated reports. By default, Serenity will call the toString() method. If you provide a public method returning a String that is annotated by the @Qualifier annotation, then this method will be used to distinguish data sets. It should return a value that is unique to each data set.
The test runner will create a new instance of this class for each row of data in the CSV file, assigning the properties with corresponding values in the test data.
There are a few points to note. The columns in the CSV files are converted to camel-case property names (so for example KILOMETERS TRAVELLED becomes kilometersTravelled). All of the fields should be strings or primitive types.
If some of the field values contain commas, you will need to use a different separator. You can use the separator attribute of the @UseTestDataFrom annotation to specify an alternative separator.
@UseTestDataFrom(value="test-data/simple-semicolon-data.csv", separator=';')7.9. Modelling requirements in JUnit
As we have seen previously, Serenity produces reports that summarize the test results, going into details about the steps that were executed within each test. Serenity also produces an overall list of the test results, as shown below:
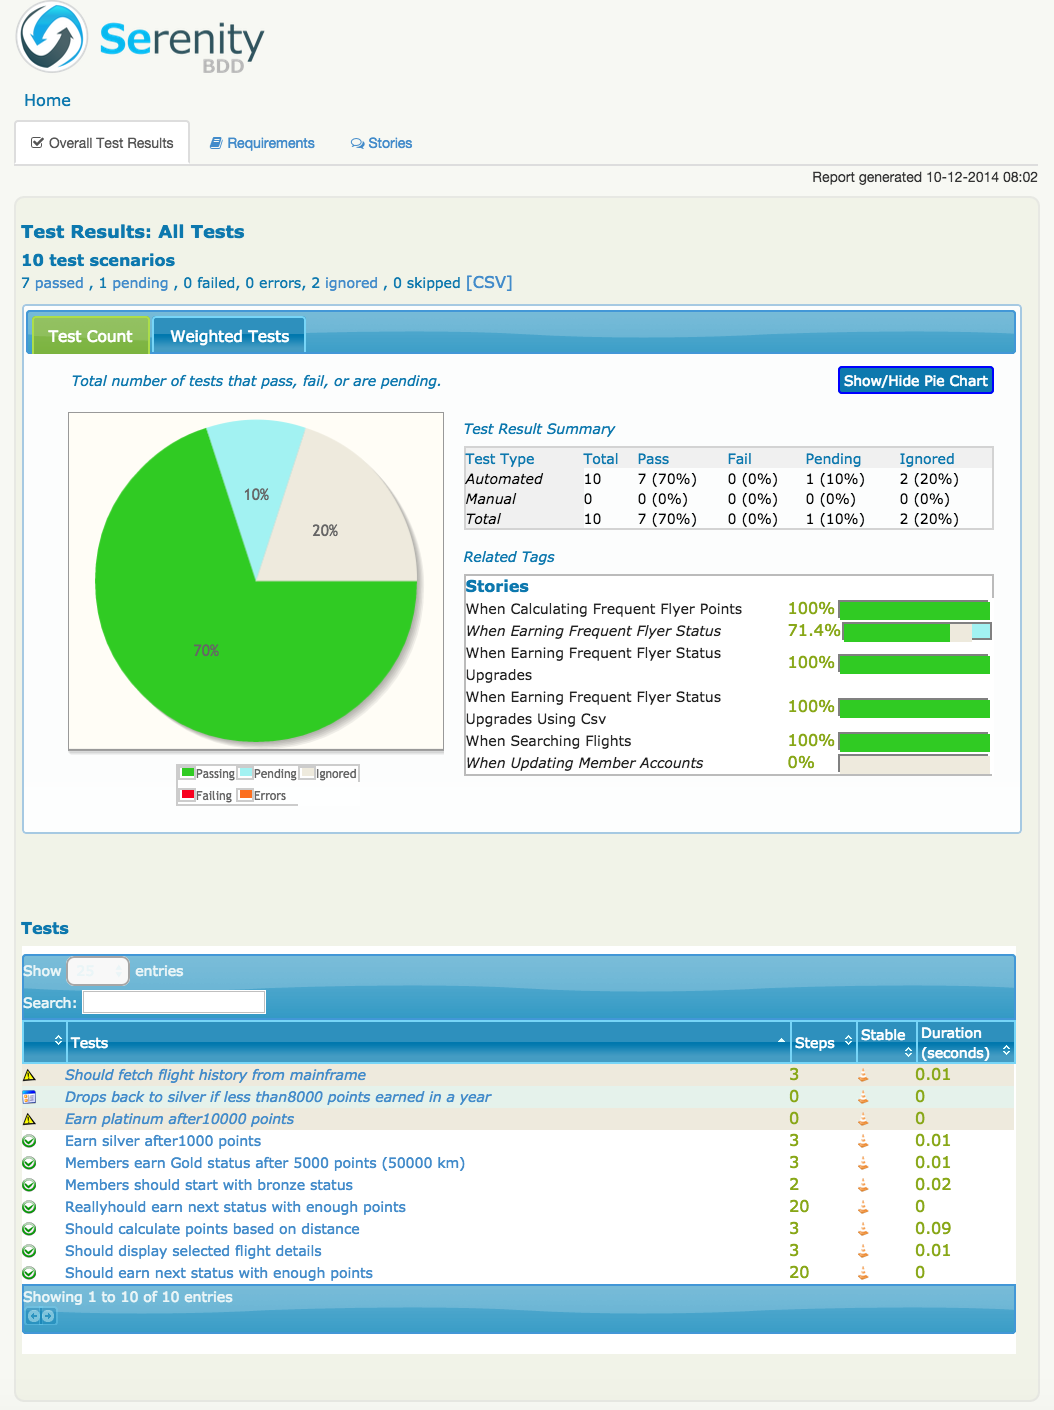
But Serenity also lets you group your tests in terms of features or user stories, in order to get a better high-level picture of the state of your application. The Requirements tab provides a high-level overview of your requirements.
For this to work, you need to organize your JUnit tests into meaningful packages. For example, you might group create packages for high-level features, and group your test cases by feature. By default, a test case is considered to represent a User Story in agile terms, and the tests within the test case correspond to the acceptance criteria for that user story.

Serenity uses the test package structure to discover the requirements organization. For example, suppose your package structure looks like this:
In this structure, the test cases are organized by feature, in a number of directories under the features parent directory.
For this to work properly, you need to tell Serenity the root package that you are using, and what terms you use for your requirements. You do this in a special file called serenity.properties, which lives in the root directory of your project, e.g.
serenity.test.root=net.serenitybdd.samples.junit.featuresThe way Serenity will report your requirements depends on the depth of the directory structure you use to store your requirements. By default, if you group your test cases in a single level of directories (as in the example above), Serenity will treat each directory as a feature. If there are two levels, the first level directories will be considered capabilities, and the second features.
You can define your own way of naming your requirements using the serenity.requirement.types property. For example, if you wanted top-level directories to represent "themes", and have a second level "epics" that actually contains the test cases, you could set this property to the following value:
serenity.requirement.types=theme,epicYou can provide extra information about stories and requirements in several ways. One is to use the @Narrative annotation in the test case, as shown here:
@Narrative(text={"In order to choose the best flight for my travels",                      (1)
                 "As a traveller",
                 "I want to be able to search for flights between specific destinations"})
@RunWith(SerenityRunner.class)
public class WhenSearchingFlights {

    @Managed(driver = "chrome")
    WebDriver driver;

    @Steps
    FlightSearchSteps theCustomer;

    @Test
    public void should_display_selected_flight_details() {
        // GIVEN
        theCustomer.searches_for_flights_between("Sydney", "London");
        // WHEN
        theCustomer.view_flight_details_for_flight(1);
        // THEN
        theCustomer.should_see_the_destination_city_in_the_summary();
    }
}| 1 | A narrative text, represented as an array of Strings |
This will produce a report like the following:
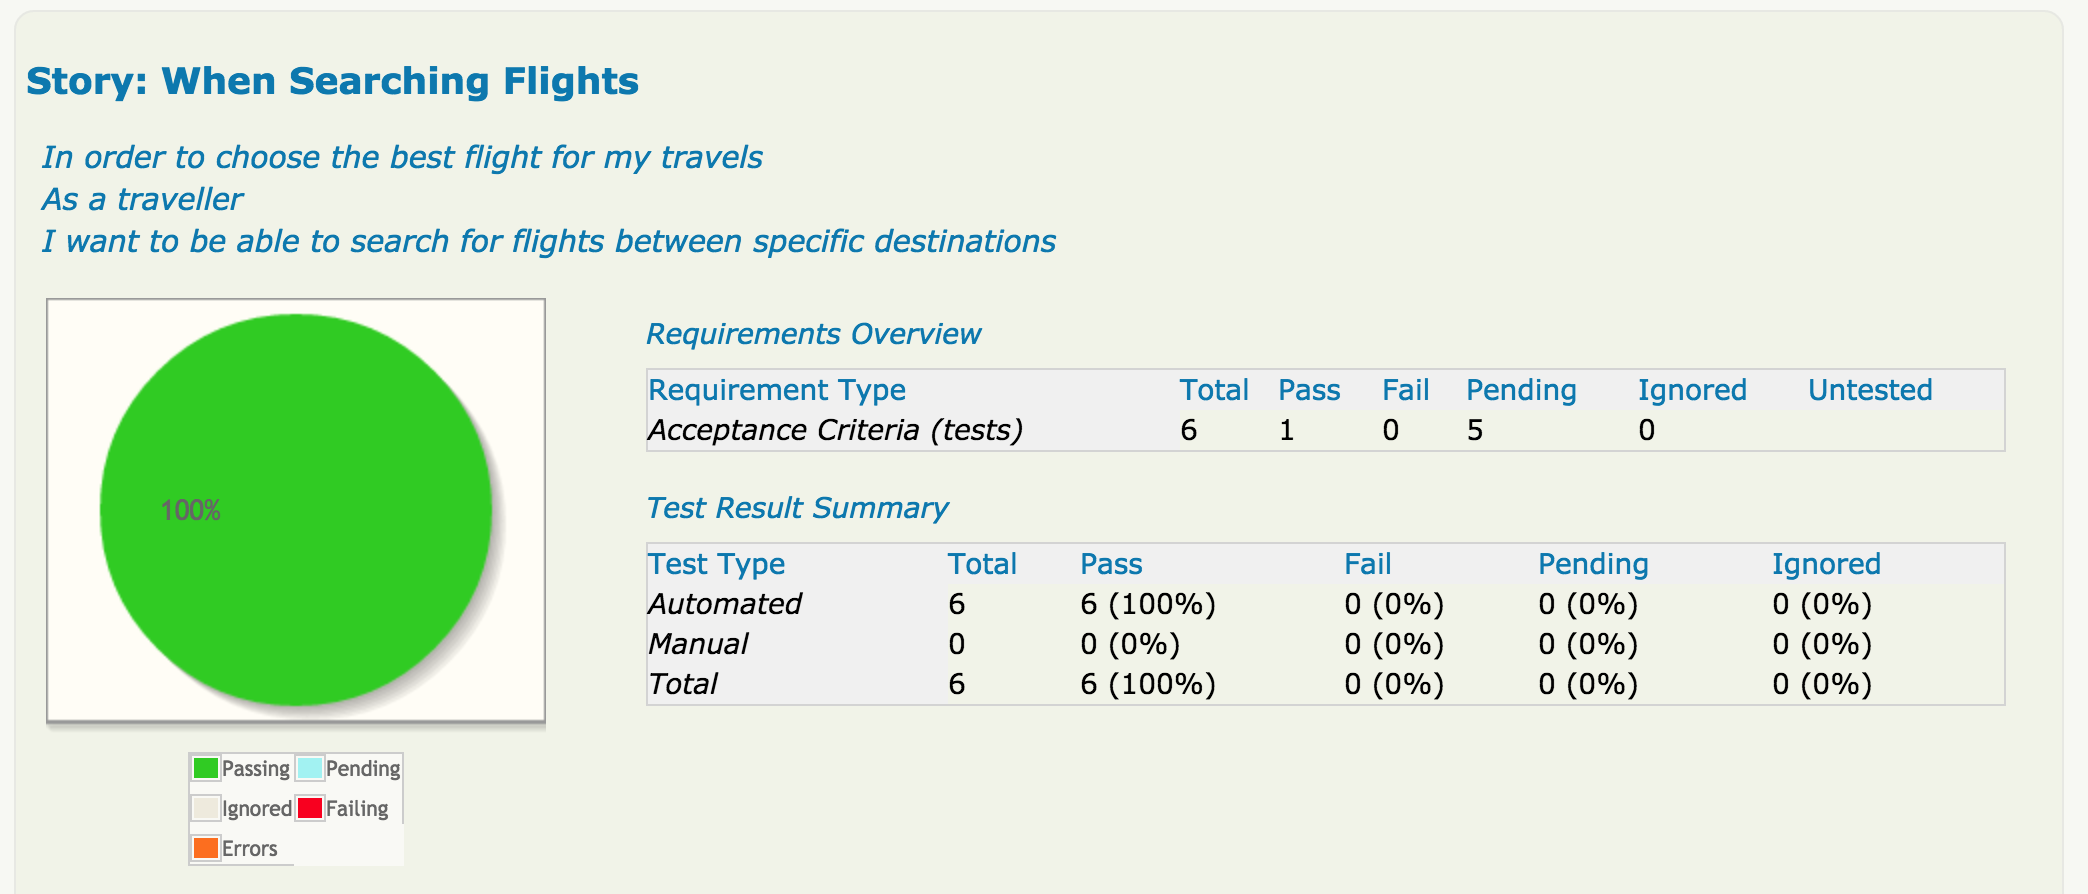
@Narrative annotation lets you add a narrative text to story reportsYou can also add the @Narrative annotation to a package-info.java file. This will add a narrative to the requirement represented by this package in the requirements reports, e.g.
@Narrative(
        text = {"Search-related functionality"}
)
package net.serenitybdd.samples.junit.features.searching;

import net.thucydides.core.annotations.Narrative;
8. Writing Serenity Page Objects
If you are working with WebDriver web tests, you will be familiar with the concept of Page Objects. Page Objects are a way of isolating the implementation details of a web page inside a class, exposing only business-focused methods related to that page. They are an excellent way of making your web tests more maintainable.
In Serenity, page objects can be just ordinary WebDriver page objects, on the condition that they have a constructor that accepts a WebDriver parameter. However, the Serenity PageObject class provides a number of utility methods that make page objects more convenient to work with, so a Serenity Page Object generally extends this class.
Here is a simple example:
@DefaultUrl("http://localhost:9000/somepage")
public class FindAJobPage extends PageObject {

    WebElementFacade keywords;
    WebElementFacade searchButton;

    public FindAJobPage(WebDriver driver) {
        super(driver);
    }

    public void look_for_jobs_with_keywords(String values) {
        typeInto(keywords, values);
        searchButton.click();
    }

    public List<String> getJobTabs() {
        List<WebElementFacade> tabs = findAll("//div[@id='tabs']//a");
        return extract(tabs, on(WebElement.class).getText());
    }
}
The typeInto method is a shorthand that simply clears a field and enters the specified text. If you prefer a more fluent-API style, you can also do something like this:
@DefaultUrl("http://localhost:9000/somepage")
public class FindAJobPage extends PageObject {
        WebElementFacade keywordsField;
        WebElementFacade searchButton;

        public FindAJobPage(WebDriver driver) {
            super(driver);
        }

        public void look_for_jobs_with_keywords(String values) {
            **enter(values).into(keywordsField);**
            searchButton.click();
        }

        public List<String> getJobTabs() {
            List<WebElementFacade> tabs = findAll("//div[@id='tabs']//a");
            return extract(tabs, on(WebElement.class).getText());
        }
}
You can use an even more fluent style of expressing the implementation steps by using methods like find, findBy and then.
For example, you can use webdriver "By" finders with element name, id, css selector or xpath selector as follows:
find(By.name("demo")).then(By.name("specialField")).getValue();

find(By.cssSelector(".foo")).getValue();

find(By.xpath("//th")).getValue();
The findBy method lets you pass the css or xpath selector directly to WebDriver. For example,
findBy("#demo").then("#specialField").getValue(); //css selectors

findBy("//div[@id='dataTable']").getValue(); //xpath selector
8.1. Using pages in a step library
When you need to use a page object in one of your steps, you just need to declare a variable of type PageObject in your step library, e.g.
FindAJobPage page;If you want to make sure you are on the right page, you can use the currentPageAt() method. This will check the page class for any @At annotations present in the Page Object class and, if present, check that the current URL corresponds to the URL pattern specified in the annotation. For example, when you invoke it using currentPageAt(), the following Page Object will check that the current URL is precisely http://www.apache.org.
@At("http://www.apache.org")
public class ApacheHomePage extends PageObject {
    ...
}
The @At annotation also supports wildcards and regular expressions. The following page object will match any Apache sub-domain:
@At("http://.*.apache.org")
public class AnyApachePage extends PageObject {
    ...
}
More generally, however, you are more interested in what comes after the host name. You can use the special #HOST token to match any server name. So the following Page Object will match both http://localhost:8080/app/action/login.form an http://staging.acme.com/app/action/login.form. It will also ignore parameters, so http://staging.acme.com/app/action/login.form?username=toto&password=oz will work fine too.
@At(urls={"#HOST/app/action/login.form"})
public class LoginPage extends PageObject {
   ...
}
8.2. Opening the page
A page object is usually designed to work with a particular web page. When the open() method is invoked, the browser will be opened to the default URL for the page.
The @DefaultUrl annotation indicates the URL that this test should use when run in isolation (e.g. from within your IDE). Generally, however, the host part of the default URL will be overridden by the webdriver.base.url property, as this allows you to set the base URL across the board for all of your tests, and so makes it easier to run your tests on different environments by simply changing this property value. For example, in the test class above, setting the webdriver.base.url to https://staging.mycompany.com would result in the page being opened at the URL of https://staging.mycompany.com/somepage.
You can also define named URLs that can be used to open the web page, optionally with parameters. For example, in the following code, we define a URL called open.issue, that accepts a single parameter:
@DefaultUrl("http://jira.mycompany.org")
@NamedUrls(
  {
    @NamedUrl(name = "open.issue", url = "http://jira.mycompany.org/issues/{1}")
  }
)
public class JiraIssuePage extends PageObject {
    ...
}
You could then open this page to the http://jira.mycompany.org/issues/ISSUE-1 URL as shown here:
page.open("open.issue", withParameters("ISSUE-1"));You could also dispense entirely with the base URL in the named URL definition, and rely on the default values:
@DefaultUrl("http://jira.mycompany.org")
@NamedUrls(
  {
    @NamedUrl(name = "open.issue", url = "/issues/{1}")
  }
)
public class JiraIssuePage extends PageObject {
    ...
}
And naturally you can define more than one definition:
@NamedUrls(
  {
          @NamedUrl(name = "open.issue", url = "/issues/{1}"),
          @NamedUrl(name = "close.issue", url = "/issues/close/{1}")
  }
)
You should never try to implement the open() method yourself. In fact, it is final. If you need your page to do something upon loading, such as waiting for a dynamic element to appear, you can use the @WhenPageOpens annotation. Methods in the PageObject with this annotation will be invoked (in an unspecified order) after the URL has been opened. In this example, the open() method will not return until the dataSection web element is visible:
@DefaultUrl("http://localhost:8080/client/list")
    public class ClientList extends PageObject {

     @FindBy(id="data-section");
     WebElement dataSection;
     ...

     @WhenPageOpens
     public void waitUntilTitleAppears() {
         element(dataSection).waitUntilVisible();
     }
}
8.3. Working with web elements
8.3.1. Checking whether elements are visible
The WebElementFacade class convenient fluent API for dealing with web elements, providing some commonly-used extra features that are not provided out-of-the-box by the WebDriver API. WebElementFacades are largely interchangeable with WebElements: you just declare a variable of type WebElementFacade instead of type WebElement. For example, you can check that an element is visible as shown here:
public class FindAJobPage extends PageObject {

    WebElementFacade searchButton;

    public boolean searchButtonIsVisible() {
        return searchButton.isVisible();
    }
    ...
}
If the button is not present on the screen, the test will wait for a short period in case it appears due to some Ajax magic. If you don’t want the test to do this, you can use the faster version:
public boolean searchButtonIsVisibleNow() {
    return searchButton.isCurrentlyVisible();
}
You can turn this into an assert by using the shouldBeVisible() method instead:
public void checkThatSearchButtonIsVisible() {
    searchButton.shouldBeVisible();
}
This method will through an assertion error if the search button is not visible to the end user.
If you are happy to expose the fact that your page has a search button to your step methods, you can make things even simpler by adding an accessor method that returns a WebElementState, as shown here:
public WebElementState searchButton() {
    return element(searchButton);
}
Then your steps will contain code like the following:
searchPage.searchButton().shouldBeVisible();8.3.2. Checking whether elements are enabled
You can also check whether an element is enabled or not:
searchButton.isEnabled()
searchButton.shouldBeEnabled()
There are also equivalent negative methods:
searchButton.shouldNotBeVisible();
searchButton.shouldNotBeCurrentlyVisible();
searchButton.shouldNotBeEnabled()
You can also check for elements that are present on the page but not visible, e.g:
searchButton.isPresent();
searchButton.isNotPresent();
searchButton.shouldBePresent();
searchButton.shouldNotBePresent();
8.3.3. Manipulating select lists
There are also helper methods available for drop-down lists. Suppose you have the following dropdown on your page:
<select id="color">
    <option value="red">Red</option>
    <option value="blue">Blue</option>
    <option value="green">Green</option>
</select>
You could write a page object to manipulate this dropdown as shown here:
public class FindAJobPage extends PageObject {

        @FindBy(id="color")
        WebElementFacade colorDropdown;

        public selectDropdownValues() {
            colorDropdown.selectByVisibleText("Blue");
            assertThat(colorDropdown.getSelectedVisibleTextValue(), is("Blue"));

            colorDropdown.selectByValue("blue");
            assertThat(colorDropdown.getSelectedValue(), is("blue"));

            colorDropdown.selectByIndex(2);
            assertThat(colorDropdown.getSelectedValue(), is("green"));

        }
        ...
}
8.3.4. Determining focus
You can determine whether a given field has the focus as follows:
firstName.hasFocus()
You can also wait for elements to appear, disappear, or become enabled or disabled:
button.waitUntilEnabled()
button.waitUntilDisabled()
or
field.waitUntilVisible()
button.waitUntilNotVisible()
8.3.5. Using direct XPath and CSS selectors
Another way to access a web element is to use an XPath or CSS expression. You can use the $() method with an XPath expression to do this more simply. For example, imagine your web application needs to click on a list item containing a given post code. One way would be as shown here:
WebElement selectedSuburb = getDriver().findElement(By.xpath("//li/a[contains(.,'" + postcode + "')]"));
selectedSuburb.click();
However, a simpler option would be to do this:
$("//li/a[contains(.,'" + postcode + "')]").click();8.4. Working with Asynchronous Pages
Asynchronous pages are those whose fields or data is not all displayed when the page is loaded. Sometimes, you need to wait for certain elements to appear, or to disappear, before being able to proceed with your tests. Serenity provides some handy methods in the PageObject base class to help with these scenarios. They are primarily designed to be used as part of your business methods in your page objects, though in the examples we will show them used as external calls on a PageObject instance for clarity.
8.4.1. Checking whether an element is visible
In WebDriver terms, there is a distinction between when an element is present on the screen (i.e. in the HTML source code), and when it is rendered (i.e. visible to the user). You may also need to check whether an element is visible on the screen. You can do this in two ways. Your first option is to use the isElementVisible method, which returns a boolean value based on whether the element is rendered (visible to the user) or not:
isElementVisible(By.xpath("//h2[.='A visible title']"))Your second option is to actively assert that the element should be visible:
shouldBeVisible(By.xpath("//h2[.='An invisible title']"));If the element does not appear immediately, you can wait for it to appear:
waitForRenderedElements(By.xpath("//h2[.='A title that is not immediately visible']"));An alternative to the above syntax is to use the more fluid waitFor method which takes a css or xpath selector as argument:
waitFor("#popup"); //css selector

waitFor("//h2[.='A title that is not immediately visible']"); //xpath selector
If you just want to check if the element is present though not necessarily visible, you can use waitForRenderedElementsToBePresent :
waitForRenderedElementsToBePresent(By.xpath("//h2[.='A title that is not immediately visible']"));or its more expressive flavour, waitForPresenceOf which takes a css or xpath selector as argument.
waitForPresenceOf("#popup"); //css

waitForPresenceOf("//h2[.='A title that is not immediately visible']"); //xpath
You can also wait for an element to disappear by using waitForRenderedElementsToDisappear or waitForAbsenceOf :
waitForRenderedElementsToDisappear(By.xpath("//h2[.='A title that will soon disappear']"));

waitForAbsenceOf("#popup");

waitForAbsenceOf("//h2[.='A title that will soon disappear']");
For simplicity, you can also use the waitForTextToAppear and waitForTextToDisappear methods:
waitForTextToDisappear("A visible bit of text");If several possible texts may appear, you can use waitForAnyTextToAppear or waitForAllTextToAppear:
waitForAnyTextToAppear("this might appear","or this", "or even this");If you need to wait for one of several possible elements to appear, you can also use the waitForAnyRenderedElementOf method:
waitForAnyRenderedElementOf(By.id("color"), By.id("taste"), By.id("sound"));8.5. Working with timeouts
Modern AJAX-based web applications add a great deal of complexity to web testing. The basic problem is, when you access a web element on a page, it may not be available yet. So you need to wait a bit. Indeed, many tests contain hard-coded pauses scattered through the code to cater for this sort of thing.
But hard-coded waits are evil. They slow down your test suite, and cause them to fail randomly if they are not long enough. Rather, you need to wait for a particular state or event. Selenium provides great support for this, and Serenity builds on this support to make it easier to use.
8.5.1. Implicit Waits
The first way you can manage how WebDriver handles tardy fields is to use the webdriver.timeouts.implicitlywait property. This determines how long, in milliseconds, WebDriver will wait if an element it tries to access is not present on the page. To quote the WebDriver documentation:
“An implicit wait is to tell WebDriver to poll the DOM for a certain amount of time when trying to find an element or elements if they are not immediately available.”
The default value in Serenity for this property is currently 2 seconds. This is different from standard WebDriver, where the default is zero.
Let’s look at an example. Suppose we have a PageObject with a field defined like this:
@FindBy(id="slow-loader")
public WebElementFacade slowLoadingField;
This field takes a little while to load, so won’t be ready immediately on the page.
Now suppose we set the webdriver.timeouts.implicitlywait value to 5000, and that our test uses the slowLoadingField:
boolean loadingFinished = slowLoadingField.isDisplayed()When we access this field, two things can happen. If the field takes less than 5 seconds to load, all will be good. But if it takes more than 5 seconds, a NoSuchElementException (or something similar) will be thrown.
That this timeout also applies for lists. Suppose we have defined a field like this, which takes some time to dynamically load:
@FindBy(css="#elements option")
public List<WebElementFacade> elementItems;
Now suppose we count the values of the element like this:
int itemCount = elementItems.size()The number of items returned will depend on the implicit wait value. If we set the webdriver.timeouts.implicitlywait value to a very small value, WebDriver may only load some of the values. But if we give the list enough time to load completely, we will get the full list.
The implicit wait value is set globally for each WebDriver instance, but you can override the value yourself. The simplest way to do this from within a Serenity PageObject is to use the setImplicitTimeout() method:
setImplicitTimeout(5, SECONDS)But remember this is a global configuration, so will also affect other page objects. So once you are done, you should always reset the implicit timeout to its previous value. Serenity gives you a handy method to do this:
resetImplicitTimeout()See Selenium Documentation for more details on how the WebDriver implicit waits work.
8.5.2. Explicit Timeouts
You can also wait until an element is in a particular state. For example, we could wait until a field becomes visible:
slowLoadingField.waitUntilVisible()You can also wait for more arbitrary conditions, e.g.
waitFor(ExpectedConditions.alertIsPresent())The default time that Serenity will wait is determined by the webdriver.wait.for.timeout property. The default value for this property is 5 seconds.
Sometimes you want to give WebDriver some more time for a specific operation. From within a PageObject, you can override or extend the implicit timeout by using the withTimeoutOf() method. For example, you could wait for the #elements list to load for up to 5 seconds like this:
withTimeoutOf(5, SECONDS).waitForPresenceOf(By.cssSelector("#elements option"))You can also specify the timeout for a field. For example, if you wanted to wait for up to 5 seconds for a button to become clickable before clicking on it, you could do the following:
someButton.withTimeoutOf(5, SECONDS).waitUntilClickable().click()You can also use this approach to retrieve elements:
elements = withTimeoutOf(5, SECONDS).findAll("#elements option")Finally, if a specific element a PageObject needs to have a bit more time to load, you can use the timeoutInSeconds attribute in the Serenity @FindBy annotation, e.g.
import net.serenitybdd.core.annotations.findby.FindBy;
...
@FindBy(name = "country", timeoutInSeconds="10")
public WebElementFacade country;
You can also wait for an element to be in a particular state, and then perform an action on the element. Here we wait for an element to be clickable before clicking on the element:
addToCartButton.withTimeoutOf(5, SECONDS).waitUntilClickable().click()Or, you can wait directly on a web element:
@FindBy(id="share1-fb-like")
WebElementFacade facebookIcon;
  ...
public WebElementState facebookIcon() {
    return withTimeoutOf(5, TimeUnit.SECONDS).waitFor(facebookIcon);
}
Or even:
List<WebElementFacade> currencies = withTimeoutOf(5, TimeUnit.SECONDS)
                              .waitFor(currencyTab)
                              .thenFindAll(".currency-code");
8.6. Executing Javascript
There are times when you may find it useful to execute a little Javascript directly within the browser to get the job done. You can use the evaluateJavascript() method of the PageObject class to do this. For example, you might need to evaluate an expression and use the result in your tests. The following command will evaluate the document title and return it to the calling Java code:
String result = (String) evaluateJavascript("return document.title");Alternatively, you may just want to execute a Javascript command locally in the browser. In the following code, for example, we set the focus to the firstname input field:
evaluateJavascript("document.getElementById('firstname').focus()");And, if you are familiar with JQuery, you can also invoke JQuery expressions:
evaluateJavascript("$('#firstname').focus()");This is often a useful strategy if you need to trigger events such as mouse-overs that are not currently supported by the WebDriver API.
8.7. Uploading files
Uploading files is easy. Files to be uploaded can be either placed in a hard-coded location (bad) or stored on the classpath (better). Here is a simple example:
public class NewCompanyPage extends PageObject {
    ...
    @FindBy(id="object_logo")
    WebElementFacade logoField;

    public NewCompanyPage(WebDriver driver) {
        super(driver);
    }

    public void loadLogoFrom(String filename) {
        upload(filename).to(logoField);
    }
}
8.8. Using Fluent Matcher expressions
When writing acceptance tests, you often find yourself expressing expectations about individual domain objects or collections of domain objects. For example, if you are testing a multi-criteria search feature, you will want to know that the application finds the records you expected. You might be able to do this in a very precise manner (for example, knowing exactly what field values you expect), or you might want to make your tests more flexible by expressing the ranges of values that would be acceptable. Serenity provides a few features that make it easier to write acceptance tests for this sort of case.
In the rest of this section, we will study some examples based on tests for the Maven Central search site (see The results page for the Maven Central search page). This site lets you search the Maven repository for Maven artifacts, and view the details of a particular artifact.
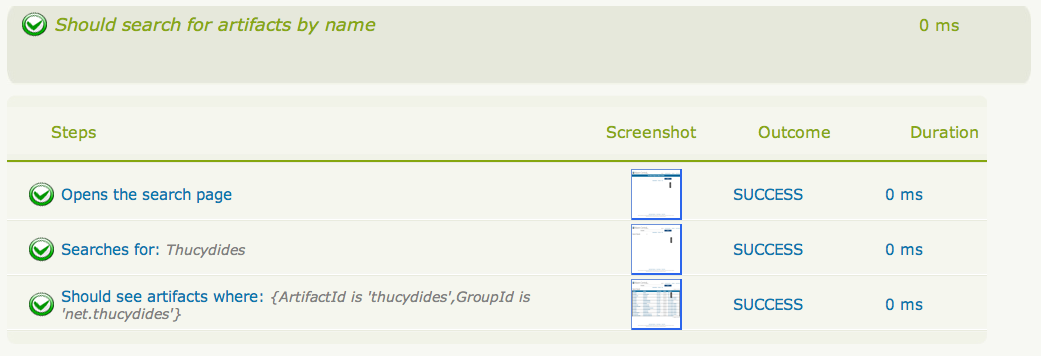
We will use some imaginary regression tests for this site to illustrate how the Serenity matchers can be used to write more expressive tests. The first scenario we will consider is simply searching for an artifact by name, and making sure that only artifacts matching this name appear in the results list. We might express this acceptance criteria informally in the following way:
-
Give that the developer is on the search page,
-
And the developer searches for artifacts called Serenity
-
Then the developer should see at least 16 Serenity artifacts, each with a unique artifact Id
In JUnit, a Serenity test for this scenario might look like the one:
...
import static net.thucydides.core.matchers.BeanMatchers.the_count;
import static net.thucydides.core.matchers.BeanMatchers.each;
import static net.thucydides.core.matchers.BeanMatchers.the;
import static org.hamcrest.Matchers.greaterThanOrEqualTo;
import static org.hamcrest.Matchers.is;
import static org.hamcrest.Matchers.startsWith;

@RunWith(SerenityRunner.class)
public class WhenSearchingForArtifacts {

    @Managed
    WebDriver driver;

    @ManagedPages(defaultUrl = "http://search.maven.org")
    public Pages pages;

    @Steps
    public DeveloperSteps developer;

    @Test
    public void should_find_the_right_number_of_artifacts() {
        developer.opens_the_search_page();
        developer.searches_for("Serenity");
        developer.should_see_artifacts_where(the("GroupId", startsWith("net.thucydides")),
                                             each("ArtifactId").isDifferent(),
                                             the_count(is(greaterThanOrEqualTo(16))));

    }
}
Let’s see how the test in this class is implemented. The should_find_the_right_number_of_artifacts() test could be expressed as follows:
-
When we open the search page
-
And we search for artifacts containing the word Serenity
-
Then we should see a list of artifacts where each Group ID starts with "net.Serenity", each Artifact ID is unique, and that there are at least 16 such entries displayed.
The implementation of these steps is illustrated here:
...
import static net.thucydides.core.matchers.BeanMatcherAsserts.shouldMatch;

public class DeveloperSteps extends ScenarioSteps {

    public DeveloperSteps(Pages pages) {
        super(pages);
    }

    @Step
    public void opens_the_search_page() {
        onSearchPage().open();
    }

    @Step
    public void searches_for(String search_terms) {
        onSearchPage().enter_search_terms(search_terms);
        onSearchPage().starts_search();
    }

    @Step
    public void should_see_artifacts_where(BeanMatcher... matchers) {
        shouldMatch(onSearchResultsPage().getSearchResults(), matchers);
    }

    private SearchPage onSearchPage() {
        return getPages().get(SearchPage.class);
    }

    private SearchResultsPage onSearchResultsPage() {
        return getPages().get(SearchResultsPage.class);
    }
}
The first two steps are implemented by relatively simple methods. However the third step is more interesting. Let’s look at it more closely:
    @Step
    public void should_see_artifacts_where(BeanMatcher... matchers) {
        shouldMatch(onSearchResultsPage().getSearchResults(), matchers);
    }
Here, we are passing an arbitrary number of expressions into the method. These expressions actually matchers, instances of the BeanMatcher class. Not that you usually have to worry about that level of detail - you create these matcher expressions using a set of static methods provided in the BeanMatchers class. So you typically would pass fairly readable expressions like the("GroupId", startsWith("net.Serenity")) or each("ArtifactId").isDifferent().
The shouldMatch() method from the BeanMatcherAsserts class takes either a single Java object, or a collection of Java objects, and checks that at least some of the objects match the constraints specified by the matchers. In the context of web testing, these objects are typically POJOs provided by the Page Object to represent the domain object or objects displayed on a screen.
There are a number of different matcher expressions to choose from. The most commonly used matcher just checks the value of a field in an object. For example, suppose you are using the domain object shown here:
     public class Person {
        private final String firstName;
        private final String lastName;

        Person(String firstName, String lastName) {
            this.firstName = firstName;
            this.lastName = lastName;
        }

        public String getFirstName() {...}

        public String getLastName() {...}
    }
You could write a test to ensure that a list of Persons contained at least one person named "Bill" by using the "the" static method, as shown here:
    List<Person> persons = Arrays.asList(new Person("Bill", "Oddie"), new Person("Tim", "Brooke-Taylor"));

    shouldMatch(persons, the("firstName", is("Bill"))
The second parameter in the the() method is a Hamcrest matcher, which gives you a great deal of flexibility with your expressions. For example, you could also write the following:
    List<Person> persons = Arrays.asList(new Person("Bill", "Oddie"), new Person("Tim", "Brooke-Taylor"));

    shouldMatch(persons, the("firstName", is(not("Tim"))));
    shouldMatch(persons, the("firstName", startsWith("B")));
You can also pass in multiple conditions:
    List<Person> persons = Arrays.asList(new Person("Bill", "Oddie"), new Person("Tim", "Brooke-Taylor"));

    shouldMatch(persons, the("firstName", is("Bill"), the("lastName", is("Oddie"));
Serenity also provides the DateMatchers class, which lets you apply Hamcrest matches to standard java Dates and JodaTime DateTimes. The following code samples illustrate how these might be used:
    DateTime january1st2010 = new DateTime(2010,01,01,12,0).toDate();
    DateTime may31st2010 = new DateTime(2010,05,31,12,0).toDate();

    the("purchaseDate", isBefore(january1st2010))
    the("purchaseDate", isAfter(january1st2010))
    the("purchaseDate", isSameAs(january1st2010))
    the("purchaseDate", isBetween(january1st2010, may31st2010))
You sometimes also need to check constraints that apply to all of the elements under consideration. The simplest of these is to check that all of the field values for a particular field are unique. You can do this using the each() method:
shouldMatch(persons, each("lastName").isDifferent())You can also check that the number of matching elements corresponds to what you are expecting. For example, to check that there is only one person who’s first name is Bill, you could do this:
shouldMatch(persons, the("firstName", is("Bill"), the_count(is(1)));You can also check the minimum and maximum values using the max() and min() methods. For example, if the Person class had a getAge() method, we could ensure that every person is over 21 and under 65 by doing the following:
     shouldMatch(persons, min("age", greaterThanOrEqualTo(21)),
                          max("age", lessThanOrEqualTo(65)));
These methods work with normal Java objects, but also with Maps. So the following code will also work:
    Map<String, String> person = new HashMap<String, String>();
    person.put("firstName", "Bill");
    person.put("lastName", "Oddie");

    List<Map<String,String>> persons = Arrays.asList(person);
    shouldMatch(persons, the("firstName", is("Bill"))
The other nice thing about this approach is that the matchers play nicely with the Serenity reports. So when you use the BeanMatcher class as a parameter in your test steps, the conditions expressed in the step will be displayed in the test report, as shown in Conditional expressions are displayed in the test reports.
There are two common usage patterns when building Page Objects and steps that use this sort of matcher. The first is to write a Page Object method that returns the list of domain objects (for example, Persons) displayed on the table. For example, the getSearchResults() method used in the should_see_artifacts_where() step could be implemented as follows:
    public List<Artifact> getSearchResults() {
        List<WebElement> rows = resultTable.findElements(By.xpath(".//tr[td]"));
        List<Artifact> artifacts = new ArrayList<Artifact>();
        for (WebElement row : rows) {
            List<WebElement> cells = row.findElements(By.tagName("td"));
            artifacts.add(new Artifact(cells.get(0).getText(),
                                       cells.get(1).getText(),
                                       cells.get(2).getText()));

        }
        return artifacts;
    }
The second is to access the HTML table contents directly, without explicitly modelling the data contained in the table. This approach is faster and more effective if you don’t expect to reuse the domain object in other pages. We will see how to do this next.
8.8.1. Working with HTML Tables
Since HTML tables are still widely used to represent sets of data on web applications, Serenity comes the HtmlTable class, which provides a number of useful methods that make it easier to write Page Objects that contain tables. For example, the rowsFrom method returns the contents of an HTML table as a list of Maps, where each map contains the cell values for a row indexed by the corresponding heading, as shown here:
...
import static net.thucydides.core.pages.components.HtmlTable.rowsFrom;

public class SearchResultsPage extends PageObject {

    WebElement resultTable;

    public SearchResultsPage(WebDriver driver) {
        super(driver);
    }

    public List<Map<String, String>> getSearchResults() {
        return rowsFrom(resultTable);
    }

}
This saves a lot of typing - our getSearchResults() method now looks like this:
    public List<Map<String, String>> getSearchResults() {
        return rowsFrom(resultTable);
    }
And since the Serenity matchers work with both Java objects and Maps, the matcher expressions will be very similar. The only difference is that the Maps returned are indexed by the text values contained in the table headings, rather than by java-friendly property names.
You can also read tables without headers (i.e., <th> elements) by specifying your own headings using the withColumns method. For example:
    List<Map<Object, String>> tableRows =
                    HtmlTable.withColumns("First Name","Last Name", "Favorite Colour")
                             .readRowsFrom(page.table_with_no_headings);
You can also use the HtmlTable class to select particular rows within a table to work with. For example, another test scenario for the Maven Search page involves clicking on an artifact and displaying the details for that artifact. The test for this might look something like this:
    @Test
    public void clicking_on_artifact_should_display_details_page() {
        developer.opens_the_search_page();
        developer.searches_for("Serenity");
        developer.open_artifact_where(the("ArtifactId", is("Serenity")),
                                      the("GroupId", is("net.Serenity")));

        developer.should_see_artifact_details_where(the("artifactId", is("Serenity")),
                                                    the("groupId", is("net.Serenity")));
    }
Now the open_artifact_where() method needs to click on a particular row in the table. This step looks like this:
    @Step
    public void open_artifact_where(BeanMatcher... matchers) {
        onSearchResultsPage().clickOnFirstRowMatching(matchers);
    }
So we are effectively delegating to the Page Object, who does the real work. The corresponding Page Object method looks like this:
import static net.thucydides.core.pages.components.HtmlTable.filterRows;
...
    public void clickOnFirstRowMatching(BeanMatcher... matchers) {
        List<WebElement> matchingRows = filterRows(resultTable, matchers);
        WebElement targetRow = matchingRows.get(0);
        WebElement detailsLink = targetRow.findElement(By.xpath(".//a[contains(@href,'artifactdetails')]"));
        detailsLink.click();
    }
The interesting part here is the first line of the method, where we use the filterRows() method. This method will return a list of WebElements that match the matchers you have passed in. This method makes it fairly easy to select the rows you are interested in for special treatment.
8.9. Running several steps using the same page object
Sometimes, querying the browser can be expensive. For example, if you are testing tables with large numbers of web elements (e.g. a web element for each cell), performance can be slow, and memory usage high. Normally, Serenity will requery the page (and create a new Page Object) each time you call Pages.get() or Pages.currentPageAt(). If you are certain that the page will not change (i.e., that you are only performing read-only operations on the page), you can use the onSamePage() method of the ScenarioSteps class to ensure that subsequent calls to Pages.get() or Pages.currentPageAt() will return the same page object:
@RunWith(SerenityRunner.class)
public class WhenDisplayingTableContents {

    @Managed
    public WebDriver webdriver;

    @ManagedPages(defaultUrl = "http://my.web.site/index.html")
    public Pages pages;

    @Steps
    public DemoSiteSteps steps;

    @Test
    public void the_user_opens_another_page() {
        steps.navigate_to_page_with_a_large_table();
        steps.onSamePage(DemoSiteSteps.class).check_row(1);
        steps.onSamePage(DemoSiteSteps.class).check_row(2);
        steps.onSamePage(DemoSiteSteps.class).check_row(3);
    }
}
8.10. Switching to another page
A method, switchToPage() is provided in PageObject class to make it convenient to return a new PageObject after navigation from within a method of a PageObject class. For example,
@DefaultUrl("http://mail.acme.com/login.html")
public class EmailLoginPage extends PageObject {

    ...
    public void forgotPassword() {
        ...
        forgotPassword.click();
        ForgotPasswordPage forgotPasswordPage = this.switchToPage(ForgotPasswordPage.class);
        forgotPasswordPage.open();
        ...
    }
    ...
}
9. Serenity and the Screenplay Pattern
The Screenplay Pattern is an approach to writing high quality automated acceptance tests based on good software engineering principles such as the Single Responsibility Principle, the Open-Closed Principle, and effective use of Layers of Abstraction. It encourages good testing habits and well-designed test suites that are easy to read, easy to maintain and easy to extend, enabling teams to write more robust and more reliable automated tests more effectively.
In this section we will look at how to use the Screenplay Pattern with Serenity BDD. We will be illustrating the Screenplay Pattern using the AngularJS implementation of the well-known TodoMVC (http://todomvc.com) project (see The Screenplay Pattern will be illustrated by some tests against the TodoMVC application). You can experiment with this application at http://todomvc.com/examples/angularjs/#/.
You can use the Screenplay Pattern with Serenity BDD in JUnit, Cucumber or JBehave. For simplicity, the examples will be using JUnit.
9.1. Introducing the Screenplay Pattern
Suppose we are implementing the “Add new todo items” feature of the ToDo MVC application. This feature could have an acceptance criteria along the lines of “Should be able to add a new todo item”. If we were testing these scenarios manually, we could create test plans like the following:
-
Should be able to add a new todo item
-
Open the application
-
Add an item called ‘Buy some milk’
-
The ‘Buy some milk’ item should appear in the todo list
-
Using the Screenplay Pattern, we could write this code very naturally like this:
    @Test
    public void should_be_able_to_add_a_todo_item() {

        givenThat(james).wasAbleTo(OpenTheApplication.onTheHomePage());

        when(james).attemptsTo(AddATodoItem.called("Buy some milk"));

        then(james).should(seeThat(theDisplayedItems, hasItem("Buy some milk")));
    }
One of the motivations behind the Screenplay Pattern is the highly readable test code that it produces. Even if you are not familiar with how this code is implemented under the hood, it should be quite obvious what the test is trying to demonstrate, and how it is going about it.
In addition, the Serenity reports produced for this test also reflect this narrative structure, making it easier for testers, business analysts and business people to understand what the tests are actually demonstrating. A typical Screenplay Pattern report is shown in The Serenity report documents both the intent and the implementation of the test.
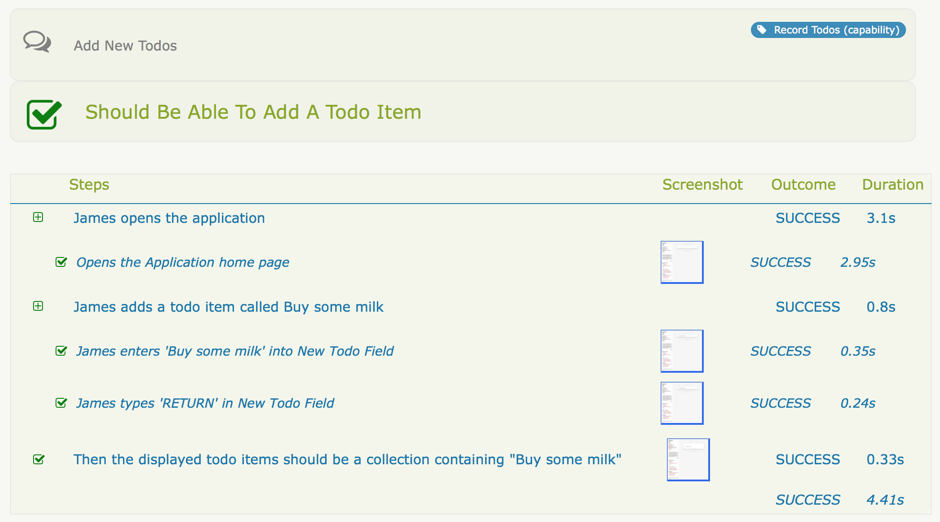
The code listed above certainly reads cleanly, but it may leave you wondering how it actually works under the hood. Let’s see how it all fits together.
9.2. Screenplay Pattern tests runs like any other Serenity test
The Serenity Screenplay Pattern currently integrates with both JUnit and Cucumber. In JUnit, you use the SerenityRunner JUnit runner, as for any other Serenity JUnit tests. The full source code of the test we saw earlier is shown here:
@RunWith(SerenityRunner.class)
public class AddNewTodos {

    private Actor james = Actor.named("James");

    @Managed
    private WebDriver hisBrowser;

    @Steps
    private PlaceholderText thePlaceholderText;

    private DisplayedItems theDisplayedItems = new DisplayedItems();

    @Before
    public void jamesCanBrowseTheWeb() {
        james.can(BrowseTheWeb.with(hisBrowser));
    }

    @Test
    public void should_be_able_to_add_a_todo_item() {

        givenThat(james).wasAbleTo(OpenTheApplication.onTheHomePage());

        when(james).attemptsTo(AddATodoItem.called("Buy some milk"));

        then(james).should(seeThat(theDisplayedItems, hasItem("Buy some milk")));
    }
}
It’s not hard to guess what this test does just by reading the code. There are however a few things here that are new. In the following sections, we will take a closer look at the details.
9.3. Layers of abstraction
Experienced automated testers use layers of abstraction to separate the intent of the test (what you are trying to achieve) from the implementation details (how you achieve it). By separating the what from the how, the intent from the implementation, layers of abstraction help make tests easier to understand and to maintain. Indeed, well defined layers of abstraction are perhaps the single most important factor in writing high quality automated tests.
In User Experience (UX) Design, we break down the way a user interacts with an application into goals, tasks and actions:
-
The goal describes what the user is trying to achieve in business terms
-
The tasks describe the high level steps the user needs to perform to achieve this goal, and
-
The actions correspond to how a user interacts with the system to perform a particular task, such as by clicking on a button or entering a value into a field.
The Screenplay Pattern in Serenity BDD provides a clear distinction between tasks and actions, which makes it easier for teams to write layered tests more consistently.
9.4. Actors and the Screenplay Pattern
Tests describe how a user interacts with the application to achieve a goal. For this reason, tests read much better if they are presented from the point of view of the user.
In the Screenplay Pattern, we call a user interacting with the system an Actor. Actors are at the heart of the Screenplay Pattern (see The Screenplay Pattern uses an actor-centric model). Each actor has a certain number of Abilities, such as the ability to browse the web or to query a restful web service. Actors can also perform Tasks such as adding an item to the Todo list. To achieve these tasks, they will typically need to interact with the application, such as by entering a value into a field or by clicking on a button. We call these interactions Actions. Actors can also ask Questions about the state of the application, such as by reading the value of a field on the screen or by querying a web service.

In Serenity, creating an actor is as simple as creating an instance of the Actor class and providing a name:
Actor james = Actor.named("James");We find it useful to give the actors real names, rather than just to use a generic one such as "the user". Different names can be a short-hand for different user roles or personas, and make the scenarios easier to relate to.
9.5. Actors have abilities
Actors need to be able to do things to perform their assigned tasks. So we give our actors “abilities”, a bit like the superpowers of a super-hero, but in more mundane. If this is a web test, for example, we need James to be able to browse the web using a browser.
Serenity BDD plays well with Selenium WebDriver, and is happy to manage the browser lifecycle for you. All you need to do is to use the @Managed annotation with a WebDriver member variable, as shown here:
@Managed
WebDriver hisBrowser;
We can then let James use this browser like this:
james.can(BrowseTheWeb.with(hisBrowser));To make it clear that this is a precondition for the test (and could very well go in a JUnit @Before method), we can use the syntactic sugar method givenThat():
givenThat(james).can(BrowseTheWeb.with(hisBrowser));Each of the actor’s abilities is represented by an Ability class (in this case, BrowseTheWeb) which keeps track of the things the actor needs to perform this ability (for example, the WebDriver instance used to interact with the browser). Keeping the things an actor can do (browse the web, invoke a web service…) separate from the actor makes it easier to extend the actor’s abilities. For example, to add a new custom ability, you just need to implement a new Ability class.
9.6. Actors perform tasks
An actor needs to perform a number of tasks to achieve a business goal. A fairly typical example of a task is “adding a todo item”, which we could write as follows:
james.attemptsTo(AddATodoItem.called("Buy some milk"))Or, if the task is a precondition, rather than the main subject of the test, we could write something like this:
james.wasAbleTo(AddATodoItem.called("Buy some milk"))For more readability, we can also wrap the actor in a static method from the GivenWhenThen class:
-
givenThat()
-
andThat()
-
when()
-
then()
-
and()
-
but()
For example, we could have written the last line of code like this:
givenThat(james).wasAbleTo(AddATodoItem.called("Buy some milk"))Let’s break it down to understand what is going on. At the heart of the Screenplay Pattern, an actor performs a sequence of tasks. In Serenity, this mechanism is implemented in the Actor class using a variation of the Command Pattern, where the actor executes each task by invoking a special method called performAs() on the corresponding Task object (see The actor invokes the performAs() method on a sequence of tasks).
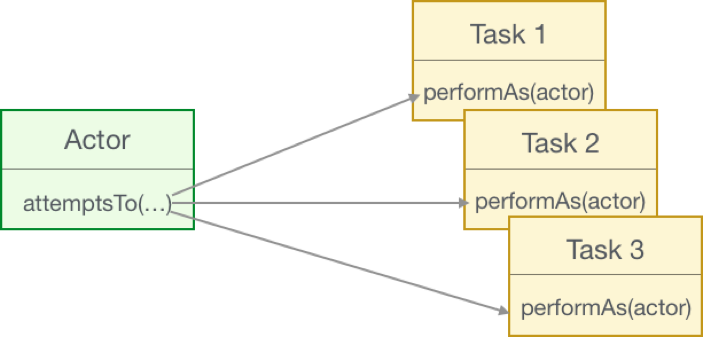
performAs() method on a sequence of tasksTasks are just objects that implement the Task interface, and need to implement the performAs(actor) method. In fact, you can think of any Task class as basically a performAs() method alongside a supporting cast of helper methods.
9.7. Tasks can be created using annotated fields or builders
To do its reporting magic, Serenity BDD needs to instrument the task and action objects used during the tests. The simplest way to do arrange this is to let Serenity create it for you, just like any other Serenity step library, using the @Steps annotation. In the following code snippet, Serenity will instantiate the openTheApplication field for you, so that James can use it to open the application:
@Steps
OpenTheApplication openTheApplication;
…
james.attemptsTo(openTheApplication);
This works well for very simple tasks or actions, for example ones that take no parameters. But for more sophisticated tasks or actions, a builder pattern like the one used with the AddATodoItem earlier on is more convenient. Experienced practitioners generally like to make the builder method and the class name combine to read like an English sentence, so that the intent of the task remains crystal clear:
AddATodoItem.called("Buy some milk"))Serenity BDD provides the special Instrumented class that makes it easy to create task or action objects using the builder pattern. For example, the AddATodoItem class has an immutable field called thingToDo, that contains the text to go in the new Todo item.
public class AddATodoItem implements Task {

    private final String thingToDo;

    protected AddATodoItem(String thingToDo) { this.thingToDo = thingToDo; }
}
We can invoke this constructor using the Instrumented.instanceOf().withProperties() methods, as shown here:
public class AddATodoItem implements Task {

    private final String thingToDo;

    protected AddATodoItem(String thingToDo) { this.thingToDo = thingToDo; }

    public static AddATodoItem called(String thingToDo) {
        return Instrumented.instanceOf(AddATodoItem.class).withProperties(thingToDo);
    }
}
9.8. High level tasks rely on other lower-level tasks or actions
To get the job done, a high level business task will usually need to call either lower level business tasks or actions that interact more directly with the application. In practice, this means that the performAs() method of a task typically executes other, lower level tasks or interacts with the application in some other way. For example, adding a todo item requires two UI actions:
1. Enter the todo text in the text field
2. Press Return
    @Step("{0} adds a todo item called #thingToDo")
    public <T extends Actor> void performAs(T actor) {
        actor.attemptsTo(
                Enter.theValue(thingToDo).into(NewTodoForm.NEW_TODO_FIELD),
                Hit.the(RETURN).keyIn(NewTodoForm.NEW_TODO_FIELD)
        );
    }
The actual implementation uses pre-defined Action classes (such as Enter and Hit `shown here) that come with Serenity. `Action classes are very similar to Task classes, except that they focus on interacting directly with the application. Serenity provides a small number of basic Action classes for core UI interactions such as entering field values, clicking on elements, or selecting values from drop-down lists. You can find these in the net.serenitybdd.screenplay.actions package. In practice, these provide a convenient and readable DSL that let you describe common low-level UI interactions needed to perform a task.
For example, the UI Action to enter the text defined in the thingToDo field into the input field with an ID value of “new-todo” would look like this:
Enter.theValue(thingToDo).into("#new-todo")However, hard-coding the CSS selector could lead to duplication. A better practice would be to refactor the selector into a simple Page Object class, like this one:
public class NewTodoForm extends PageObject {
    public static String NEW_TODO_FIELD = "#new-todo";
}
Alternatively, we could use the Serenity Target class to associate a meaningful label with a CSS selector. These labels appear in the test reports and make them more readable:
public class NewTodoForm extends PageObject {
    public static Target NEW_TODO_FIELD  = Target.the("New Todo Field").locatedBy("#new-todo");
}
The @Step annotation on the performAs() method is used to provide information about how the task will appear in the test reports:
@Step("{0} adds a todo item called #thingToDo")
public <T extends Actor> void performAs(T actor) {...}
Any member variables can be referred to in the @Step annotation by name using the hash (‘#’) prefix (like "#thingToDo" in the example). You can also reference the actor itself using the special "{0} placeholder. The end result is a blow-by-blow account of how each business task was performed (see Test reports show details about both tasks and UI interactions).
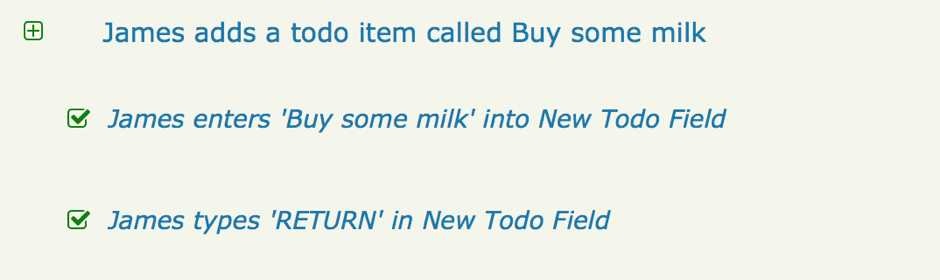
9.9. Action classes can access the Serenity WebDriver integration
You can also write your own Action classes. If the actor has the BrowseTheWeb ability, the Action class can integrate with the Serenity WebDriver support in several ways.
One approach is to use the BrowseTheWeb class to access the WebDriver instance associated with an actor. To do this, you use the BrowseTheWeb.as(theActor) method, as shown here:
public <T extends Actor> void performAs(T theActor) {
    WebElement deleteButton = BrowseTheWeb.as(theActor).findBy(pathTo(target));
    BrowseTheWeb.as(theActor).evaluateJavascript("arguments[0].click()", deleteButton);
}
9.10. Tasks can be used as building blocks by other tasks
It is easy to reuse tasks in other, higher level tasks. For example, the sample project uses a AddTodoItems task to add a number of todo items to the list, like this:
givenThat(james).wasAbleTo(AddTodoItems.called("Walk the dog", "Put out the garbage"));This task is defined using the AddATodoItem class, as shown here:
public class AddTodoItems implements Task {

    private final List<String> todos;

    protected AddTodoItems(List<String> items) { this.todos = ImmutableList.copyOf(items); }

    @Step("{0} adds the todo items called #todos")
    public <T extends Actor> void performAs(T actor) {
        todos.forEach(
                todo -> actor.attemptsTo(AddATodoItem.called(todo))
        );
    }

    public static AddTodoItems called(String... items) {
        return Instrumented.instanceOf(AddTodoItems.class).withProperties(asList(items));
    }
}
It is quite frequent to reuse existing tasks to build up more sophisticated business tasks in this way.
9.11. Actors can ask questions about the state of the application
A typical automated acceptance test has three parts: 1. Set up some test data and/or get the application into a known state 2. Perform some action 3. Compare the new application state with what is expected.
From a testing perspective, the third step is where the real value lies – this is where we check that the application does what it is supposed to do.
In a traditional Serenity test, we would write an assertion using a library like Hamcrest or AssertJ to check an outcome against an expected value. Using the Serenity Screenplay Pattern, we express assertions using a flexible, fluent API quite similar to the one used for Tasks and Actions. In the test shown above, the assertion looks like this:
then(james).should(seeThat(theDisplayedItems, hasItem("Buy some milk")));The structure of this code is illustrated in A Serenity Screenplay Pattern assertion
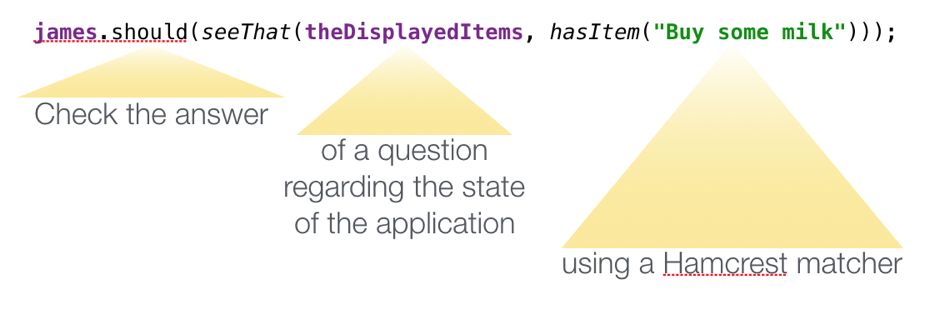
As you might expect, this code checks a value retrieved from the application (the items displayed on the screen) against an expected value (described by a Hamcrest expression). However, rather than passing an actual value, we pass a Question object. The role of a Question object is to answer a precise question about the state of the application, from the point of view of the actor, and typically using the abilities of the actor to do so.
9.12. Actors use their abilities to interact with the system
Let’s see this principle in action in another test. The Todo application has a counter in the bottom left hand corner indicating the remaining number of items (see The number of remaining items is displayed in the bottom left corner of the list).
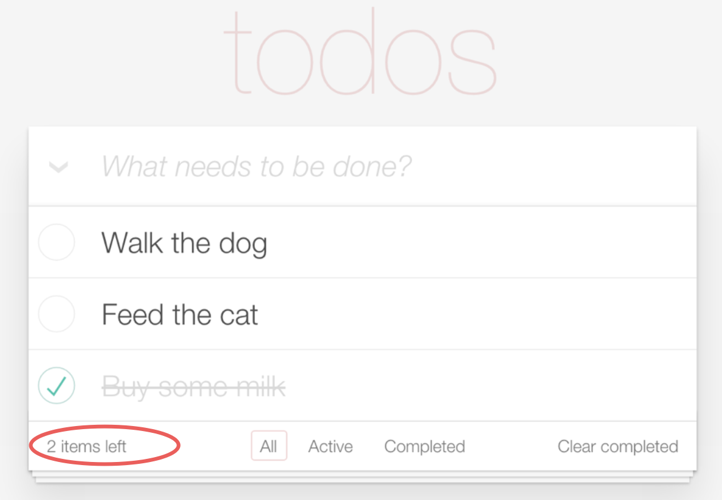
The test to describe and verify this behavior could look like this:
    @Test
    public void items_left_counter_should_be_decremented_when_an_item_is_completed() {

        givenThat(james).wasAbleTo(OpenTheApplication.onTheHomePage());
        andThat(james).wasAbleTo(AddTodoItems.called("Walk the dog", "Put out the garbage"));

        when(james).attemptsTo(
                Complete.itemCalled("Walk the dog")
        );

        then(james).should(seeThat(TheRemainingItemCount.value(), is(1)));
    }
    // end::items_left_counter_should_be_decremented_when_an_item_is_completed

    @Test
    public void completed_items_should_not_appear_in_the_active_list() {

        givenThat(james).wasAbleTo(OpenTheApplication.onTheHomePage());
        andThat(james).wasAbleTo(AddTodoItems.called("Walk the dog", "Put out the garbage"));

        when(james).attemptsTo(
                Complete.itemCalled("Walk the dog"),
                FilterItems.byStatus(Active)
        );

        then(james).should(seeThat(theDisplayedItems, not(contains("Walk the dog"))));
    }

}
The test needs to check that the number of remaining items is 1. The corresponding assertion is in the last line of the test:
then(james).should(seeThat(TheRemainingItemCount.value(), is(1)));The Question object here is defined by the TheRemainingItemCount class. This class has one very precise responsibility: to read the number in the remaining item count text displayed at the bottom of the todo list.
The static value()` method is a simple factory method that returns a new instance of the TheRemainingItemCount class. This is simply to make the code read more fluently.
Question objects are similar to Task and Action objects. However, instead of the performAs() used for Tasks and Actions, a Question class needs to implement the answeredBy(actor) method, and return a result of a specified type. The TheRemainingItemCount class is configured to return an Integer. Since it will be querying the web interface, we can extend the WebQuestion class to give us access to the powerful Serenity WebDriver API.
public class TheRemainingItemCount extends WebQuestion implements Question<Integer> {
    @Override
    public Integer answeredBy(Actor actor) {...}
}
Serenity provides a number of Interaction classes that let you query the web page using a fluent API. A simple implementation using this approach might be the following:
    public Integer answeredBy(Actor actor) {
        return Text.of(TodoCounter.ITEM_COUNT)
                   .onTheScreenOf(actor)
                   .asInteger();
    }
There are interaction classes for most WebDriver calls, including:
-
Attribute
-
CSSValue
-
CurrentlyEnabled
-
CurrentVisibility
-
Enabled
-
JavaScript
-
Presence
-
SelectedOptions
-
SelectedStatus
-
SelectedValue
-
SelectedVisibleTextValue
-
Text
-
TheCoordinates
-
TheLocation
-
TheSize
-
Value
-
Visibility
A few examples of these methods are shown here:
Read the visible text value of a the COUNTRY dropdown list:
String country = SelectedVisibleTextValue.of(ProfilePage.COUNTRY).onTheScreenOf(actor).value();Determine whether the completeItemButton checkbox is checked:
Boolean itemChecked = SelectedStatus.of(completeItemButton).onTheScreenOf(actor).as(Boolean.class);Determine whether the completeItemButton checkbox is checked:
Boolean itemChecked = SelectedStatus.of(completeItemButton).onTheScreenOf(actor).as(Boolean.class);Return a list of all the elements matching the TODO_ITEMS target:
return Text.of(ToDoList.TODO_ITEMS)
           .onTheScreenOf(actor)
           .asList();
10. Advanced WebDriver integration
10.1. Custom WebDriver implementations
You can add your own custom WebDriver provider by implementing the DriverSource interface. First, you need to set up the following system properties (e.g. in your serenity.properties file):
webdriver.driver = provided
webdriver.provided.type = mydriver
webdriver.provided.mydriver = com.acme.MyPhantomJSDriver
thucydides.driver.capabilities = mydriver
Your custom driver must implement the DriverSource interface, as shown here:
public class MyPhantomJSDriver implements DriverSource {

    @Override
    public WebDriver newDriver() {
        try {
            DesiredCapabilities capabilities = DesiredCapabilities.phantomjs();
            // Add
            return new PhantomJSDriver(ResolvingPhantomJSDriverService.createDefaultService(), capabilities);
        }
        catch (IOException e) {
            throw new Error(e);
        }
    }

        @Override
    public boolean takesScreenshots() {
        return true;
    }
}
This driver will now take screenshots normally.
11. Running Remote tests
You can also use Serenity to run your WebDriver tests on a remote machine, such as a Selenium Grid or a remote service such as provided by SauceLabs or BrowserStack. This allows you to run your web tests against a variety of different browsers and operating systems, and also benefit from faster test execution when running the tests in parallel.
In all cases, you tell Serenity to run tests remotely by using the Selenium Remote driver,
11.1. Running tests against a Selenium Grid server
Selenium Grid allows you to run tests on a number of remote machines. It is open source, and relatively easy to set up and configure.
To run your Serenity tests on a Selenium Grid, you need to provide the URL of the Selenium Hub using the webdriver.remote.url property. You may also want to provide more information about how and where you want to run your tests, using the following properties:
webdriver.remote.driver:: What driver to use remotely (firefox,chrome,iexplorer etc.)
webdriver.remote.browser.version:: What version of the remote browser to use
webdriver.remote.os:: What operating system the tests should be run on.
For example, if you were running a Selenium Hub locally on port 4444 (the default),
mvn verify -Dwebdriver.remote.url=http://localhost:4444/wd/hub -Dwebdriver.remote.driver=chrome -Dwebdriver.remote.os=WINDOWS
If you are running PhantomJS remotely, you may need to specify what port PhantomJS is to run on using the phantomjs.webdriver property.
mvn verify -Dphantomjs.webdriver=5555 -Dwebdriver.remote.url=http://seleniumgrid:4444/wd/hub
You can also pass the usual driver-specific capabilities to the remote browser
mvn verify -Dwebdriver.remote.url=http://localhost:4444/wd/hub -Dwebdriver.remote.driver=chrome -Dwebdriver.remote.os=WINDOWS -Dchrome.switches="--no-sandbox,--ignore-certificate-errors,--homepage=about:blank,--no-first-run"
11.2. Running tests on Appium
Serenity supports running tests on mobile devices/emulators out of the box with Appium.
You just need to install Appium:
(sudo) npm install -g appium --chromedriver_version="2.16"
Afterwards Appium is available as command and can be started by invoking the following command:
appium
Then adopt serenity.properties to run on an Android device:
webdriver.driver= appium
webdriver.base.url = http://www.google.com/
appium.hub = http://127.0.0.1:4723/wd/hub
appium.platformName = Android
appium.platformVersion = 5.1.1
appium.deviceName = e2f5c460
appium.browserName = Chrome
Here’s an example for iOS:
webdriver.driver= appium
webdriver.base.url = http://www.google.com/
appium.hub = http://127.0.0.1:4723/wd/hub
appium.platformName = iOS
appium.platformVersion = 8.1
appium.deviceName = iPhone 5
appium.browserName = Safari
Besides the properties file you can also use commandline switches:
mvn test -Dappium.hub=http://127.0.0.1:4723/wd/hub -Dwebdriver.driver=appium -Dappium.platformName=iOS -Dappium.browserName=Safari -Dappium.deviceName="iPhone 5"
You can also add Appium to an existing grid. See the Appium documentation for more details about the node-config option.
11.3. Running tests on SauceLabs
Serenity has special support for running tests on the Cloud-based testing platform SauceLabs. The general approach is the same as discussed above, but there are a few extra Saucelabs-specific properties:
saucelabs.url-
Usually of the form http://<my_id>:<my_API Key>@ondemand.saucelabs.com:80/wd/hub
saucelabs.target.platformsaucelabs.driver.versionsaucelabs.test.name-
The name of the test as it will appear on the Saucelabs site
saucelabs.access.key-
Your Saucelabs API key, optional, used to generate links to the Saucelabs results
saucelabs.user.id-
Your Saucelabs User ID, optional, used to generate links to the Saucelabs results
saucelabs.record.screenshots::Saucelabs records screenshots as well as videos by default. Since Serenity also records screenshots, this feature is disabled by default. It can be reactivated using this system property saucelabs.implicit.wait-
Override the default implicit timeout value for the Saucelabs driver
An example of running tests on Saucelabs is shown here:
mvn verify -Dsaucelabs.target.platform=XP -Dwebdriver.driver=chrome -Dsaucelabs.driver.version=26 -Dsaucelabs.url=http://<my_id>:<my_API Key>@ondemand.saucelabs.com:80/wd/hub -Dsaucelabs.access.key=<My_API_Key> -Dsaucelabs.user.id=<my_id> -Dwebdriver.base.url=https://www.website.com -Dmaven.test.failure.ignore=true
In case if you need to define an OS-Browser Combination, you should change serenity.driver.capabilities as follows:
serenity.driver.capabilities="browserName:iphone; deviceName:iPad Retina; version:9.2"
11.5. Running tests on BrowserStack
The setup for running tests on BrowserStack is similar to the one for SauceLabs. The following system properties are available:
browserstack.url-
BrowserStack Hub URL if running the tests on BrowserStack Cloud
browserstack.os-
OS type (e.g. WINDOWS, OS X)
browserstack.os_version-
OS version (e.g. Windows: XP, 7, 8 and 8.1; OS X: Snow Leopard, Lion, Mountain Lion, Mavericks, Yosemite, El Capitan)
browserstack.browser-
Browser type (e.g. Firefox, Safari, IE, Chrome, Opera)
browserstack.browser_version-
Browser version (defaults to latest stable; check list of available browsers)
browserstack.device-
BrowserStack mobile device name on which tests should be run
browserstack.deviceOrientation-
Set the screen orientation of BrowserStack mobile device (portrait or landscape, default: portrait)
browserstack.project-
Specify a name for a logical group of builds on BrowserStack
browserstack.build-
Specify a name for a logical group of tests on BrowserStack
browserstack.name-
Specify an identifier for the test run on BrowserStack
browserstack.local-
For Testing against internal/local servers on BrowserStack
browserstack.debug-
Generates screenshots at various steps in tests on BrowserStack
browserstack.resolution-
Sets resolution of VM on BrowserStack
browserstack.selenium_versionbrowserstack.ie.noFlash-
Disable flash on Internet Explorer on BrowserStack
browserstack.ie.driver-
Specify the Internet Explorer webdriver version on BrowserStack
browserstack.ie.enablePopups-
Enable the popup blocker in Internet Explorer on BrowserStack
12. Managing screenshots
By default, Serenity saves a screenshot for every step executed during the tests. Serenity can be configured to control when screenshots are stored.
12.1. Configuring when screenshots are taken
The property serenity.take.screenshots can be set to configure how often the screenshots are taken. This property can take the following values:
FOR_EACH_ACTION-
Saves a screenshot at every web element action (like click(), typeAndEnter(), type(), typeAndTab() etc.).
BEFORE_AND_AFTER_EACH_STEP-
Saves a screeshot before and asfter every step.
AFTER_EACH_STEP-
Saves a screenshot after every step
FOR_FAILURES-
Saves screenshots only for failing steps. This can save disk space and speed up the tests a little. It is very useful for data-driven testing.
DISABLED-
Doesn’t save screenshots for any steps.
12.2. Using annotations to control screenshots
An even more granular level of control is possible using annotations. You can annotate any test or step method (or any method used by a step or test) with the @Screenshots annotation to override the number of screenshots taken within this step (or sub-step). Some sample uses are shown here:
@Step
@Screenshots(onlyOnFailures=true)
public void screenshots_will_only_be_taken_for_failures_from_here_on() {…}

@Test
@Screenshots(forEachStep=true)
public void should_take_screenshots_for_each_step_in_this_test() {…}

@Test
@Screenshots(forEachAction=true)
public void should_take_screenshots_for_each_action_in_this_test() {…}

@Test
@Screenshots(disabled=true)
public void should_not_take_screenshots_for_any_action_in_this_test(() {…}
12.3. Taking screenshots at any arbitrary point during a step
It is possible to have even finer control on capturing screenshots in the tests. Using the takeScreenshot method, you can instruct Serenity to take a screenshot at any arbitrary point in the step irrespective of the screenshot level set using configuration or annotations.
Simply call Serenity.takeScreenshot() in the step methods whenever you want a screenshot to be captured.
12.4. Increasing the size of screenshots
Sometimes the default window size is too small to display all of the application screen in the screenshots. You can increase the size of the window Serenity opens by providing the Serenity.browser.width and Serenity.browser.height system properties. For example, to use a browser window with dimensions of 1200x1024, you could do the following:
$ mvn clean verify -Dserenity.browser.width=1200 -DSerenity.browser.height=1024
Typically, the width parameter is the only one you will need to specify, as the height will be determined by the contents of the browser page.
If you are running Serenity with JUnit, you can also specify this parameter (and any of the others, for that matter) directly in your pom.xml file, in the maven-surefire-plugin configuration, e.g:
<build>
    <plugins>
        <plugin>
            <groupId>org.apache.maven.plugins</groupId>
            <artifactId>maven-surefire-plugin</artifactId>
            <version>2.7.1</version>
            <configuration>
                <argLine>-Xmx1024m</argLine>
                <systemPropertyVariables>
                    <serenity.browser.width>1200</serenity.browser.width>
                </systemPropertyVariables>
            </configuration>
        </plugin>
        ...
When the browser width is larger than 1000px, the slideshow view in the reports will expand to show the full screenshots.
Note there are some caveats with this feature. In particular, it will not work at all with Chrome, as Chrome, by design, does not support window resizing. In addition, since WebDriver uses a real browser, so the maximum size will be limited by the physical size of the browser. This limitation applies to the browser width, as the full vertical length of the screen will still be recorded in the screenshot even if it scrolls beyond a single page.
12.4.1. Screenshots and OutOfMemoryError issues
Selenium needs memory to take screenshots, particularly if the screens are large. If Selenium runs out of memory when taking screenshots, it will log an error in the test output. In this case, configure the maven-surefire-plugin to use more memory, as illustrated here:
<plugin>
    <groupId>org.apache.maven.plugins</groupId>
    <artifactId>maven-surefire-plugin</artifactId>
    <version>2.7.1</version>
    <configuration>
        <argLine>-Xmx1024m</argLine>
    </configuration>
</plugin>
12.5. Saving raw screenshots
Serenity saves only rescaled screenshots by default. This is done to help reduce the disk space taken by reports. If you require to save the original unscaled screenshots, this default can be easily overridden by setting the property, serenity.keep.unscaled.screenshots to true.
12.6. Saving HTML source files for screenshots
It is possible to save html source files for the screenshots by setting the property, serenity.store.html.source to true. Html source files are not saved by default to conserve disk space.
12.7. Blurring sensitive screenshots
For security/privacy reasons, it may be required to blur sensitive screenshots in Serenity reports. This can be done by annotating the test methods or steps with the annotation @BlurScreenshots. When defined on a test, all screenshots for that test will be blurred. When defined on a step, only the screenshot for that step will be blurred. @BlurredScreenshot takes a string parameter with values LIGHT, MEDIUM or HEAVY to indicate the amount of blurring. For example,
@Test
@BlurScreenshots("HEAVY")
public void looking_up_the_definition_of_pineapple_should_display_the_corresponding_article() {
    endUser.is_the_home_page();
    endUser.looks_for("pineapple");
    endUser.should_see_definition_containing_words("A thorny fruit");
}
A screen at various blur levels is shown below.

13. Retrying failed tests
Sometimes it is required to retry a failed test. This can be achieved by setting the system properties junit.retry.tests to true and max.retries to the number of times you want failed tests to be retried. If max.retries provided and junit.retry.tests=true, all method tests will be executed until first successful run, but not more than 1 + max.retries times.
Here is short example, for it we will use next test class:
@RunWith(SerenityRunner.class)
public class SampleTest {

    @Steps
    TestSteps steps;

    @Test
    public void shouldExecuteThisTest() {
        steps.initialization(2);
        steps.when_example_action_for(1);
        steps.then_example_result_should_be(2);
    }
}
Steps class:
public class TestSteps {

    private static Integer counter = 2;

    @Step
    public void initialization(final int value) {
        action();
    }

    @Step
    public void when_example_action_for(final int value) {
        action();
        Assert.assertTrue(true);
    }

    @Step
    public void then_example_result_should_be(final int value) {
        action();
        Assert.assertTrue(--counter <= 0);
    }

    private void action() {
        //some action
    }
}
If this test will be executed - it will fail:
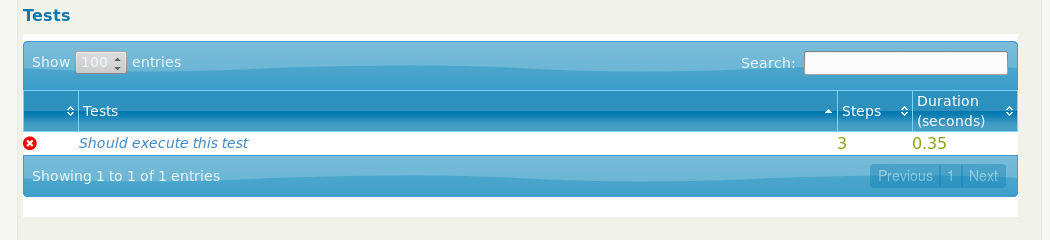
If we provide next properties in serenity.property file, framework will execute tests more according to configuration until test will be successful or number of tries will be reached:
max.retries=4
junit.retry.tests=true
After executing same test it will be successful - because method then_example_result_should_be fails only twice, and third "try" will successful:
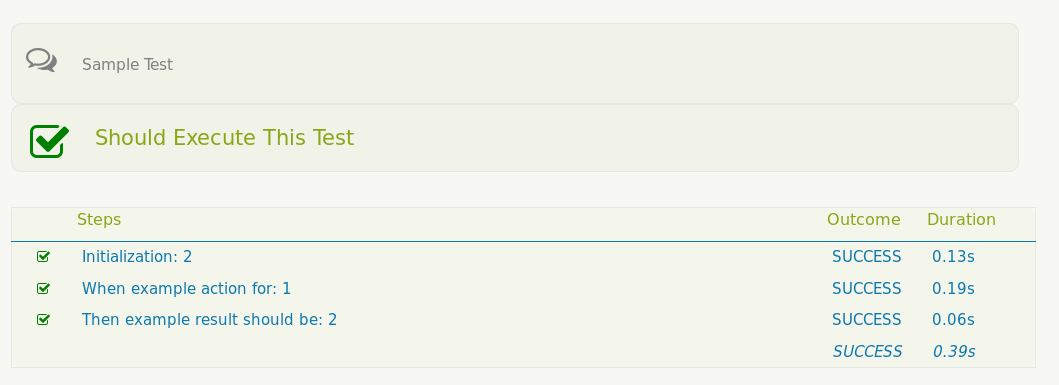
If you’re using Jenkins for aggregating your test results use this folder pattern for JUnit test results:
target/site/serenity/SERENITY-JUNIT-*.xml
This will exclude the previous failed tests from your report.
14. Filtering test executing with tags
In real-world projects, scenarios can become quite numerous, and it’s important to keep them well organized. You may also need to be able to identify and group scenarios in different ways; for example, you might want to distinguish UI-related scenarios from batch-processing scenarios, or identify the regression scenarios only.
Tags are also a great way to help organize test execution. For example, you might want to flag all of the web services tests, or mark certain tests to run against Internet Explorer browser only.
14.1. Annotating scenarios with tags
Tags are added to JUnit tests using WithTag annotation. The following will add a tag of type epic with name Audit:
@WithTag(type="epic", name="Audit")If no type is defined, the default tag type is assumed to be feature. In other words, the following two tags are equivalent:
@WithTag(type="feature", name="Reporting")
@WithTag(name="Reporting")
WithTag has an alternative, more concise syntax using a colon (:) to separate the tag type and name. For example:
@WithTag("epic:Audit")or
@WithTag("feature:Reporting")Multiple tags can be added using @WithTags annotation or it’s shorter version - @WithTagsValuesOf:
@WithTags (
        {
                @WithTag(type="feature", name="Reporting"),
                @WithTag(type="release", name="sprint-2")
        }
)
Using @WithTagsValuesOf, the above can be written more succinctly as:
@WithTagsValuesOf({"Reporting", "release:sprint-2"})In JBehave, you can add tags using the Meta keyword:
Download account statements

Meta:               (1)
@web @iexplorer     (2)

Scenario: Download account statement in SWIFT MT940 format| 1 | Tags need to be introduced by the Meta keyword |
| 2 | Tags start with @ and can be any text value |
With Cucumber, things are even simpler:
Feature: Download account statements
@web @iexplorer     (1)
Scenario: Download account statement in SWIFT MT940 format| 1 | Cucumber doesn’t need the Meta keyword |
This way, when executing the tests, you can configure one or more filters to run (or exclude from run) the tests with a particular tag.
You can also use tags as a powerful reporting tool. Using @tag or @tags, Serenity lets you define tags that will appear in the test reports:
Executing an international payment

Meta:
@tag component: payment     (1)

Scenario: Executing an international payment as a standing order
| 1 | Scenarios in this file all involve the Payment component |
These tags can take any name and value combination and so can be used to report on whatever aspects you need in the living documentation.
In @Step libraries you have access to both read and add tag values.
|
To access current tags:
@Step
public void should_run_just_for_end_to_end_tests () {

        Map<String, String> metadata = Serenity.getCurrentSession().getMetaData();

        if (!metadata.get("level").equalsIgnoreCase("system")) {
                StepEventBus.getEventBus().testIgnored();
        }
        else {
                // step logic
        }
}
To add tags to existing ones:
public void add_tags_based_on_sidebar_status () {
        if (sidebar().shows(REPORTS)) {
                List<TestTag> myTags = Lists.newArrayList(TestTag.withName("Reports").andType("feature"));
                StepEventBus.getEventBus().addTagsToCurrentStory(myTags);
        } elseif (sidebar().shows(DOCUMENTS)) {
                List<TestTag> myTags = Lists.newArrayList(TestTag.withName("Documents").andType("feature"));
                StepEventBus.getEventBus().addTagsToCurrentStory(myTags);
        }
}
14.2. Running scenarios by tags
You can filter tests by tag while running Serenity.
14.2.1. JUnit
With JUnit tests, this can be achieved by providing a single tag or a comma separated list of tags from command line. If provided, only classes and/or methods with tags in this list will be executed.
mvn clean verify -Dtags="release:sprint-2"or
mvn clean verify -Dtags="feature:Reporting, release:sprint-2"14.2.2. Cucumber
With Cucumber framework, you need to use the cucumber.options system property for tests filtering.
mvn clean verify -Dcucumber.options="--tags release:sprint-2"14.2.3. JBehave
In case JBehave is your framework of choice, you can filter tests by using -Dmetafilter in your maven command, as follows:
mvn clean verify -Dmetafilter="+feature Reporting"Using JBehave meta matchers you are not only able to specify which tests to run, but also which tests to skip:
mvn clean verify -Dmetafilter="+release sprint-1 -skip"In the above example, will skip running all the tests assigned to sprint-1. We can even skip a subset of tests, as shown below:
mvn clean verify -Dmetafilter="+release sprint-2 -feature Reporting"Using this command, we will execute all test cases assigned to sprint-2, excluding those ones written for Reporting feature.
| With JBehave meta matchers, you can use powerful groovy matchers for advanced tests filtering |
mvn clean verify -Dmetafilter="groovy: level ==~ /.*[testing|regression].*/"Please read available JBehave documentation for more info on meta matchers.
15. Integration with Issue & Project Tracking systems
Serenity BDD provides different ways of integration with issue and project tracking systems. Most simple way - including references to issues in reports of tests. Also Serenity BDD allow create two way JIRA integrations.
15.1. Linking scenarios/tests with issues
Serenity BDD allows create links between stories/tests and issues. Sometimes it is useful for complex development workflow, and for organizing self-documented tests.
Configuration of links is made by annotations and property serenity.issue.tracker.url that can be provided in serenity.params or using system variables. The URL provided by serenity.issue.tracker.url is used as "body of link", and issue name provided in annotations - last part of this link.
Generally in annotations you should use name of issues according to mask #(NAME)(-)(NUMBER), link will be created to (NAME)(-)(NUMBER), below you can find example.
15.1.1. Linking with issues for JUnit
When tests created with JUnit you can use annotations @Issue, @Issues, @Title.
-
@Issueused for linking single issue. It should be initialised with name of referenced issue, started with# -
@Issuesused for linking multiple issues. It should be initialised with array with names of referenced issues, started with# -
@Titleused for providing readable name of test case (more in Human-readable method titles), also it can be used to linking multiple issues to this scenario - in title should be included name of issue started with#
Here is little example with test cases linked to issues:
serenity.properties contains:
serenity.issue.tracker.url = https://example.server.com/cases/view/{0}test class looks like:
@RunWith(SerenityRunner.class)
public class SampleTest {

    @Steps
    TestSteps steps;

    @Test
    @Title("Test case for some issue #BP-64  ")
    public void shouldExecuteThisTest() {
        steps.initialization();
        steps.when_example_action_for(1);
        steps.then_example_result_should_be(2);
    }

    @Test
    @Title("Tests important bugs : #BP-64,#IS-84")
    public void shouldExecuteThisTestTwo() {
        steps.initialization();
        steps.when_example_action_for(1);
        steps.then_example_result_should_be(2);
    }

    @Test
    @Issue("#NO-97")
    public void shouldExecuteThisTestThree() {
        steps.initialization();
        steps.when_example_action_for(1);
        steps.then_example_result_should_be(2);
    }

    @Test
    @Issues({"#PN-97", "#KB-927"})
    public void shouldExecuteThisTestLast() {
        steps.initialization();
        steps.when_example_action_for(1);
        steps.then_example_result_should_be(2);
    }
}
In this case report will look like:
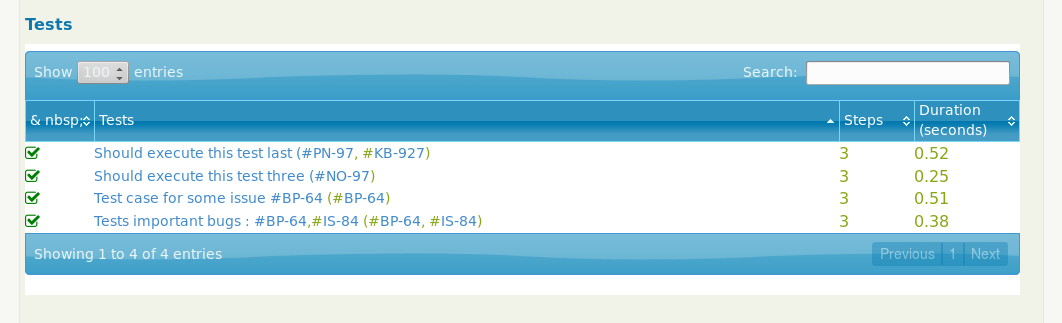
Also, all references clickable and will be :
#PN-97:  https://example.server.com/cases/view/PN-97
#KB-927: https://example.server.com/cases/view/KB-927
#NO-97:  https://example.server.com/cases/view/NO-97
15.1.2. Linking with issues for JBehave
Also you can use the @issue annotation or # in scenario name to link scenarios with issues when using JBehave, as illustrated here:
Meta:
@issue #MYPROJ-1, #MYPROJ-2

Scenario: A scenario that works according #MP-4
Meta:
@issues #MYPROJ-3,#MYPROJ-4
@issue #MYPROJ-5

Given I have an implemented JBehave scenario
And the scenario works
When I run the scenario
Then I should get a successful result
In this case links will be created according same rules as for Linking with issues for JUnit
15.1.3. Linking with issues for Cucumber
The @issue or @issues annotations can be used in Cucumber .feature files to link scenarios with issues , as shown below:
@issues:ISSUE-123,ISSUE-789
Feature: Basic Arithmetic
  Calculating Additions

  Background: A Calculator
    Given a calculator I just turned on

  @issues:ISSUE-456,ISSUE-001
  Scenario: Addition
    When I add 4 and 5
    Then the result is 9

  @issue:ISSUE-456
  Scenario: Another Addition
    When I add 4 and 7
    Then the result is 11
16. Integrating with JIRA
With Selenium BDD it is possible create tight one and two-way integration with JIRA
16.1. One way integration with JIRA
JIRA is a popular issue tracking system that is also often used for Agile project and requirements management. Many teams using JIRA store their requirements electronically in the form of story cards and epics in JIRA
Suppose we are implementing a Frequent Flyer application for an airline. The idea is that travellers will earn points when they fly with our airline, based on the distance they fly. Travellers start out with a “Bronze” status, and can earn a better status by flying more frequently. Travellers with a higher frequent flyer status benefit from advantages such as lounge access, prioritized boarding, and so on. One of the story cards for this feature might look like the following:
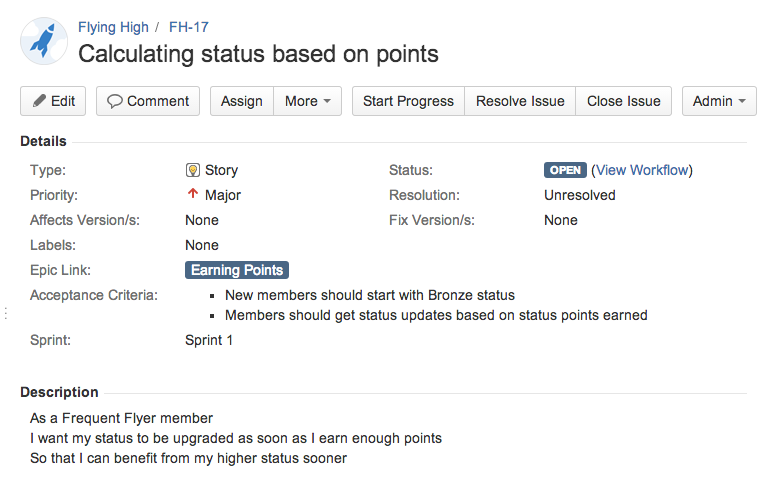
This story contains a description following one of the frequently-used formats for user story descriptions (“as a..I want..so that”). It also contains a custom “Acceptance Criteria” field, where we can write down a brief outline of the “definition of done” for this story.
These stories can be grouped into epics, and placed into sprints for project planning, as illustrated in the JIRA Agile board shown here:
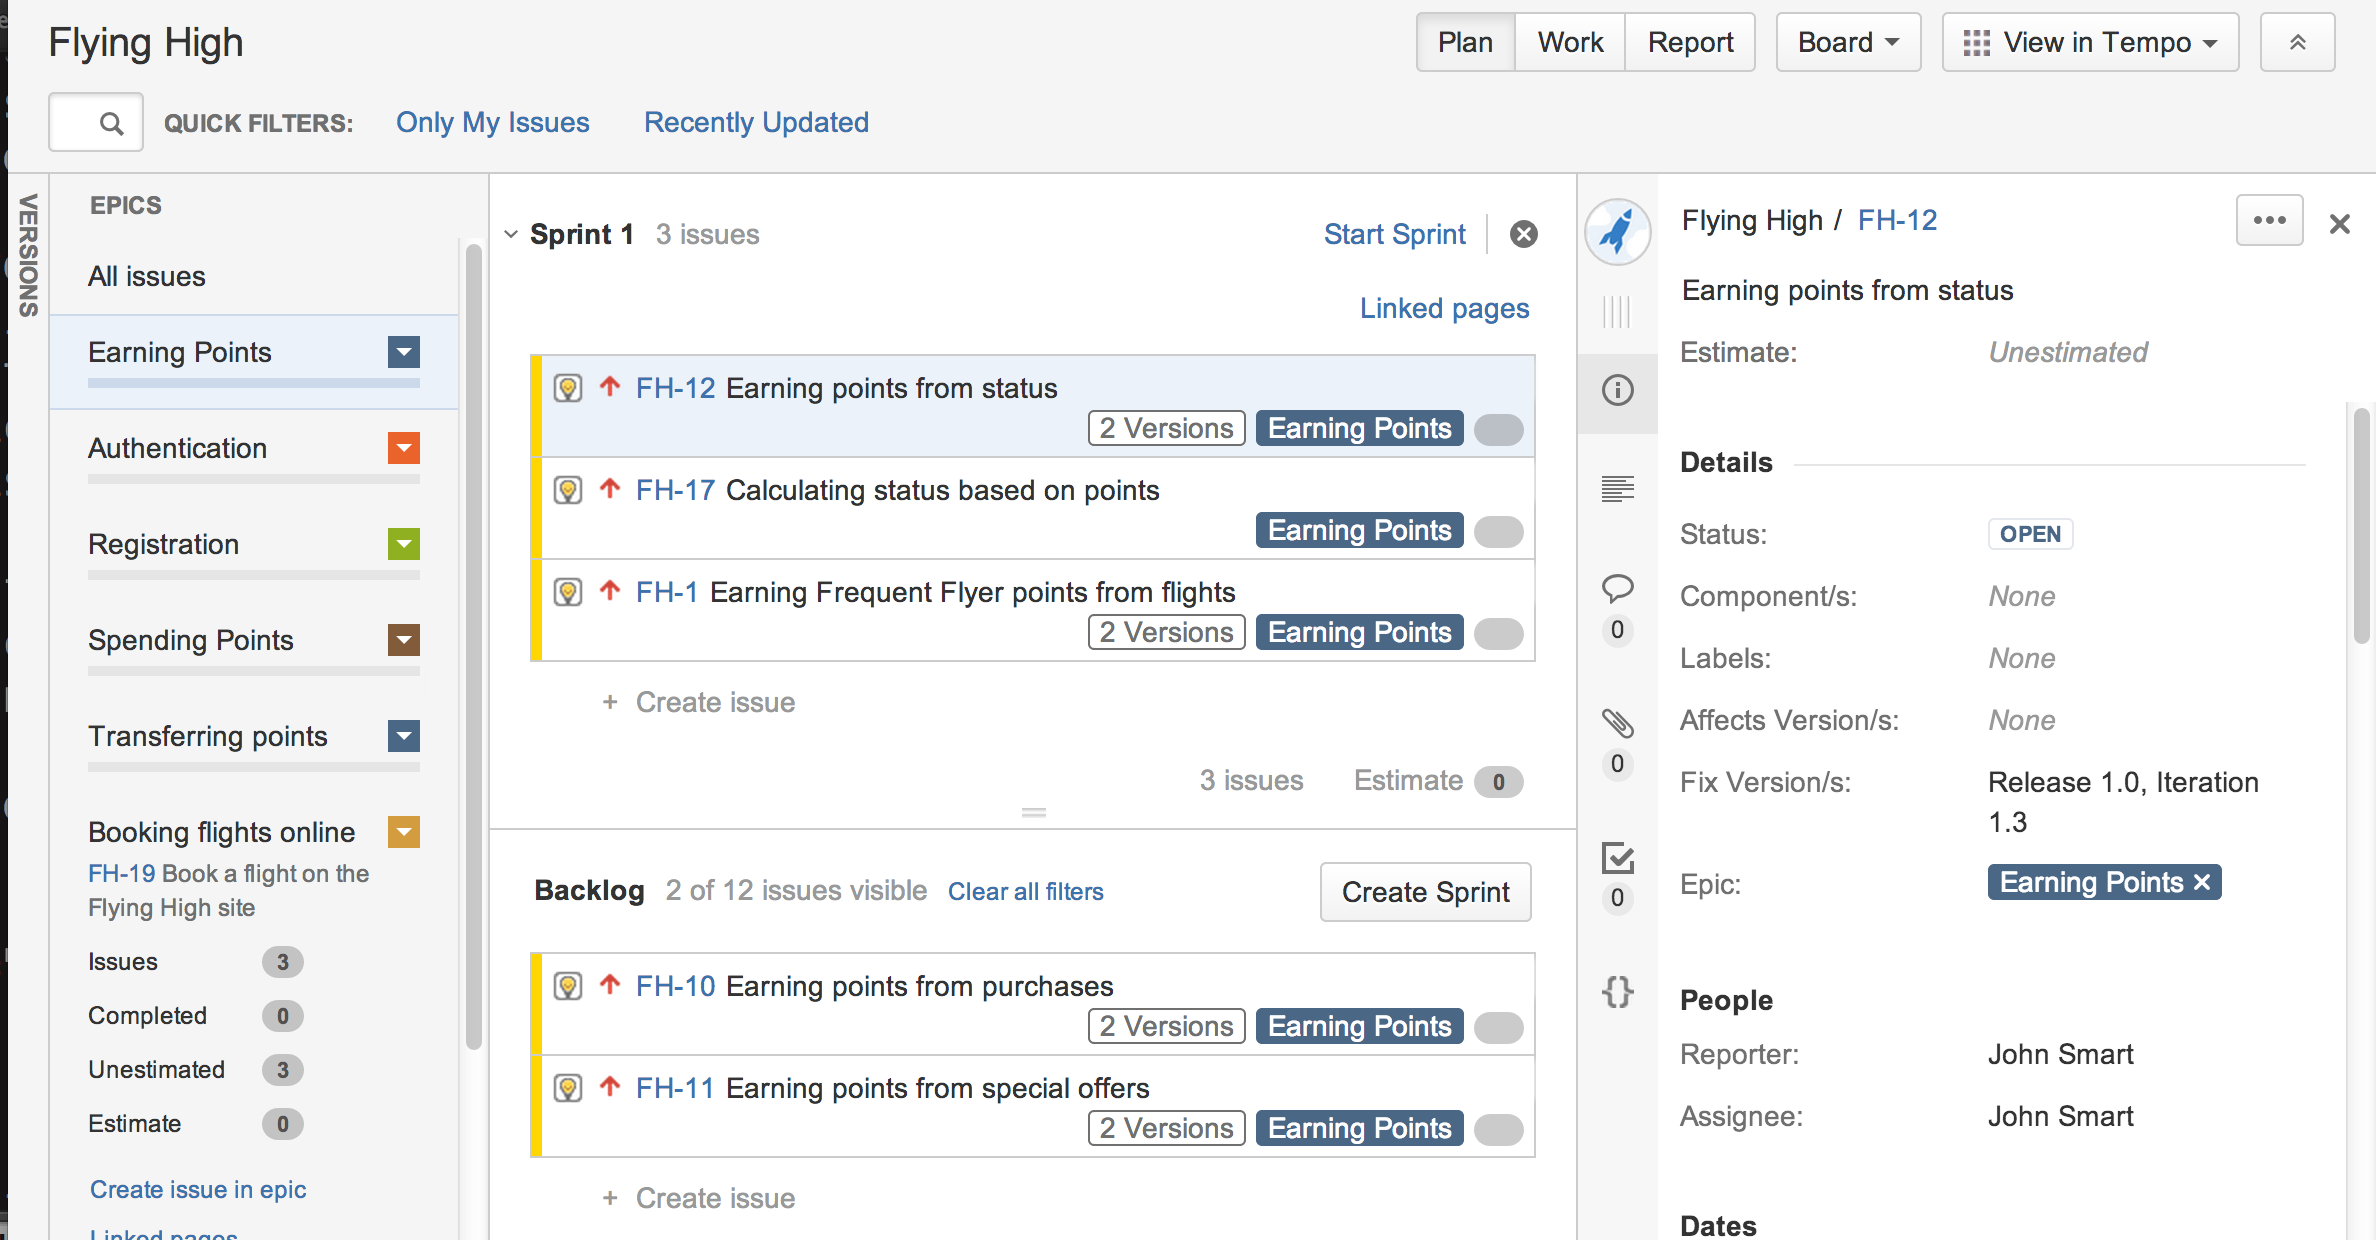
As illustrated in the story card, each of these stories has a set of acceptance criteria, which we can build into more detailed scenarios, based on concrete examples. We can then automate these scenarios using a BDD tool like JBehave.
The story in Frequent Flyer story card describes how many points members need to earn to be awarded each status level. A JBehave scenario for the story card illustrated earlier might look like this:
Frequent Flyer status is calculated based on points

Meta:
@issue #FH-17

Scenario: New members should start out as Bronze members
Given Jill Smith is not a Frequent Flyer member
When she registers on the Frequent Flyer program
Then she should have a status of Bronze

Scenario: Members should get status updates based on status points earned
Given a member has a status of <initialStatus>
And he has <initialStatusPoints> status points
When he earns <extraPoints> extra status points
Then he should have a status of <finalStatus>
Examples:
| initialStatus | initialStatusPoints | extraPoints | finalStatus | notes                    |
| Bronze        | 0                   | 300         | Silver      | 300 points for Silver    |
| Silver        | 0                   | 700         | Gold        | 700 points for Gold      |
| Gold          | 0                   | 1500        | Platinum    | 1500 points for Platinum |
Serenity lets you associate JBehave stories or JUnit tests with a JIRA card using the @issue meta tag (illustrated above), or the equivalent @Issue annotation in JUnit. At the most basic level, this will generate links back to the corresponding JIRA cards in your test reports, as illustrated here:

For this to work, Serenity needs to know where your JIRA server. The simplest way to do this is to define the following properties in a file called serenity.properties in your project root directory:
jira.url=https://myserver.atlassian.net
jira.project=FH
jira.username=jirauser
jira.password=t0psecret
You can also set these properties up in your Maven pom.xml file or pass them in as system properties.
16.1.1. Feature Coverage
But test results only report part of the picture. If you are using JIRA to store your stories and epics, you can use these to keep track of progress. But how do you know what automated acceptance tests have been implemented for your stories and epics, and, equally importantly, how do you know which stories or epics have no automated acceptance tests? In agile terms, a story cannot be declared “done” until the automated acceptance tests pass. Furthermore, we need to be confident not only that the tests exist, but they test the right requirements, and that they test them sufficiently well.
We call this idea of measuring the number (and quality) of the acceptance tests for each of the features we want to build “feature coverage”. Serenity can provide feature coverage reporting in addition to the more conventional test results. If you are using JIRA, you will need to add serenity-jira-requirements-provider to the dependencies section of your pom.xml file:
<dependencies>
    ...
    <dependency>
        <groupId>net.serenity.plugins.jira</groupId>
        <artifactId>serenity-jira-requirements-provider</artifactId>
        <version>xxx</version>
    </dependency>
</dependencies>
(The actual version number might be different for you – always take a look at Maven Central to know what the latest version is).
You will also need to add this dependency to the Serenity reporting plugin configuration:
<build>
    ...
    <plugins>
        ...
        <plugin>
            <groupId>net.serenity.maven.plugins</groupId>
            <artifactId>maven-serenity-plugin</artifactId>
            <version>xxx</version>
            <executions>
                <execution>
                    <id>serenity-reports</id>
                    <phase>post-integration-test</phase>
                    <goals>
                        <goal>aggregate</goal>
                    </goals>
                </execution>
            </executions>
            <dependencies>
                <dependency>
                    <groupId>net.serenity.plugins.jira</groupId>
                    <artifactId>serenity-jira-requirements-provider</artifactId>
                    <version>xxx</version>
                </dependency>
            </dependencies>
        </plugin>
    </plugins>
</build>
Now, when you run the tests, Serenity will query JIRA to determine the epics and stories that you have defined, and list them in the Requirements page. This page gives you an overview of how many requirements (epics and stories) have passing tests (green), how many have failing (red) or broken (orange) tests, and how many have no tests at all (blue):
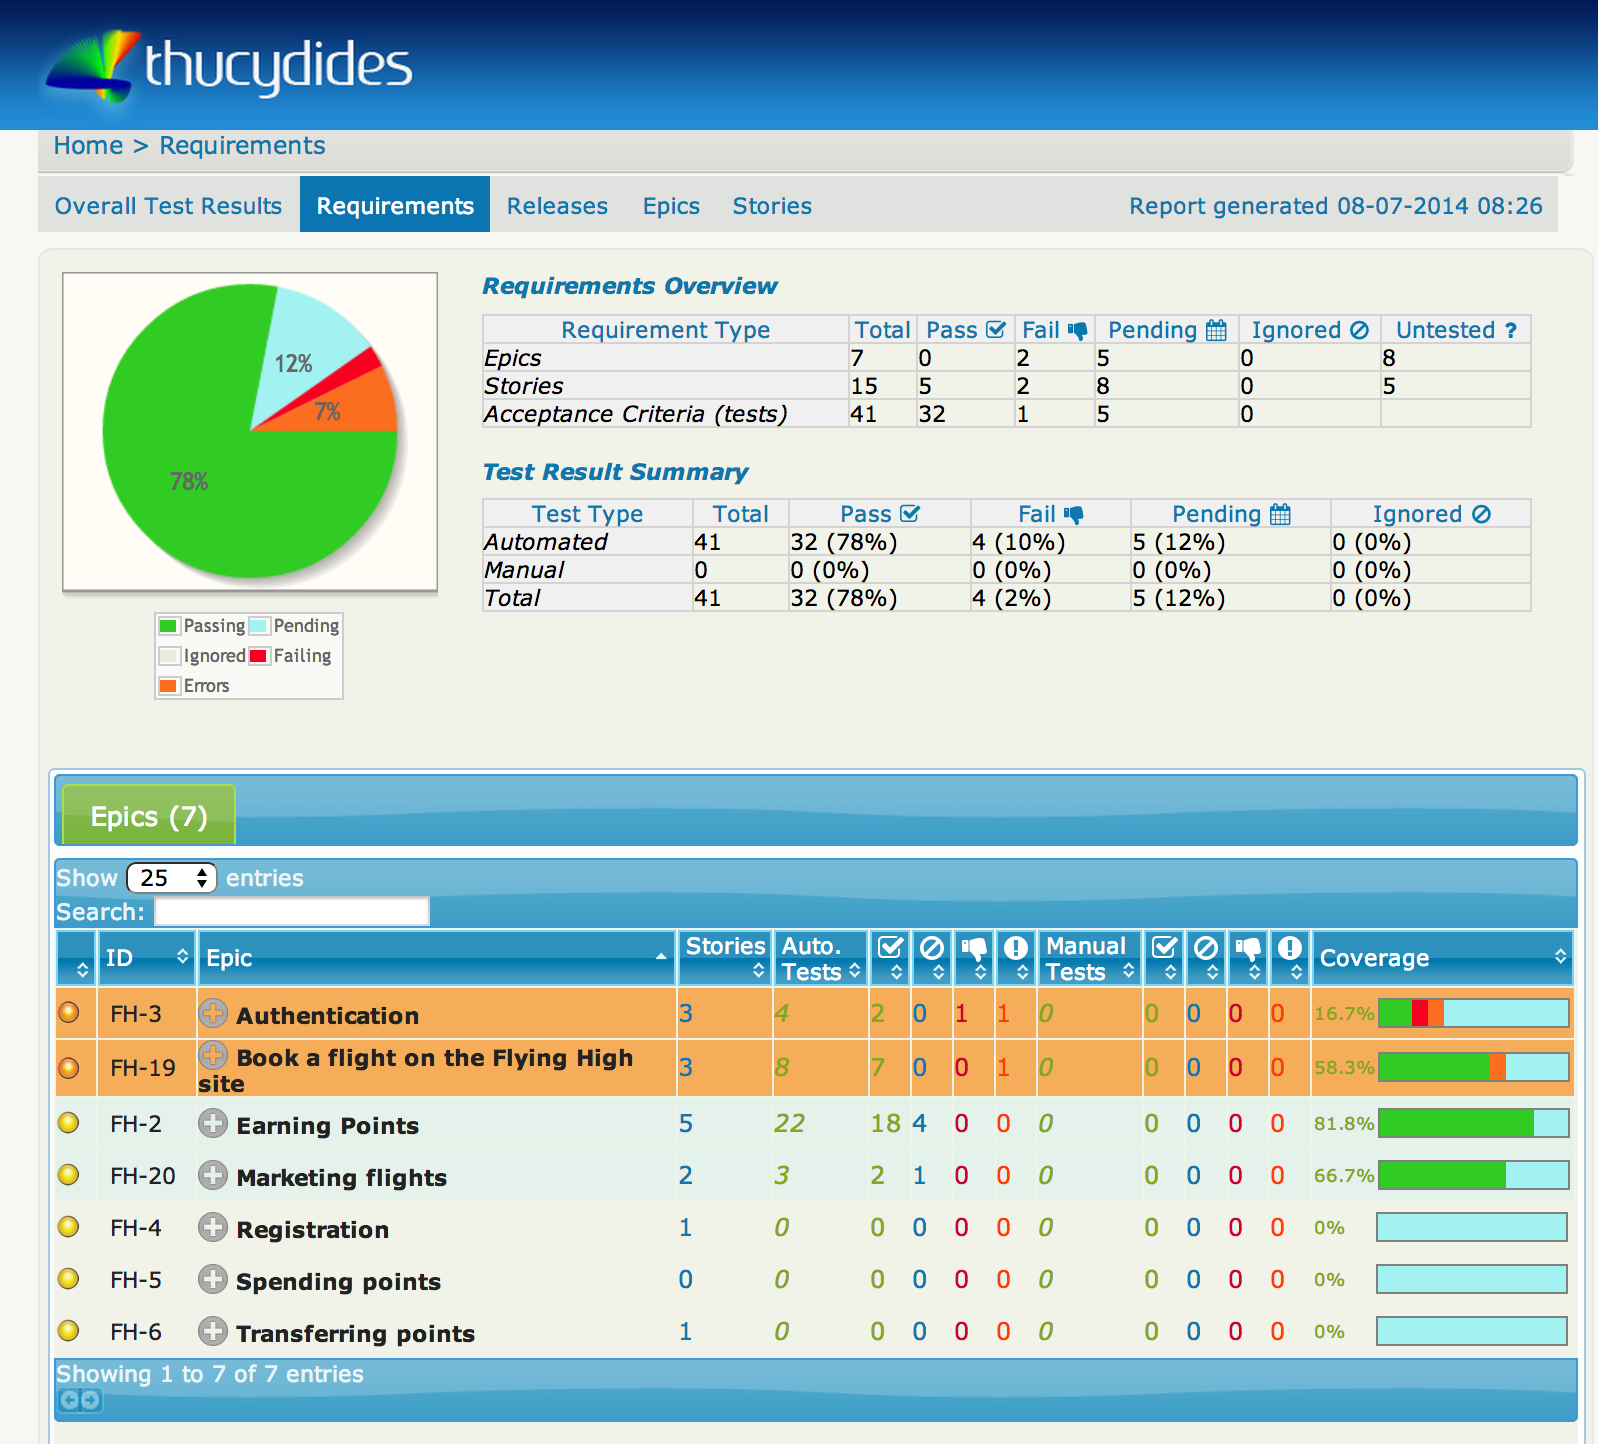
If you click on an epic, you can see the stories defined for the epic, including an indicator (in the “Coverage” column) of how well each story has been tested.
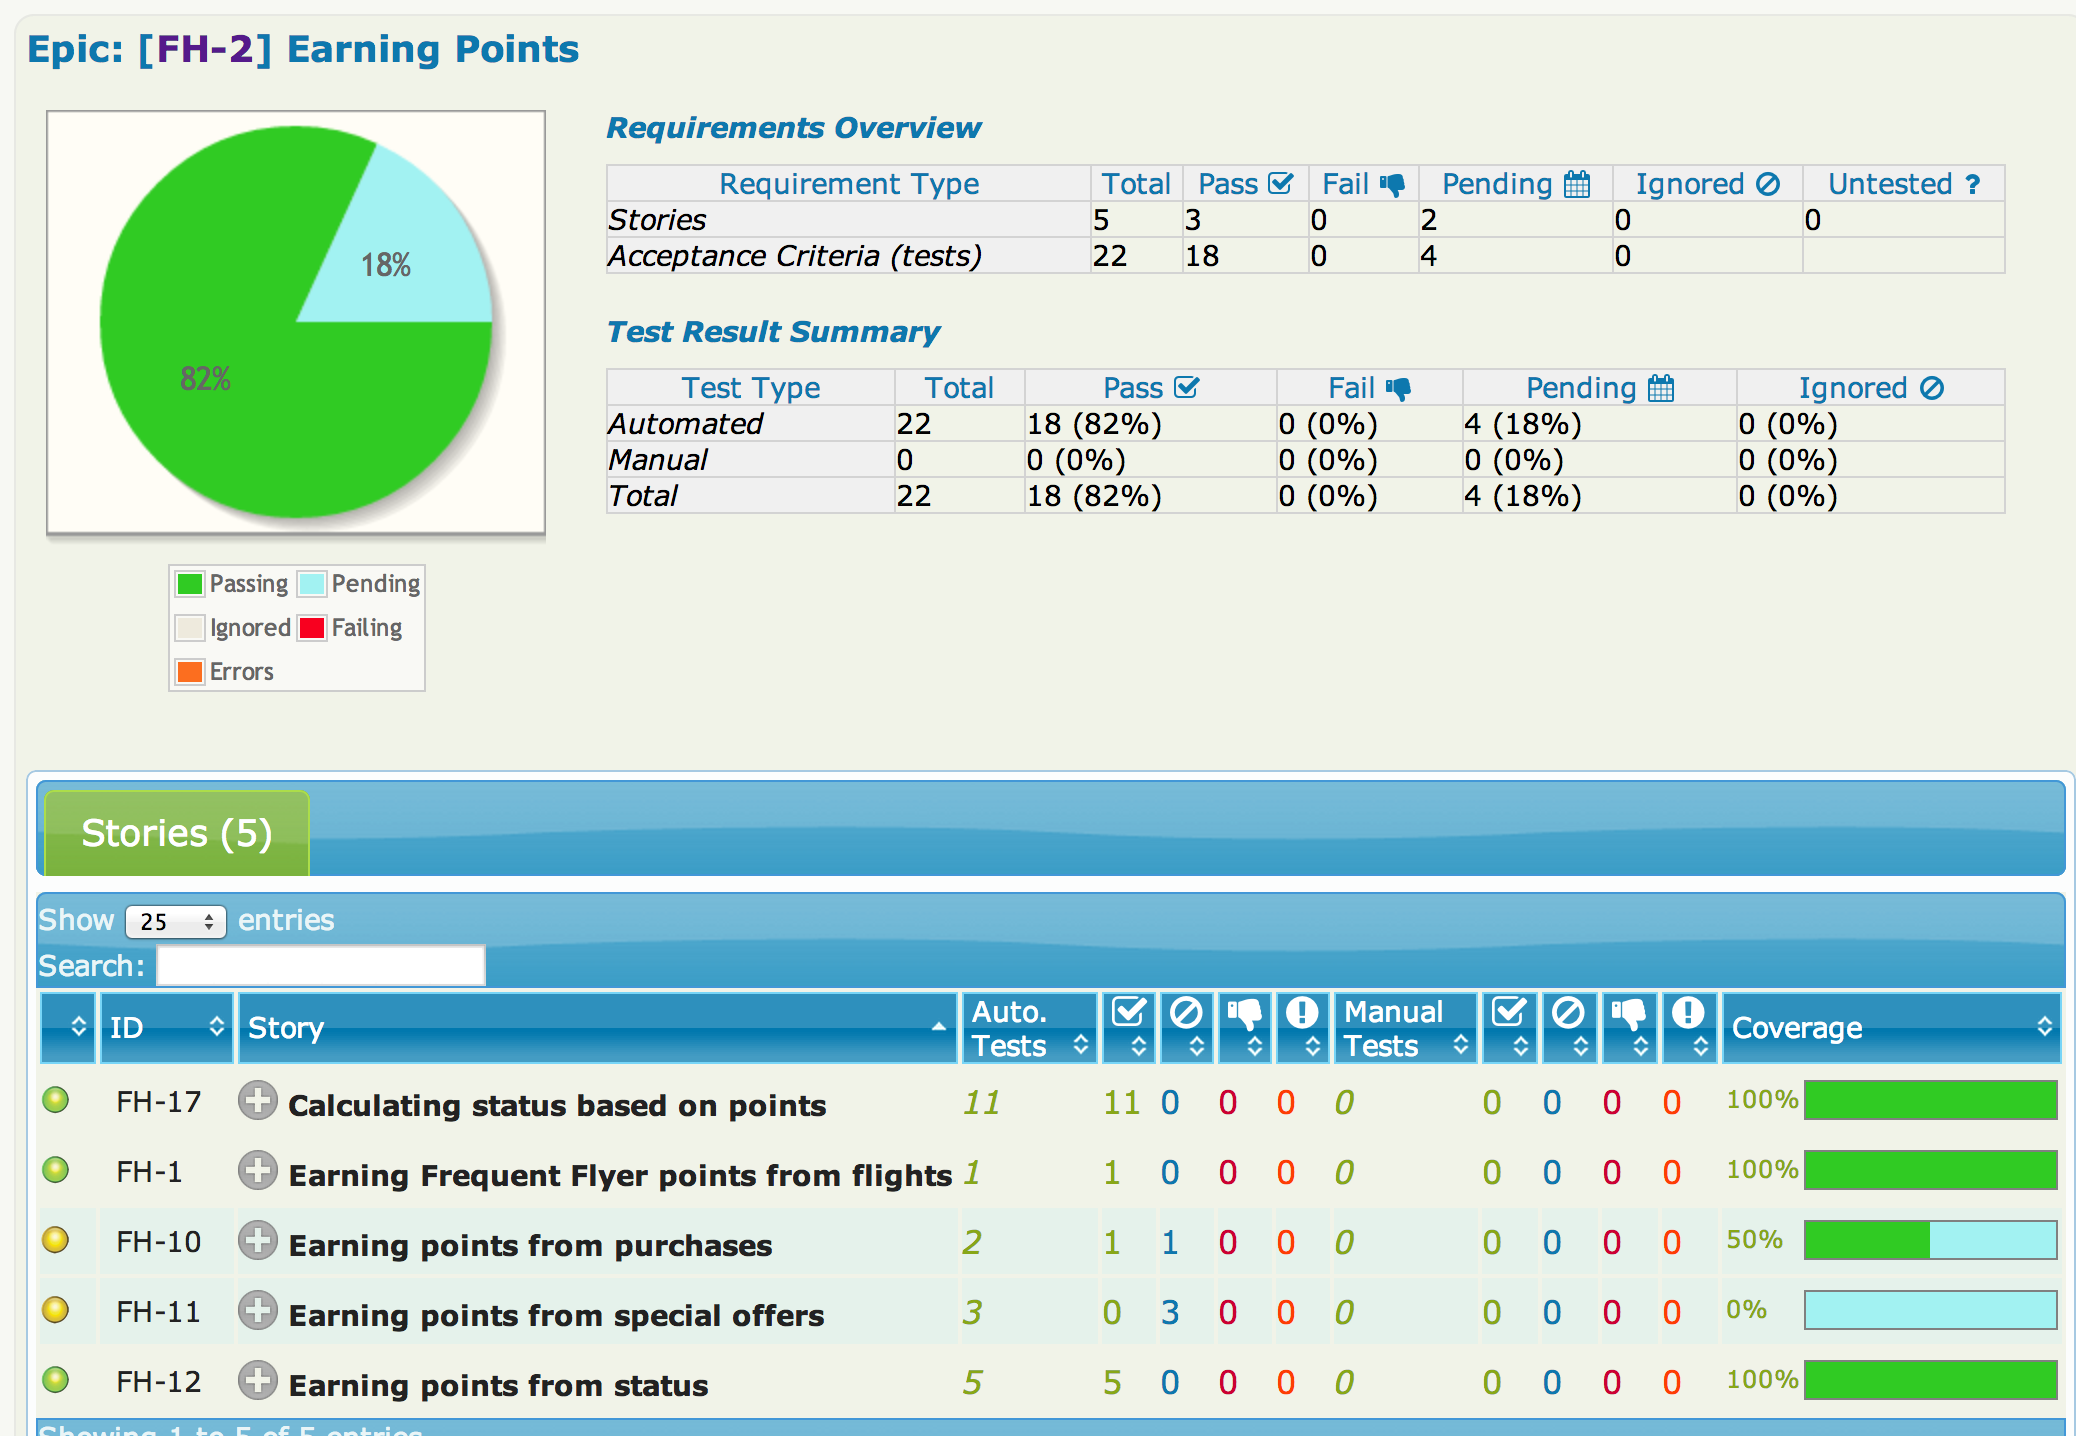
From here, you may want to drill down into the details about a given story, including what acceptance tests have been defined for this story, and whether they ran successfully:
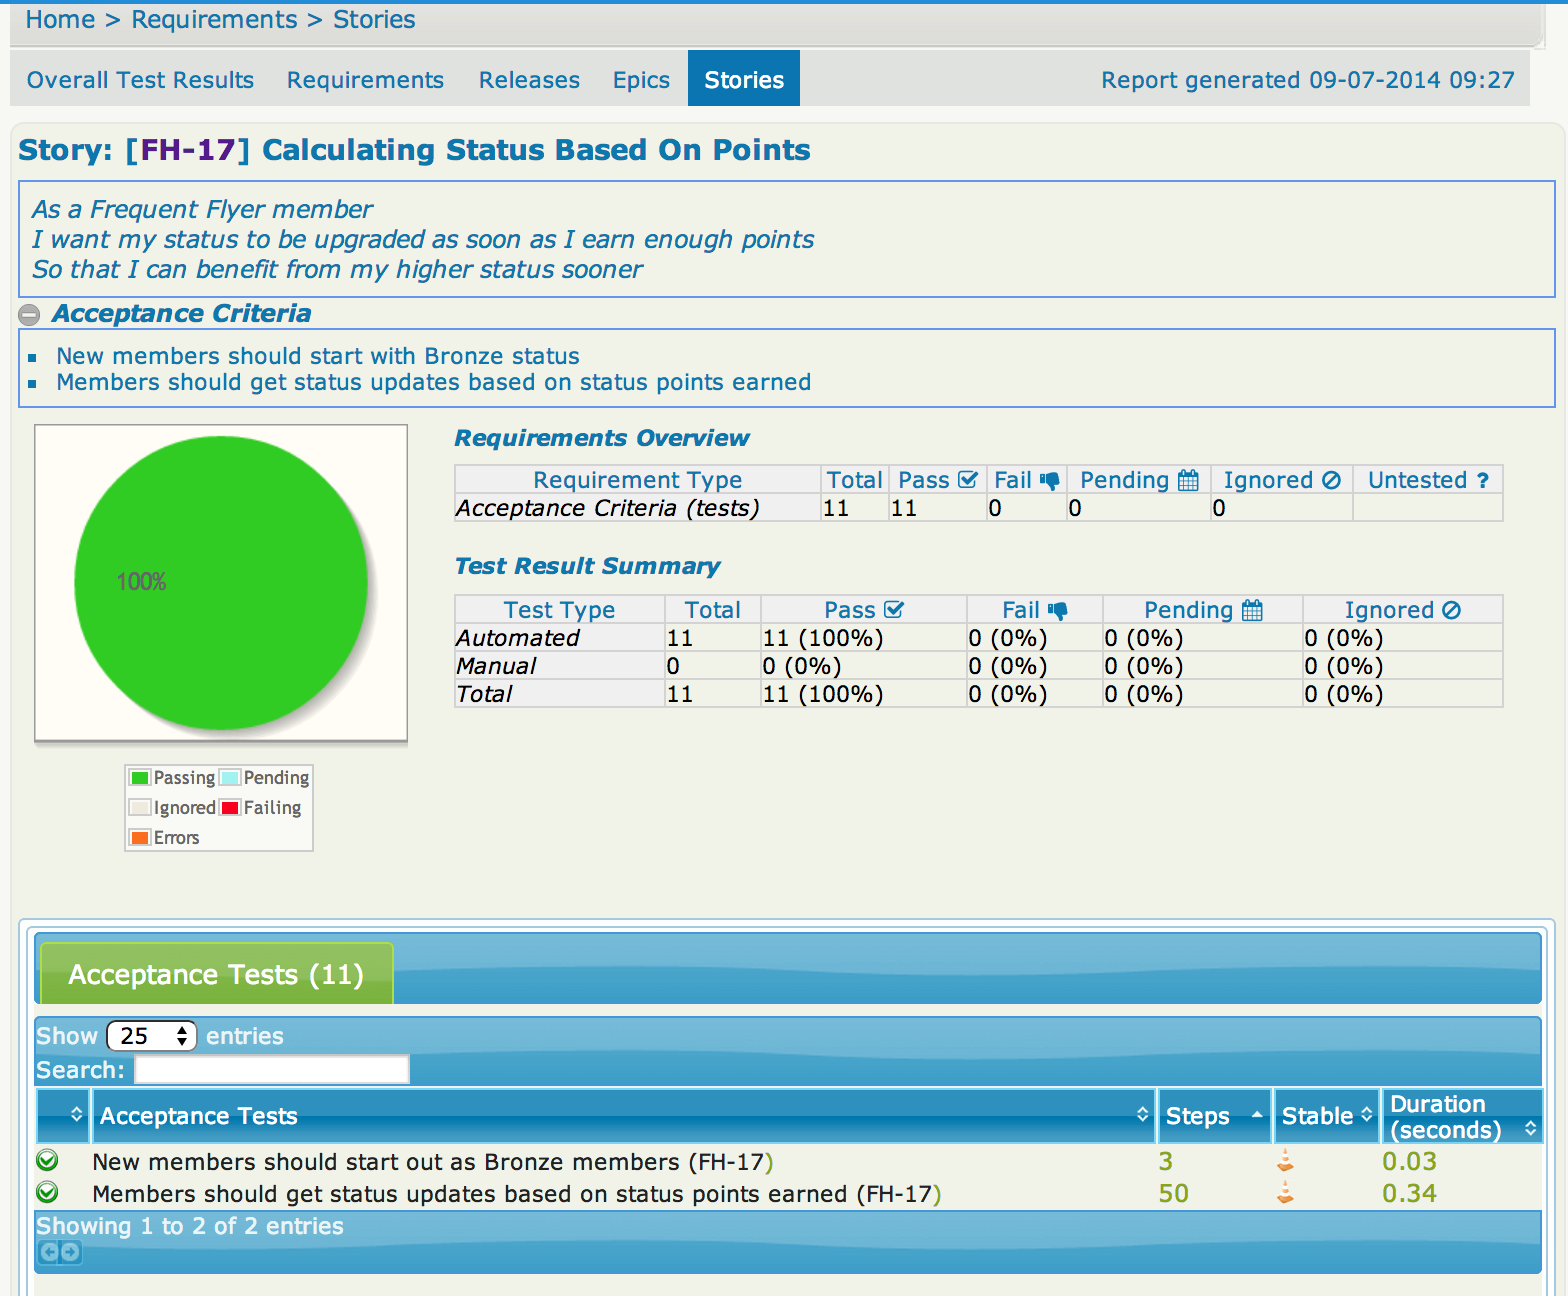
Both JIRA and the JIRA-Serenity integration are quite flexible. We saw earlier that we had configured a custom “Acceptance Criteria” field in our JIRA stories. We have displayed this custom field in the report shown above by including it in the serenity.properties file, like this:
jira.custom.field.1=Acceptance Criteria
Serenity reads the narrative text appearing in this report (“As a frequent flyer…”) from the Descriptionfield of the corresponding JIRA card. We can override this behavior and get Serenity to read this value from a different custom field using the jira.custom.narrative.field property. For example, some teams use a custom field called “User Story” to store the narrative text, instead of the Description field. We could get Serenity to use this field as follows:
jira.custom.narrative.field=User Story
16.2. Two way integration with JIRA
16.2.1. Links from JIRA to Serenity
The simplest form of two-way integration between Serenity and JIRA is to get Serenity to insert a comment containing links to the Serenity test reports for each related issue card. To get this to work, you need to tell Serenity where the reports live. One way to do this is to add a property called serenity.public.url to your serenity.properties file with the address of the serenity reports.
serenity.public.url=http://buildserver.myorg.com/latest/serenity/report
This will tell Serenity that you not only want links from the Serenity reports to JIRA, but you also want to include links in the JIRA cards back to the corresponding Serenity reports. When this property is defined, Serenity will add a comment like the following to any issues associated with the executed tests:
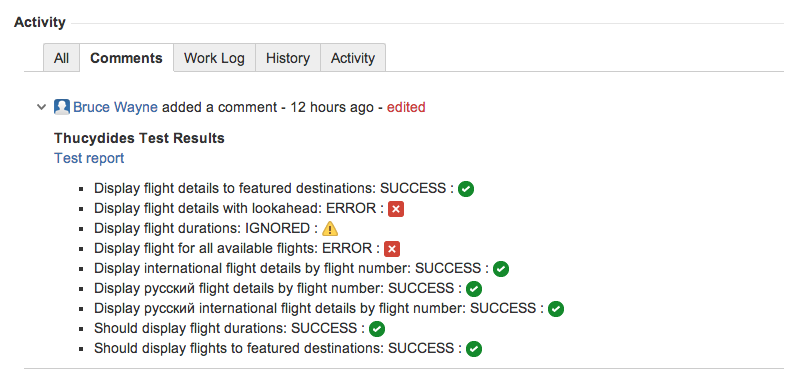
The serenity.public.url will typically point to a local web server where you deploy your reports, or to a path within your CI server. For example you could publish the Serenity reports on Jenkins using the Jenkins HTML Publisher Plugin, and then add a line like the following to your serenity.properties file:
serenity.public.url=http://jenkins.myorg.com/job/myproject-acceptance-tests/Serenity_Report/
If you do not want Serenity to update the JIRA issues for a particular run (e.g. when running your tests locally), you can also set serenity.skip.jira.updates to true, e.g.
serenity.skip.jira.updates=true
This will simply write the relevant issue numbers to the log rather than trying to connect to JIRA.
16.2.2. Updating JIRA issue states
You can also configure the plugin to update the status of JIRA issues. This is deactivated by default: to use this option, you need to set the serenity.jira.workflow.active option to true, e.g.
serenity.jira.workflow.active=true
The default configuration will work with the default JIRA workflow: open or in progress issues associated with successful tests will be resolved, and closed or resolved issues associated with failing tests will be reopened. If you are using a customized workflow, or want to modify the way the transitions work, you can write your own workflow configuration. Workflow configuration uses a simple Groovy DSL. The following is an example of the configuration file used for the default workflow:
when 'Open', {
    'success' should: 'Resolve Issue'
}

when 'Reopened', {
    'success' should: 'Resolve Issue'
}

when 'Resolved', {
    'failure' should: 'Reopen Issue'
}

when 'In Progress', {
    'success' should: ['Stop Progress','Resolve Issue']
}

when 'Closed', {
    'failure' should: 'Reopen Issue'
}
You can write your own configuration file and place it on the classpath of your test project (e.g. in serenity’s directory). Then you can override the default configuration by using serenity.jira.workflow property, e.g.
serenity.jira.workflow=my-workflow.groovy
Alternatively, you can simply create a file called jira-workflow.groovy and place it somewhere on your classpath (e.g. in the src/test/resources directory). Serenity will then use this workflow. In both these cases, you don’t need to explicitly set the serenity.jira.workflow.active property.
16.2.3. Release management
In JIRA, you can organize your project releases into versions, as illustrated here:
You can and assign cards to one or more versions using the Fix Version/s field:
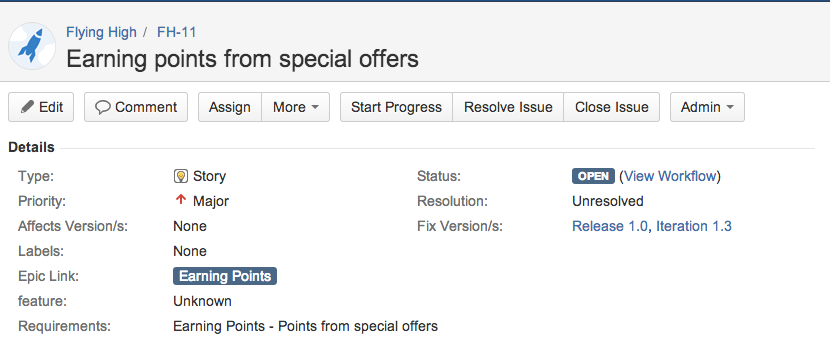
By default, Serenity will read version details from the Releases in JIRA. Test outcomes will be associated with a particular version using the “Fixed versions” field. The Releases tab gives you a run-down of the different planned versions, and how well they have been tested so far:
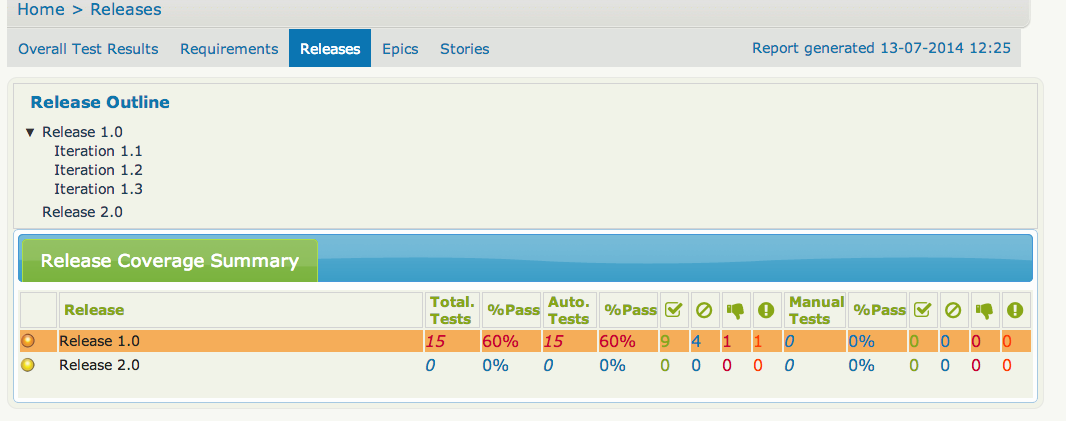
JIRA uses a flat version structure – you can’t have for example releases that are made up of a number of sprints. Serenity lets you organize these in a hierarchical structure based on a simple naming convention. By default, Serenity uses “release” as the highest level release, and either “iteration” or “sprint” as the second level. For example, suppose you have the the following list of versions in JIRA – Release 1 – Iteration 1.1 – Iteration 1.2 – Release 2 – Release 3
This will produce Release reports for Release 1, Release 2, and Release 3, with Iteration 1.2 and Iteration 1.2 appearing underneath Release 1. The reports will contain the list of requirements and test outcomes associated with each release. You can drill down into any of the releases to see details about that particular release.
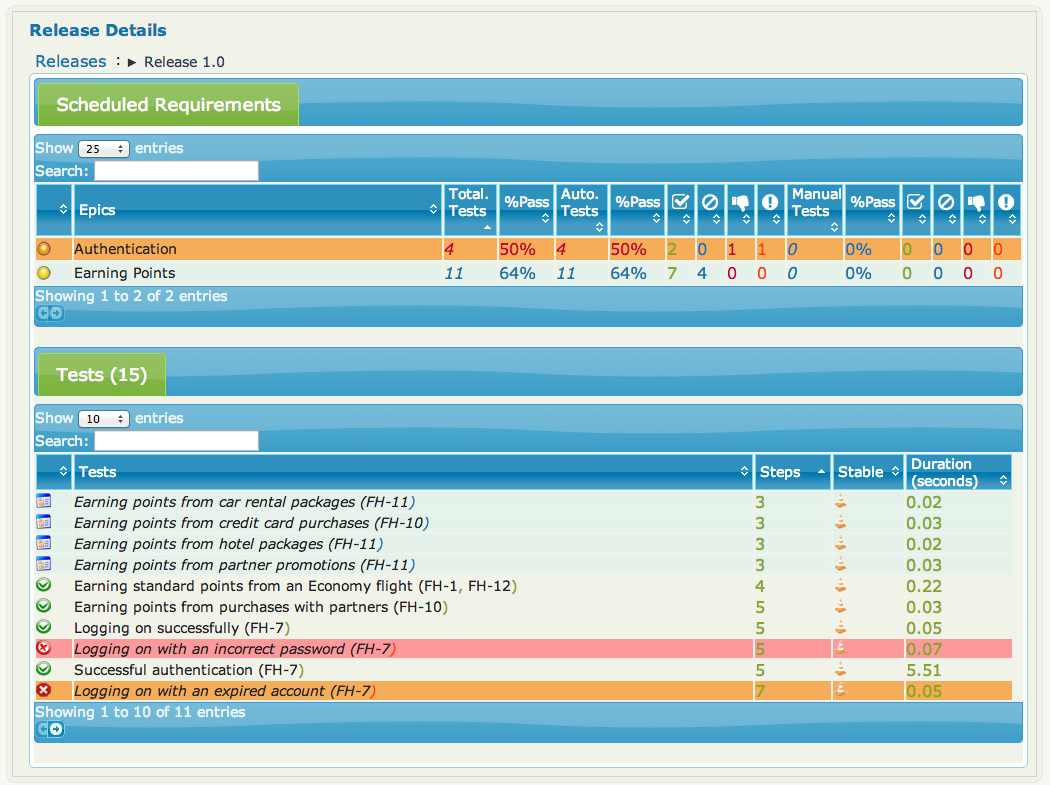
You can also customize the names of the types of release usinge the serenity.release.types property, e.g.
serenity.release.types=milestone, release, version
17. Integrating with Spring
If you are running your acceptance tests against an embedded web server (for example, using Jetty), it can occasionally be useful to access the service layers directly for fixture or infrastructure-related code. For example, you may have a scenario where a user action must, as a side effect, record an audit log in a table in the database. To keep your test focused and simple, you may want to call the service layer directly to check the audit logs, rather than logging on as an administrator and navigating to the audit logs screen.
Spring provides excellent support for integration tests, via the SpringJUnit4ClassRunner test runner. Unfortunately, if you are using Serenity, this is not an option, as a test cannot have two runners at the same time. Fortunately, however, there is a solution! To inject dependencies using a Spring configuration file, you just need to include the Serenity SpringIntegration rule in your test class. You instantiate this variable as shown here:
@Rule
public SpringIntegration springIntegration = new SpringIntegration();
Then you use the @ContextConfiguration annotation to define the configuration file or files to use. The you can inject dependencies as you would with an ordinary Spring integration test, using the usual Spring annotations such as @Autowired or @Resource. For example, suppose we are using the following Spring configuration file, called ‘config.xml’:
<beans>
    <bean id="widgetService" class="net.serenity.junit.spring.WidgetService">
        <property name="name"><value>Widgets</value></property>
        <property name="quota"><value>1</value></property>
    </bean>
    <bean id="gizmoService" class="net.serenity.junit.spring.GizmoService">
        <property name="name"><value>Gizmos</value></property>
        <property name="widgetService"><ref bean="widgetService" /></property>
    </bean>
</beans>
We can use this configuration file to inject dependencies as shown here:
@RunWith(SerenityRunner.class)
@ContextConfiguration(locations = "/config.xml")
public class WhenInjectingSpringDependencies {

    @Managed
    WebDriver driver;

    @ManagedPages(defaultUrl = "http://www.google.com")
    public Pages pages;

    @Rule
    public SpringIntegration springIntegration = new SpringIntegration();

    @Autowired
    public GizmoService gizmoService;

    @Test
    public void shouldInstanciateGizmoService() {
        assertThat(gizmoService, is(not(nullValue())));
    }

    @Test
    public void shouldInstanciateNestedServices() {
        assertThat(gizmoService.getWidgetService(), is(not(nullValue())));
    }
}
Other context-related annotations such as @DirtiesContext will also work as they would in a traditional Spring Integration test. Spring will create a new ApplicationContext for each test, but it will use a single ApplicationContext for all of the methods in your test. If one of your tests modifies an object in the ApplicationContext, you may want to tell Spring so that it can reset the context for the next test. You do this using the @DirtiesContext annotation. In the following test case, for example, the tests will fail without the @DirtiesContext annotation:
@RunWith(SerenityRunner.class)
@ContextConfiguration(locations = "/spring/config.xml")
public class WhenWorkingWithDirtyContexts {

    @Managed
    WebDriver driver;

    @ManagedPages(defaultUrl = "http://www.google.com")
    public Pages pages;

    @Rule
    public SpringIntegration springIntegration = new SpringIntegration();

    @Autowired
    public GizmoService gizmoService;

    @Test
    @DirtiesContext
    public void shouldNotBeAffectedByTheOtherTest() {
        assertThat(gizmoService.getName(), is("Gizmos"));
        gizmoService.setName("New Gizmos");
    }

    @Test
    @DirtiesContext
    public void shouldNotBeAffectedByTheOtherTestEither() {
        assertThat(gizmoService.getName(), is("Gizmos"));
        gizmoService.setName("New Gizmos");
    }

}
You can also inject Spring dependencies directly into your Step libraries, for JUnit, Cucumber and JBehave, as shown in this example:
@ContextConfiguration(locations = "/spring/config.xml")
public class NestedSpringEnabledSteps {

    @Autowired
    public WidgetService widgetService;

    private String widgetName;

    @Steps
    private NestedSteps nestedSteps;

    @Given("I hava a nested autowired Spring bean")
    public void givenIHavaAnAutowiredSpringBean() {
        assertThat(nestedSteps.widgetService, notNullValue());
    }

    @When("I use the nested bean")
    public void whenIUseTheBean() {
        widgetName = nestedSteps.widgetService.getName();
    }

    @Then("the nested bean should be instanciated")
    public void thenItShouldBeInstanciated() {
        assertThat(widgetName, is("Widgets"));
    }

}
18. Running Serenity tests in parallel batches
Sometimes projects have a lot of tests, and executing of them takes a lot of time. Testing can be sped up significantly by running different tests in parallel. However, this is often harder to implement than it sounds.
Some build automation tools have builtin parallel test execution, but this not so good for huge amount of tests and heavy tests. For example web tests are as a rule much slower than other types of tests, it make them good candidates for concurrent testing, in theory at least, but the implementation can be tricky. For example, although it is easy enough to configure running tests in parallel, on the other hand running several webdriver instances of Firefox/Chrome in parallel on the same display, tends to become unreliable.
The natural solution in this case is to split the web tests into smaller batches, and to run each batch on a different machine and/or on a different virtual display. When each batch has finished, the results can be retrieved and aggregated into the final test reports.
However splitting tests into batches by hand tends to be tedious and unreliable – it is easy to forget to add a new test to a batch, for example, or have unevenly-distributed batches.
Serenity lets you do this automatically, by splitting your test cases evenly into batches of a given size. In practice, you run a build job for each batch - you take same sources with all tests and configure serenity to run from current copy some amount of test by providing several parameters. After that you retrieve all tests results generated by each batch to aggregate into the final serenity test report.
18.1. Splitting serenity tests to batches
To split tests to batches you need configure serenity run some tests and skip others. For different batches it will be different tests, below you can find short example of such configuration.
For configuration batches three parameters are used:
- serenity.batch.strategy
-
Optional parameter for choosing batch creating strategy. Possible values are
DIVIDE_EQUALLYandDIVIDE_BY_TEST_COUNT. Default value isDIVIDE_EQUALLY. Instead of it can be used redundantthucydides.batch.strategy, but it strongly not recommended - serenity.batch.size
-
This parameter should be the same for each batch, and should more than 0. This is amount of all bathes for current sources, and synonym of serenity.batch.count. Instead of it can be used redundant
thucydides.batch.size, but it strongly not recommended - serenity.batch.count
-
This parameter should be the same for each batch, and should more than 0. This is amount of all bathes for current sources, and synonym of serenity.batch.size. Instead of it can be used redundant
thucydides.batch.count, but it strongly not recommended - serenity.batch.number
-
This parameter should be different for each batch, and should be less or equal
serenity.batch.sizeand more than 0. This is number of bath for execution in current build. Instead of it can be used redundantthucydides.batch.number, but it strongly not recommended
Those parameters can be populated as system parameters of in serenity.properties file. Meaning of parameters size/number depends on serenity.batch.strategy value. For explanation strategies will be used tests with next structure (full sources available under serenity-demos repository):
...
@RunWith(SerenityRunner.class)
public class LoginUserTest {
    @Steps
    UserActionSteps steps;

    @Test
    public void should_create_login_record_after_login() {
        // GIVEN
        final User user = new User("user.login", "user@mail.com");
        steps.given_registered_user(user);
        // WHEN
        steps.when_user_login();
        // THEN
        steps.then_one_login_record_should_exist();
    }

    @Test
    public void should_clean_login_records_after_logout() {
        // GIVEN
        final User user = new User("user.login", "user@mail.com");
        steps.given_registered_user(user);
        // WHEN
        steps.when_user_login();
        steps.when_user_logout();
        // THEN
        steps.then_login_record_should_not_exist();
    }

    @Test
    public void should_not_create_duplicate_records_during_parallel_login() {
        // GIVEN
        final User user = new User("user.login", "user@mail.com");
        steps.given_registered_user(user);
        // WHEN
        steps.when_user_login();
        steps.when_user_login();
        // THEN
        steps.then_one_login_record_should_exist();
    }

    @Test
    public void should_clean_login_records_after_session_expired() {
        // GIVEN
        final User user = new User("user.login", "user@mail.com");
        steps.given_registered_user(user);
        // WHEN
        steps.when_user_login();
        steps.when_user_session_expired();
        // THEN
        steps.then_login_record_should_not_exist();
    }
}
...
@RunWith(SerenityRunner.class)
public class RegisterUserTest {
@Steps
UserActionSteps steps;
@Test
public void should_be_available_after_finishing_registration() {
// GIVEN
final User user = new User("user.login", "user@mail.com");
steps.given_started_registration_process(user);
// WHEN
steps.when_user_activate_registration();
// THEN
steps.then_user_should_be_available();
}
@Test
public void should_be_not_available_before_finishing_registration() {
// GIVEN
final User user = new User("user.login", "user@mail.com");
steps.given_started_registration_process(user);
// WHEN
steps.when_user_not_finished_registration();
// THEN
steps.then_user_should_be_not_available();
}
}...
@RunWith(SerenityRunner.class)
public class UserActivationProcessTest {
@Steps
MailActivationSteps steps;
@Test
public void should_activate_user_account() {
// GIVEN
final User user = new User("user.login", "user@mail.com");
final ActivationMail activation = new ActivationMail(user.getEmail()
, String.valueOf(ThreadLocalRandom.current().nextLong()));
steps.given_activation_send(activation, user);
// WHEN
steps.when_user_enter_activation_code();
// THEN
steps.then_user_account_activated();
}
@Test
public void should_send_notification_to_user() {
// GIVEN
final User user = new User("user.login", "user@mail.com");
final ActivationMail activation = new ActivationMail(user.getEmail()
, String.valueOf(ThreadLocalRandom.current().nextLong()));
steps.given_activation_send(activation, user);
// WHEN
steps.when_activation_code_expired();
// THEN
steps.then_user_received_notification();
}
}Screenshot for aggregation report created after executing all tests without enabling batches (serenity.batch.count and serenity.batch.number and serenity.batch.size aren’t provided or equal to 0). It contains all Tests from above classes:
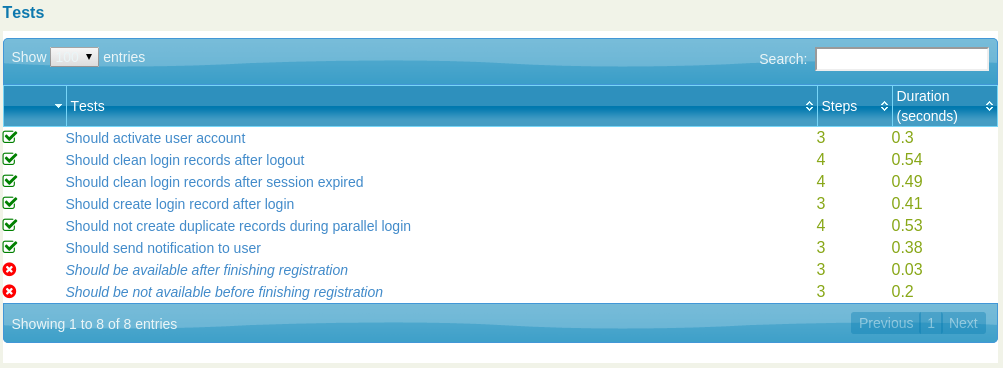
18.1.1. Divide tests to batches using DIVIDE_EQUALLY batch strategy
This strategy enabled by default. It allows split all test classes among serenity.batch.size batches. Value serenity.batch.number will refer to some batch and only tests from Test classes from this batch will be executed.When test phase will be started Serenity will check if serenity.batch.size > 0 and serenity.batch.number > 0, and if so it will split tests classes to serenity.batch.size batches and run batch with number equal to serenity.batch.number.
All classes will be included to bathes one by one. So if size=3 and we have classes T1, T2, T3, T4, T5 - first batch will contains {T1,T4}, second - {T2,T5}, third - {T3}.
For example to split Test classes (LoginUserTest, RegisterUserTest, UserActivationProcessTest) into two bathes and execute first batch we should provide serenity.batch.size = 2, serenity.batch.number = 1. Serenity report will be next:
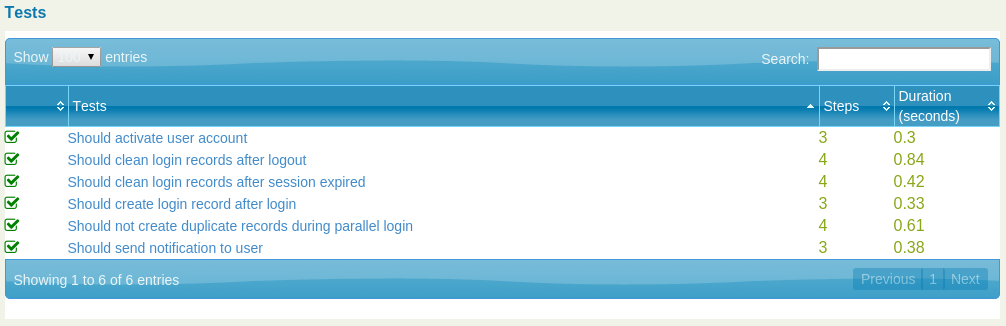
To run same build for second batch, we need provide serenity.batch.size = 2, serenity.batch.number = 2. In this case Serenity report will be:

18.1.2. Divide tests to batches using DIVIDE_BY_TEST_COUNT strategy
This strategy will be enabled if during test phase set serenity.batch.strategy = DIVIDE_BY_TEST_COUNT.It allows split all test classes among serenity.batch.size batches. Value serenity.batch.number will refer to some batch and only tests from Test classes from this batch will be executed.
When test phase will be started Serenity will check if serenity.batch.size > 0 and serenity.batch.number > 0, and if so it will split tests classes to serenity.batch.size batches and run batch with number equal to serenity.batch.number.
All classes will be included to bathes according to numbers of testCases in this classes. This strategy allows split tests between batches optimally. In our case LoginUserTest contains 4 tests, RegisterUserTest contains 2 tests, UserActivationProcessTest contains 2 tests, if we try to split this tests to 2 bathes using this strategy - both batch will contain 4 tests, first one from LoginUserTest, second one from UserActivationProcessTest and RegisterUserTest. It will look like:
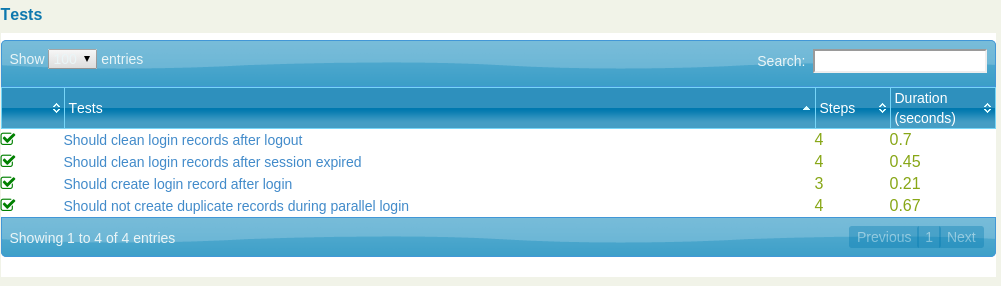
18.2. Configuration parallel executing with Jenkins
This approach is easy to set up on Jenkins using a multi-configuration build. In the following screenshot, we are running a multi-configuration build to run web tests across three batches. We use a single user-defined parameter (BATCH_NUMBER) to define the batch being run, passing this parameter into the Maven build job properties we discussed above.
The most robust way to aggregate the build results from the different batches is to set up a second build job that runs after the test executions, and retrieves the build results from the batch jobs. You can use the Jenkins Copy Artifacts plugin to do this. First, ensure that the multi-configuration build archives the Serenity reports, as shown here:
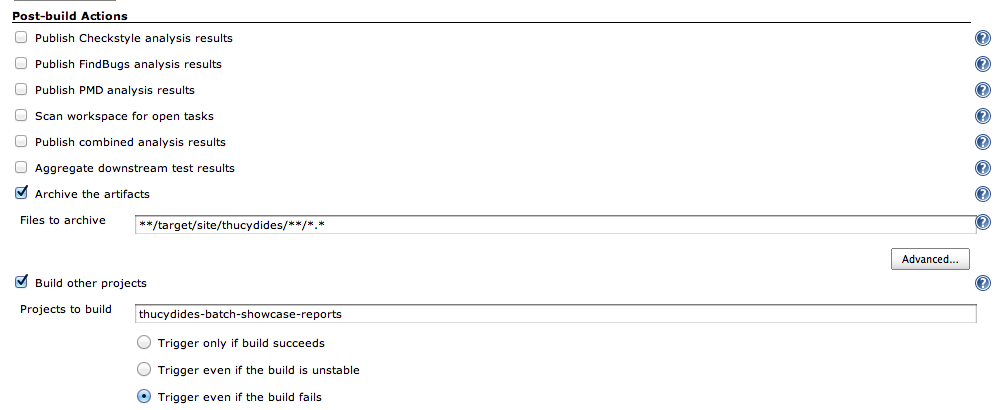
This build will then trigger another, freestyle build job. This job needs to copy the Serenity report artifacts from the matrix build jobs into the current workspace, and then run the mvn serenity:aggregate command to generate the Serenity aggregate reports. The matrix build job reports need to be copied one-by-one for each batch, as the current version of the Copy Artifacts plugin does not support copying from multiple projects in the same action.
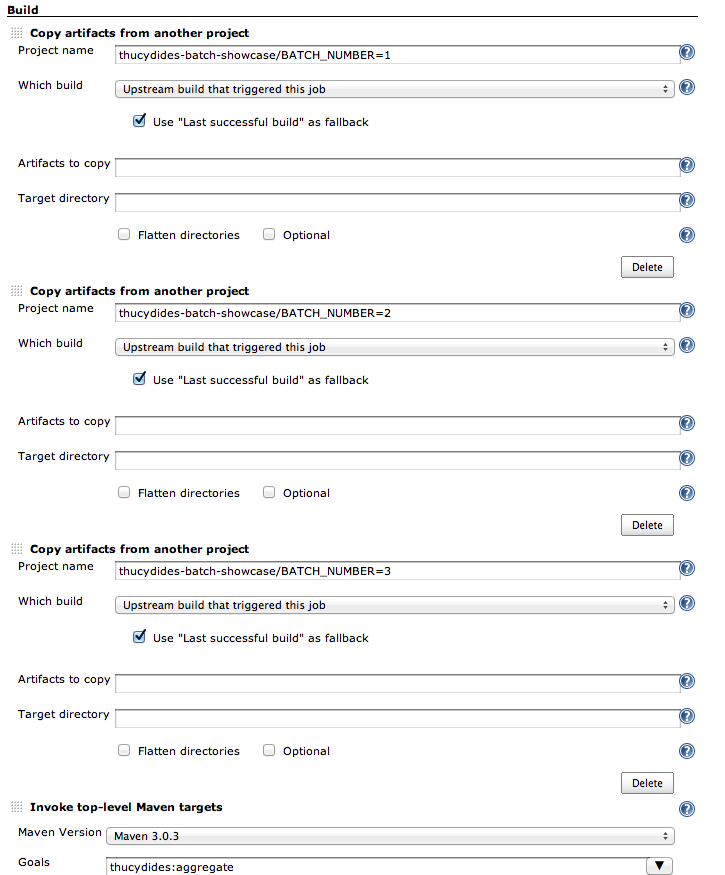
Then make sure you publish the generated HTML reports (which will be in the target/site/serenity directory) for easy access to the test results.
This simple example shows a parallel test running 3 batches – this brought the test execution time from 9 minutes to slightly over 1 minute. Results will vary, of course, but a typical real-world set of web tests would have a larger number of batches
19. Testing REST with Serenity BDD
Serenity BDD can help you to create tests for REST services, with all advantages that Serenity BDD introduce to Web Tests and even more.
It is provided tight integration with well known Rest Assured, with some improvements and advanced reporting. All what you need is use in import instead of RestAssured - SerenityRest, and that’s all!!
19.1. Reports created when Rest is tested
If you use in your tests SerenityRest then all your requests/response will be included in generated report, so you can easy explore body, cookies, headers, response body, url as well as validate them in RestAssured way. Here is example of generated report for some of demo tests:
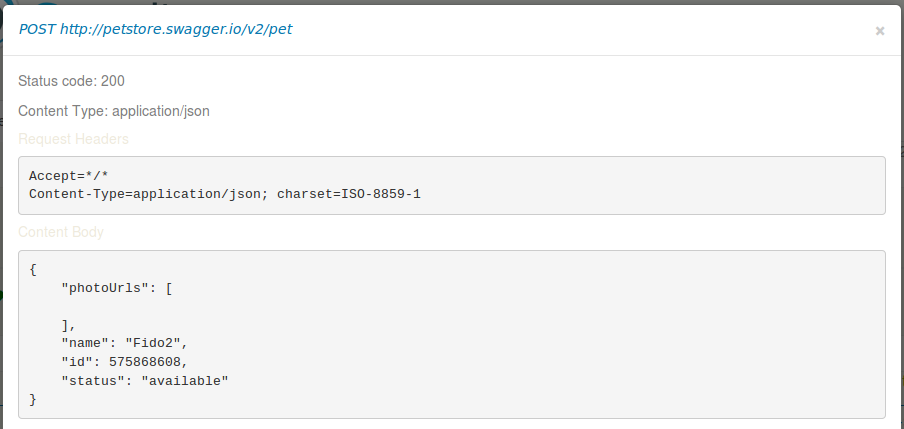
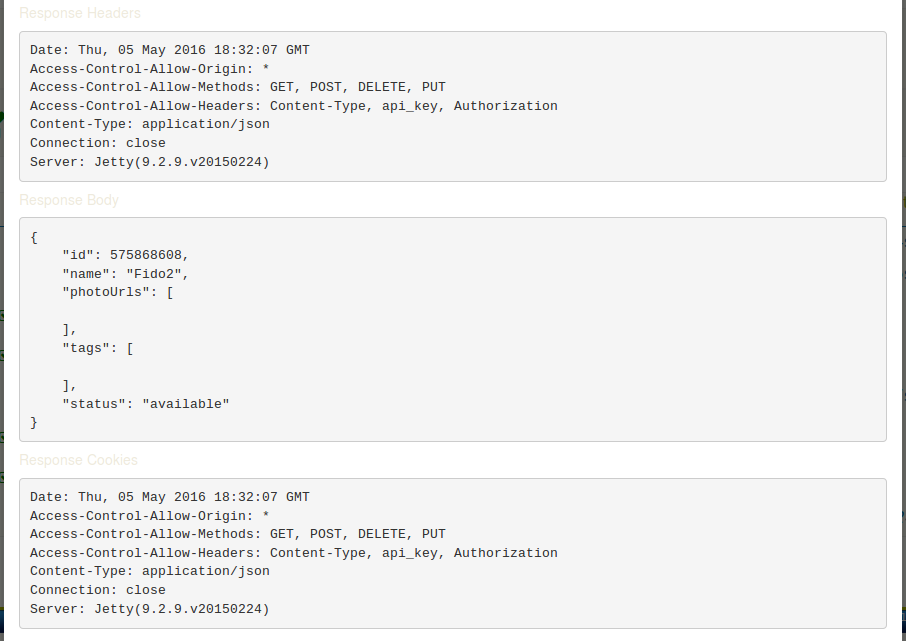
As you see all requests included in report under correspond steps:
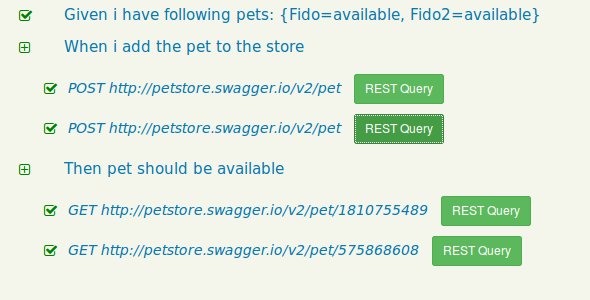
19.2. Writing tests with Rest Assured
All Rest Assured tests are valid tests for Serenity BDD. You can use all contractions like given-when-then or expect-when-then, initialise some query parameters, and so on.
...
    @Step
    public void whenIAddThePetToTheStore() {
        for (Pet pet : pets) {
            int id = Math.abs(new Random().nextInt());
            Map<String, Object> jsonAsMap = new HashMap<>();
            jsonAsMap.put("id", id);
            jsonAsMap.put("name", pet.getName());
            jsonAsMap.put("status", pet.getStatus());
            jsonAsMap.put("photoUrls", new ArrayList<>(Arrays.asList()));

            given().contentType("application/json")
                    .content(jsonAsMap).log().body()
                    .baseUri("http://petstore.swagger.io")
                    .basePath("v2/pet")
            .when().post();

            pet.setId(id);

        }
    }
or
...
    @Step
    public void thenPetShouldBeAvailable() {
        for (Pet pet : pets) {
            expect().that().statusCode(200)
                    .and().body("name", equalTo(pet.getName())).when()
                    .get("http://petstore.swagger.io/v2/pet/{id}", pet.getId());
        }
    }
More that that you can create Steps classes in Serenity BDD way and use them as reusable components, and use all features of Serenity aggregated report. Also Serenity BDD introduce possibility to share same RestResponse between steps to allow write Steps methods in more native way:
 ...
        @Step
        def getById(final String url) {
            rest().get("$url/{id}", 1000);
        }

        @Step
        def thenCheckOutcome() {
            then().body("Id", Matchers.anything())
        }
For easy configuration and resetting rest configuration you can use RestConfigurationRule. All Configuration action described in rule will executed before test and after test will be executed reset.
...
    @Rule
    def RestConfigurationRule rule = new RestConfigurationRule(new RestConfigurationAction() {
        @Override
        void apply() {
            SerenityRest.setDefaultBasePath(value)
        }
    })
19.3. Using split classes to initialise and configure Rest Assured
With Serenity BDD you can configure Rest Assured using chain of calls, that can be much more easy to read than a lot of separated lines:
...
new RestDefaultsChained().setDefaultBasePath("some/path")
    .setDefaultProxy(object).setDefaultPort(10)
Basically all what you can execute during rest tests included in one class SerenityRest, but you also use slitted classes to separate your logic and help yourself to find function what you need with RestUtility and RestDefaults and RestRequests.
20. Importing test results generated by Serenity BDD
During execution of test Serenity BDD generate Test Outcomes and use them to build aggregated report. It is possible for some external tools load test outcomes and analise them.
20.1. Loading Test OutComes from folder
Test outcomes by default are generated in XML and JSON format, both format contains same information - testcase, suites, test results, rest queries and so on. Serenity BDD uses recreation of these test result - TestOutcome and some extra features available in TestOutcomes.
To load test outcome you should know their format and folder:
....
OutcomeFormat format = OutcomeFormat.XML;
TestOutcomes outcomes = TestOutcomeLoader.loadTestOutcomes().inFormat(format)
....
20.2. Analysing Test OutComes
It is easy to analise test outcomes, for example for getting all passed test you should:
....
outcomes.getPassingTests();
....
Also you can get a lot of information from test ourcomes about execute tests, for example:
....
 for (final TestOutcome outcome : outcomes.getOutcomes()) {
     System.out.println(outcome.getCompleteName());
     System.out.println(outcome.getTestCaseName());
     System.out.println(outcome.getResult());
     System.out.println(outcome.getDurationInSeconds());
     System.out.println(outcome.getDataTable()); // if test was with some data table
     System.out.println(outcome.getIssueKeys());
 }
....Appendicies
22. Serenity System Properties and Configuration
22.1. Running Serenity tests from the command line
You typically run Serenity as part of the build process (either locally or on a CI server). In addition to the webdriver.driver option discussed about, you can also pass a number of parameters in as system properties to customize the way the tests are run. You can also place these files in a Properties file called serenity.properties (or thucydides.properties), in your project root directory.
The full list is shown here:
- properties
-
Absolute path of the property file where Serenity system property defaults are defined. Defaults to
~/serenity.properties - webdriver.driver
-
What browser do you want your tests to run in, for example firefox, chrome, phantomjs or iexplorer. You can also use the driver property as a shortcut.
- webdriver.provided_type
-
If using a provided driver, what type is it. The implementation class needs to be defined in the webdriver.provided.{type} system property.
- webdriver.base.url
-
The default starting URL for the application, and base URL for relative paths.
- webdriver.remote.url
-
The URL to be used for remote drivers (including a selenium grid hub or SauceLabs URL)
- phantomjs.webdriver.port
-
What port to run PhantomJS on (used in conjunction with webdriver.remote.url to register with a Selenium hub, e.g. -Dphantomjs.webdriver=5555 -Dwebdriver.remote.url=http://localhost:4444/wd/hub
- webdriver.remote.driver
-
The driver to be used for remote drivers
- serenity.driver.capabilities
-
A set of user-defined capabilities to be used to configure the WebDriver driver. Capabilities should be passed in as a space or semi-colon-separated list of key:value pairs, e.g. "build:build-1234; max-duration:300; single-window:true; tags:[tag1,tag2,tag3]"
- webdriver.timeouts.implicitlywait
-
How long webdriver waits for elements to appear by default, in milliseconds.
- webdriver.wait.for.timeout
-
How long webdriver waits by default when you use a fluent waiting method, in milliseconds.
- webdriver.chrome.driver
-
Path to the Chrome driver, if it is not on the system path.
- serenity.home
-
The home directory for Serenity output and data files - by default, $USER_HOME/.serenity
- serenity.outputDirectory
-
Where should reports be generated. If project contains only one module (root module), than this path will be relative to root module, if project contains more than one submodule - than this path will be relative to submodule directory, also this path can be different for each submodule or can be inherited from root project property.
- serenity.project.name
-
What name should appear on the reports
- serenity.only.save.failing.screenshots
-
Should Serenity only store screenshots for failing steps? This can save disk space and speed up the tests a little. It is very useful for data-driven testing. This property is now deprecated. Use
serenity.take.screenshotsinstead. - serenity.ext.packages*
-
Extension packages. This is a list of packages that will be scanned for custom TagProvider implementations. To add a custom tag provider, just implement the TagProvider interface and specify the root package for this provider in this parameter.
- serenity.verbose.screenshots
-
Should Serenity take screenshots for every clicked button and every selected link? By default, a screenshot will be stored at the start and end of each step. If this option is set to true, Serenity will record screenshots for any action performed on a WebElementFacade, i.e. any time you use an expression like element(…).click(), findBy(…).click() and so on. This will be overridden if the ONLY_SAVE_FAILING_SCREENSHOTS option is set to true. @Deprecated This property is still supported, but serenity.take.screenshots provides more fine-grained control.
- serenity.take.screenshots
-
Set this property to have more finer control on how screenshots are taken. This property can take the following values:
-
FOR_EACH_ACTION : Similar to
serenity.verbose.screenshots -
BEFORE_AND_AFTER_EACH_STEP
-
AFTER_EACH_STEP
-
FOR_FAILURES : Similar to
serenity.only.save.failing.screenshots -
DISABLED
-
- serenity.report.encoding
-
Encoding used to generate the CSV exports
- serenity.verbose.steps
-
Set this property to provide more detailed logging of WebElementFacade steps when tests are run.
- serenity.reports.show.step.details
-
Should Thucydides display detailed information in the test result tables. If this is set to true, test result tables will display a breakdown of the steps by result. This is false by default.
- serenity.report.show.manual.tests
-
Show statistics for manual tests in the test reports.
- serenity.report.show.releases
-
Report on releases (defaults to true).
- serenity.restart.browser.frequency
-
During data-driven tests, some browsers (Firefox in particular) may slow down over time due to memory leaks. To get around this, you can get Serenity to start a new browser session at regular intervals when it executes data-driven tests.
- thucycides.step.delay
-
Pause (in ms) between each test step.
- untrusted.certificates
-
Useful if you are running Firefox tests against an HTTPS test server without a valid certificate. This will make Serenity use a profile with the AssumeUntrustedCertificateIssuer property set.
- refuse.untrusted.certificates
-
Don’t accept sites using untrusted certificates. By default, Thucydides accepts untrusted certificates - use this to change this behaviour.
- serenity.timeout
-
How long should the driver wait for elements not immediately visible.
- serenity.browser.width and serenity.browser.height
-
Resize the browser to the specified dimensions, in order to take larger screenshots. This should work with Internet Explorer and Firefox, but not with Chrome.
- serenity.resized.image.width
-
Value in pixels. If set, screenshots are resized to this size. Useful to save space.
- serenity.keep.unscaled.screenshots
-
Set to
trueif you wish to save the original unscaled screenshots. This is set tofalseby default. - serenity.store.html.source
-
Set this property to
trueto save the HTML source code of the screenshot web pages. This is set tofalseby default. - serenity.issue.tracker.url
-
The URL used to generate links to the issue tracking system.
- serenity.activate.firebugs
-
Activate the Firebugs and FireFinder plugins for Firefox when running the WebDriver tests. This is useful for debugging, but is not recommended when running the tests on a build server.
- serenity.batch.strategy
-
Defines batch strategy. Allowed values - DIVIDE_EQUALLY (default) and DIVIDE_BY_TEST_COUNT. DIVIDE_EQUALLY will simply divide the tests equally across all batches. This could be inefficient if the number of tests vary a lot between test classes. A DIVIDE_BY_TEST_COUNT strategy could be more useful in such cases as this will create batches based on number of tests.
- serenity.batch.count
-
If batch testing is being used, this is the size of the batches being executed.
- serenity.batch.number
-
If batch testing is being used, this is the number of the batch being run on this machine.
- serenity.use.unique.browser
-
Set this to true for running all web tests in a single browser, for one test. Can be used for configuring Junit and Cucumber, default value is false.
- restart.browser.each.scenario
-
Set this to false for running all web tests in same story file with one browser, can be used when Jbehave is used. default value is false
- serenity.locator.factory
-
Set this property to override the default locator factory with another locator factory (for ex., AjaxElementLocatorFactory or DefaultElementLocatorFactory). By default, Serenity uses a custom locator factory called DisplayedElementLocatorFactory.
- serenity.native.events
-
Activate and deactivate native events for Firefox by setting this property to
trueorfalse. - security.enable_java
-
Set this to true to enable Java support in Firefox. By default, this is set to false as it slows down the web driver.
- serenity.test.requirements.basedir
-
The base folder of the sub-module where the jBehave stories are kept. It is assumed that this directory contains sub folders src/test/resources. If this property is set, the requirements are read from src/test/resources under this folder instead of the classpath or working directory. This property is used to support situations where your working directory is different from the requirements base dir (for example when building a multi-module project from parent pom with requirements stored inside a sub-module)
- serenity.proxy.http
-
HTTP Proxy URL configuration for Firefox and PhantomJS
- serenity.proxy.http_port
-
HTTP Proxy port configuration for Firefox and PhantomJS
- serenity.proxy.type
-
HTTP Proxy type configuration for Firefox and PhantomJS
- serenity.proxy.user
-
HTTP Proxy username configuration for Firefox and PhantomJS
- serenity.proxy.password
-
HTTP Proxy password configuration for Firefox and PhantomJS
- serenity.logging
-
Property for providing level of serenity actions, results, etc.
-
QUIET : No Thucydides logging at all
-
NORMAL : Log the start and end of tests
-
VERBOSE : Log the start and end of tests and test steps, default value
-
- serenity.test.root
-
The root package for the tests in a given project. If provided, Serenity will use this as the root package when determining the capabilities associated with a test. If you are using the File System Requirements provider, Thucydides will expect this directory structure to exist at the top of the requirements tree. If you want to exclude packages in a requirements definition and start at a lower level in the hierarchy, use the
serenity.requirement.exclusionsproperty.
This is also used by the PackageAnnotationBasedTagProvider to know where to look for annotated requirements.
- serenity.requirements.dir
-
Use this property if you need to completely override the location of requirements for the File System Provider.
- serenity.use.requirements.directories
-
By default, Thucydides will read requirements from the directory structure that contains the stories. When other tag and requirements plugins are used, such as the JIRA plugin, this can cause conflicting tags. Set this property to false to deactivate this feature (it is true by default).
- serenity.annotated.requirements.dir
-
Use this property if you need to completely override the location of requirements for the Annotated Provider. This is recommended if you use File System and Annotated provider simultaneously. The default value is stories.
- serenity.requirements.types
-
The hierarchy of requirement types. This is the list of requirement types to be used when reading requirements from the file system and when organizing the reports. It is a comma-separated list of tags.The default value is: capability, feature.
- serenity.requirement.exclusions
-
When deriving requirement types from a path, exclude any values from this comma-separated list.
- serenity.test.requirements.basedir
-
The base directory in which requirements are kept. It is assumed that this directory contains sub folders src/test/resources. If this property is set, the requirements are read from src/test/resources under this folder instead of the classpath or working directory. If you need to set an independent requirements directory that does not follow the src/test/resources convention, use `serenity.requirements.dir1 instead
This property is used to support situations where your working directory is different from the requirements base dir (for example when building a multi-module project from parent pom with requirements stored inside a sub-module.
- serenity.release.types
-
What tag names identify the release types (e.g. Release, Iteration, Sprint). A comma-separated list. By default, "Release, Iteration"
- serenity.locator.factory
-
Normally, Serenity uses SmartElementLocatorFactory, an extension of the AjaxElementLocatorFactory when instantiating page objects. This is to ensure that web elements are available and usable before they are used. For alternative behaviour, you can set this value to DisplayedElementLocatorFactory, AjaxElementLocatorFactory or DefaultElementLocatorFactory.
- chrome.switches
-
Arguments to be passed to the Chrome driver, separated by commas. Example:
chrome.switches = --incognito;--disable-download-notification - webdriver.firefox.profile
-
The path to the directory of the profile to use when starting firefox. This defaults to webdriver creating an anonymous profile. This is useful if you want to run the web tests using your own Firefox profile. If you are not sure about how to find the path to your profile, look here: http://support.mozilla.com/en-US/kb/Profiles. For example, to run the default profile on a Mac OS X system, you would do something like this:
$ mvn test -Dwebdriver.firefox.profile=/Users/johnsmart/Library/Application\ Support/Firefox/Profiles/2owb5g1d.default
On Windows, it would be something like:
C:\Projects\myproject>mvn test -Dwebdriver.firefox.profile=C:\Users\John Smart\AppData\Roaming\Mozilla\Firefox\Profiles\mvxjy48u.default
- firefox.preferences
-
A semicolon separated list of Firefox configuration settings. For ex.,
-Dfirefox.preferences="browser.download.folderList=2;browser.download.manager.showWhenStarting=false;browser.download.dir=c:\downloads"
Integer and boolean values will be converted to the corresponding types in the Firefox preferences; all other values will be treated as Strings. You can set a boolean value to true by simply specifying the property name, e.g. -Dfirefox.preferences=app.update.silent.
A complete reference to Firefox’s configuration settings is given here.
- serenity.csv.extra.columns
-
Add extra columns to the CSV output, obtained from tag values.
- serenity.console.headings
-
Write the console headings using ascii-art ("ascii", default value) or in normal text ("normal")
- tags
-
Comma separated list of tags. If provided, only JUnit classes and/or methods with tags in this list will be executed. For example,
mvn verify -Dtags="iteration:I1"

mvn verify -Dtags="color:red,flavor:strawberry"
- output.formats
-
What format should test results be generated in. By default, this is "json,xml".
- narrative.format
-
Set this property to asciidoc to activate using Asciidoc format in narrative text.
- jira.url
-
If the base JIRA URL is defined, Serenity will build the issue tracker url using the standard JIRA form.
- jira.project
-
If defined, the JIRA project id will be prepended to issue numbers.
- jira.username
-
If defined, the JIRA username required to connect to JIRA.
- jira.password
-
If defined, the JIRA password required to connect to JIRA.
- show.pie.charts
-
Display the pie charts on the dashboard by default. If this is set to false, the pie charts will be initially hidden on the dashboard.
- dashboard.tag.list
-
If set, this will define the list of tag types to appear on the dashboard screens
dashboard.excluded.tag.list::If set, this will define the list of tag types to be excluded from the dashboard screens
- json.pretty.printing
-
Format the JSON test outcomes nicely. "true" or "false", turned off by default.
- simplified.stack.traces
-
Stack traces are by default decluttered for readability. For example, calls to instrumented code or internal test libraries is removed. This behaviour can be deactivated by setting this property to false.
- serenity.dry.run
-
Run through the steps without actually executing them.
- feature.file,language
-
What (human) language are the Cucumber feature files written in? Defaults to "en".
- serenity.maintain.session
-
Keep the Thucydides session data between tests. Normally, the session data is cleared between tests.
- serenity.console.colors
-
Enabling or disabling in console output. All details you can find under Colors in console output
22.2. Providing your own Firefox profile
If you need to configure your own customized Firefox profile, you can do this by using the Thucydidies.useFirefoxProfile() method before you start your tests. For example:
@Before
public void setupProfile() {
  FirefoxProfile myProfile = new FirefoxProfile();
  myProfile.setPreference("network.proxy.socks_port",9999);
  myProfile.setAlwaysLoadNoFocusLib(true);
  myProfile.setEnableNativeEvents(true);
  Serenity.useFirefoxProfile(myProfile);
}

@Test
public void aTestUsingMyCustomProfile() {...}
22.3. Colors in console output
There is feature for colorful console output during executing serenity tests. To enable it you should provide variable serenity.console.colors = true, by default it is turned off. This feature can cause errors if it is enabled for builds under Jenkins.
Possible values are:
-
true
-
false (default value)
If this property equal to false (or not provided at all) - output will be as configured in your system, for example:
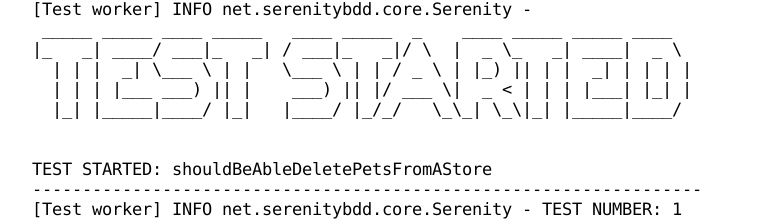
If this property equal to true you will find colorful output:
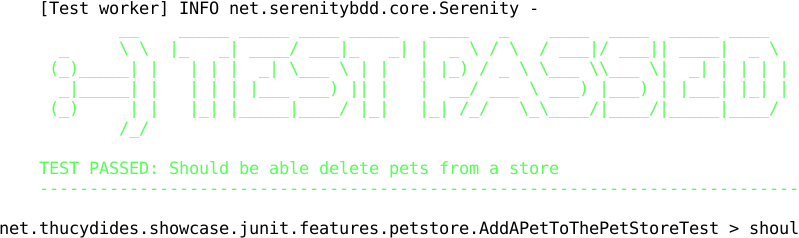
23. License and Copyright
Copyright 2011-2015 John Ferguson Smart.
Online version published by Wakaleo Consulting.
Serenity-BDD is released under the Apache 2 open source license.
This reference manual is licensed under a Creative Commons Attribution-Noncommercial-No Derivative Works 3.0 United States license. For more information about this license, see creativecommons.org/licenses/by-nc-nd/3.0/us/.