1. Introduction
The Screenplay Pattern is a powerful and elegant approach to designing and implementing automated tests, providing a number of improvements over more traditional approaches such as the Page Objects model. The Screenplay Pattern uses good software engineering principles such as the Single Responsibility Principle, the Open-Closed Principle, favours composition over inheritance, employs thinking from Domain Driven Design to reflect the domain of performing acceptance tests and steers you towards effective use of layers of abstraction. It encourages good testing habits and well-designed test suites that are easy to read, easy to maintain and easy to extend, enabling teams to write more robust and more reliable automated tests more effectively.
You can find some details about the origins of the Screenplay Pattern in this article.
In this tutorial, you will discover just how easy it is to get productive quickly with Serenity and the Screenplay pattern. We will introduce the core concepts behind the Screenplay pattern and how it is implemented in Serenity along the way.
This tutorial assumes some familiarity with Java and Java IDEs, and a passing familiarity with Maven or Gradle. The source code for this tutorial can be found on Github.
2. Getting started
The easiest way to create a project skeleton for a Serenity Screenplay project is to use the Maven Archetype Plugin. To do this, run the mvn archetype:generate command (with a filter to reduce the number of artifacts Maven proposes) as shown here:
$ mvn archetype:generate -Dfilter=screenplay
...
[INFO] No archetype defined. Using maven-archetype-quickstart (org.apache.maven.archetypes:maven-archetype-quickstart:1.0)
Choose archetype:
1: remote -> net.serenity-bdd:serenity-junit-screenplay-archetype (Serenity automated acceptance testing project using Screenplay, Selenium 2 and JUnit)
Choose a number or apply filter (format: [groupId:]artifactId, case sensitive contains): :
This will (after downloading list all of the available Serenity screenplay archetypes. For this tutorial, we will be working with JUnit, so enter the number corresponding to the net.serenity-bdd:serenity-junit-screenplay-archetype entry ("1" in the example shown here).
You will then be prompted to enter a groupId, artifactId, and version for your project, and a root package for your classes.
Choose a number or apply filter (format: [groupId:]artifactId, case sensitive contains): : 1
Define value for property 'groupId': : net.serenitybdd.tutorials
Define value for property 'artifactId': : todomvctests
Define value for property 'version':  1.0-SNAPSHOT: : 1.0.0-SNAPSHOT
Define value for property 'package':  net.serenitybdd.tutorials: :
Confirm properties configuration:
groupId: net.serenitybdd.tutorials
artifactId: todomvctests
version: 1.0.0-SNAPSHOT
package: net.serenitybdd.tutorials
 Y: : Y
Maven will now generate a project skeleton for you:
Y: : Y
[INFO] ----------------------------------------------------------------------------
[INFO] Using following parameters for creating project from Archetype: serenity-junit-screenplay-archetype:1.1.19
[INFO] ----------------------------------------------------------------------------
[INFO] Parameter: groupId, Value: net.serenitybdd.tutorials
[INFO] Parameter: artifactId, Value: todomvctests
[INFO] Parameter: version, Value: 1.0.0-SNAPSHOT
[INFO] Parameter: package, Value: net.serenitybdd.tutorials
[INFO] Parameter: packageInPathFormat, Value: net/serenitybdd/tutorials
[INFO] Parameter: package, Value: net.serenitybdd.tutorials
[INFO] Parameter: version, Value: 1.0.0-SNAPSHOT
[INFO] Parameter: groupId, Value: net.serenitybdd.tutorials
[INFO] Parameter: artifactId, Value: todomvctests
[INFO] project created from Archetype in dir: /Users/john/Projects/OpenSource/serenity/serenity-articles/screenplay-tutorial/sample-code/screenplay-tutorial
[INFO] ------------------------------------------------------------------------
[INFO] BUILD SUCCESS
[INFO] ------------------------------------------------------------------------
[INFO] Total time: 04:52 min
[INFO] Finished at: 2016-02-15T09:16:05+00:00
[INFO] Final Memory: 16M/309M
[INFO] ------------------------------------------------------------------------
You will find your new project in the screenplay-tutorial directory.
$ cd screenplay-tutorial
$ mvn clean verify
Or, if you prefer Gradle, run the following:
$ gradle test aggregate
Both will run a simple test performing a search on Google and generate some reports in the target/site/serenity directory. Open the index.html file in this directory to take a look.
3. Serenity Screenplay - a quick tour
Before we write some tests, let’s take a quick look at the sample code. Import the project you just created into your favorite IDE (we prefer IntelliJ) and take a look at the SearchByKeywordStory.java class. This should look something like this:
@RunWith(SerenityRunner.class)
public class SearchByKeywordStory {

    Actor anna = Actor.named("Anna");                                                   (1)

    @Managed(uniqueSession = true)
    public WebDriver herBrowser;

    @Steps
    OpenTheApplication openTheApplication;

    @Before
    public void annaCanBrowseTheWeb() {
        anna.can(BrowseTheWeb.with(herBrowser));                                        (2)
    }

    @Test
    public void search_results_should_show_the_search_term_in_the_title() {

        givenThat(anna).wasAbleTo(openTheApplication);

        when(anna).attemptsTo(Search.forTheTerm("BDD In Action"));                      (3)

        then(anna).should(eventually(seeThat(TheWebPage.title(),                        (4)
                                     containsString("BDD In Action"))));

    }
}| 1 | Anna is the main actor in our scenario |
| 2 | Anna can access the application via a web browser |
| 3 | Actor can perform tasks, such as searching for a particular term |
| 4 | Actors can check the state of the application, for example by checking what the page title should display. |
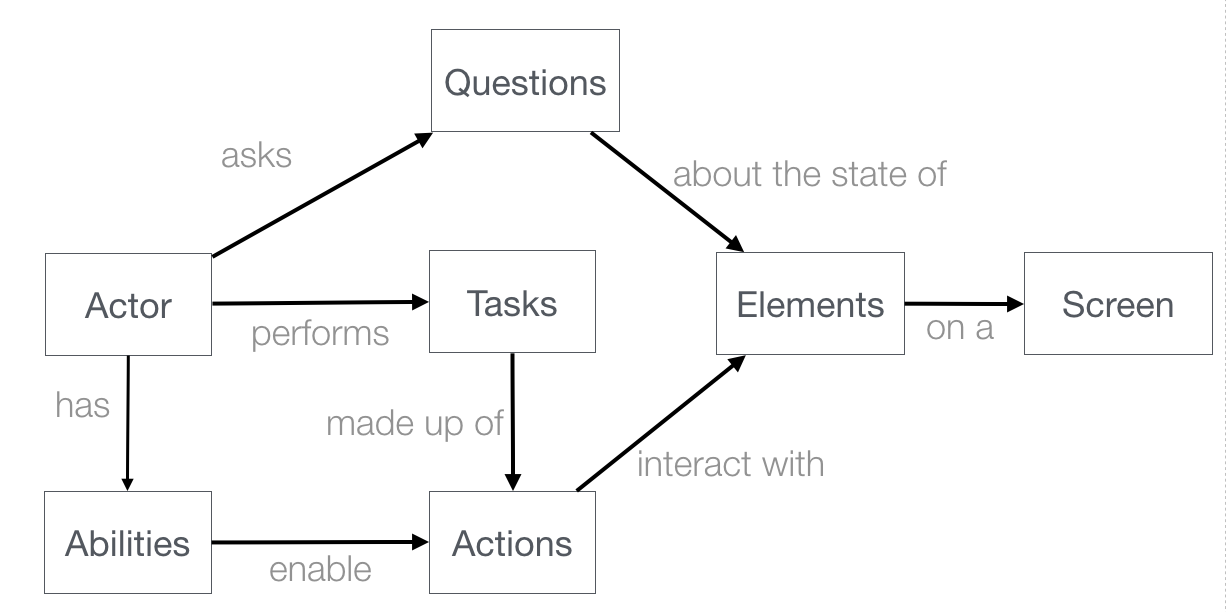
Let’s go through this test to get an idea of how a typical Serenity Screenplay test is built. Screenplay tests are expressed from the point of view of one or more actors. Actors have abilities, such as the ability to browse the web using a browser. Actors perform business-focused tasks to achieve their goals, such as "Search for a term". Actors can also ask questions about the state of the application, such as checking the state of the result screen.
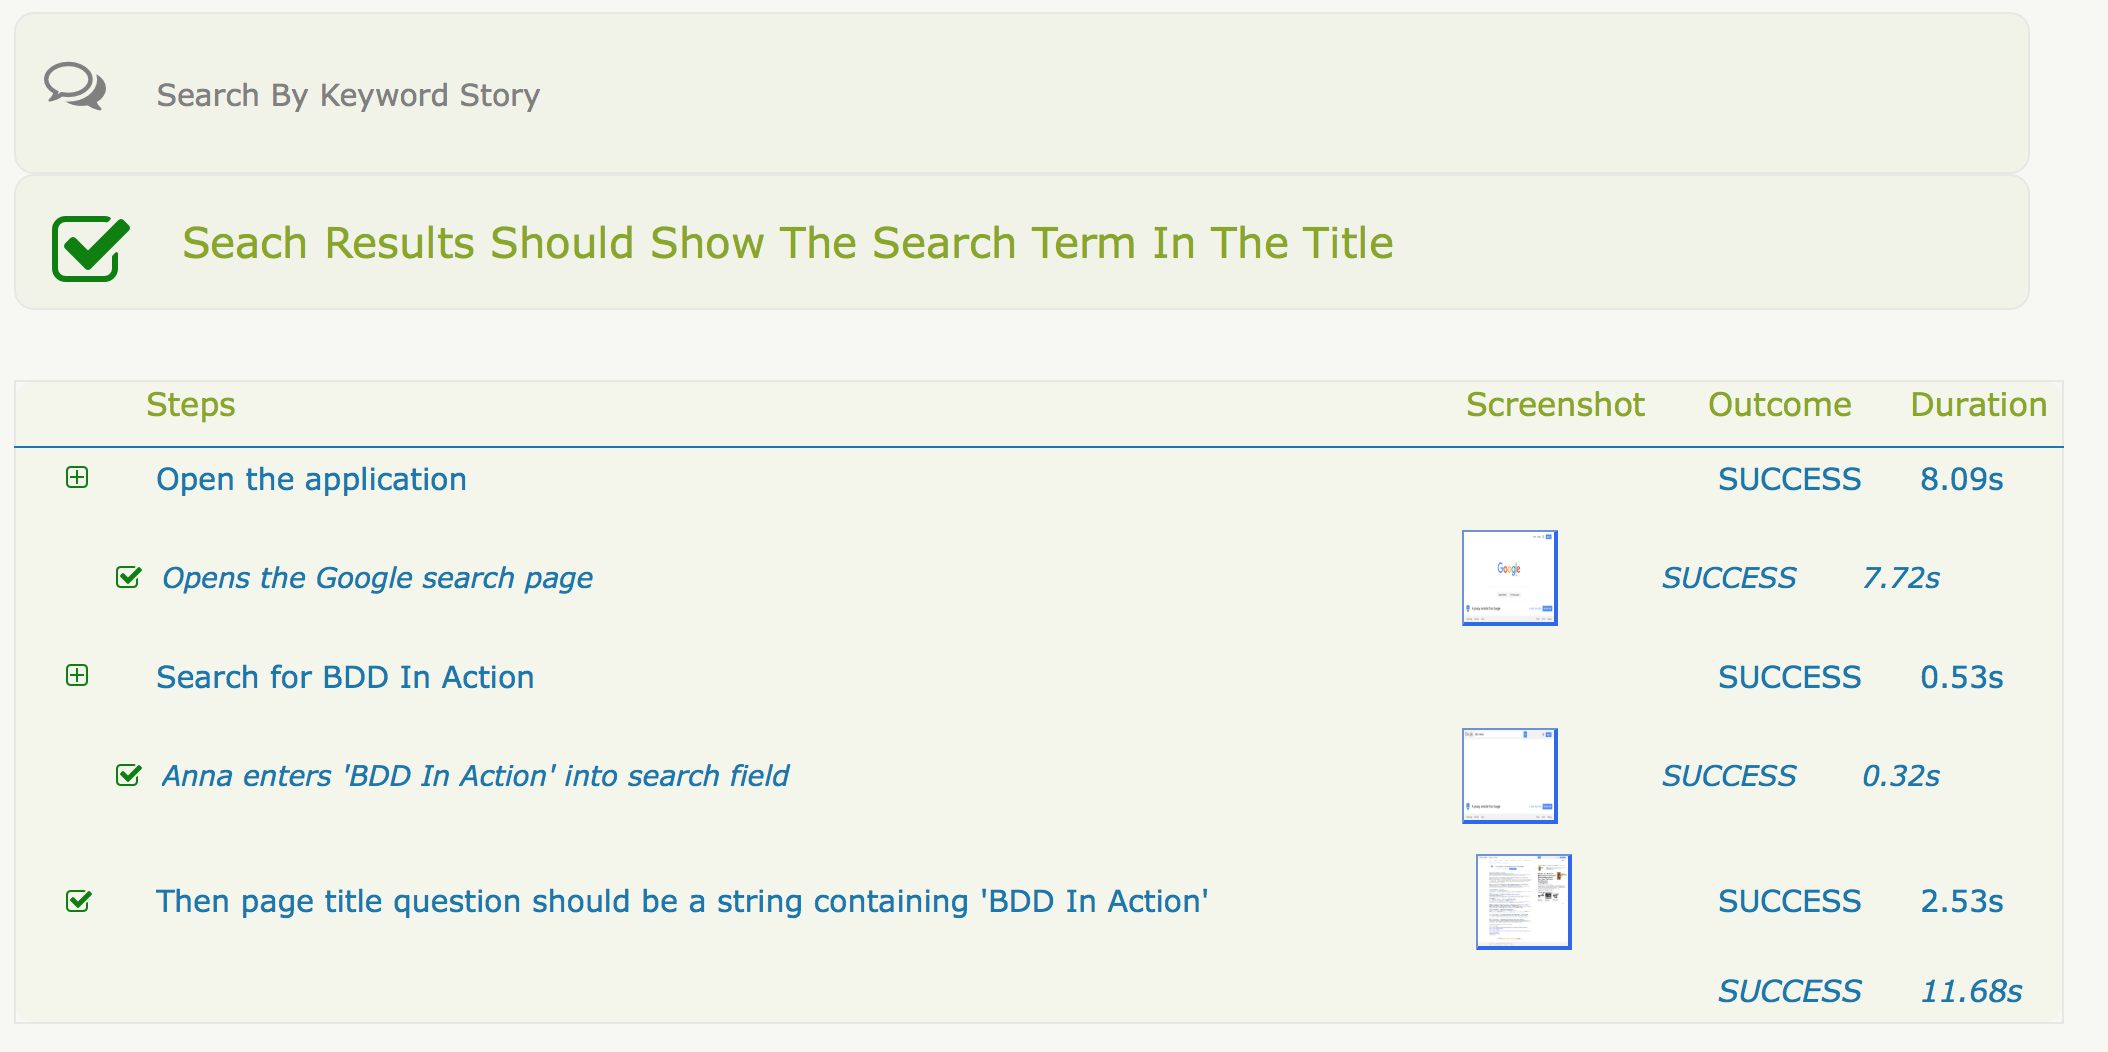
When you run this test, either through Maven/Gradle or from the command line, it will produce a rendered version of the test in HTML that looks something like this:
Now that you’ve seen what a typical Screenplay test looks like, lets see just how easy they are to write.
4. Your first Serenity Screenplay test
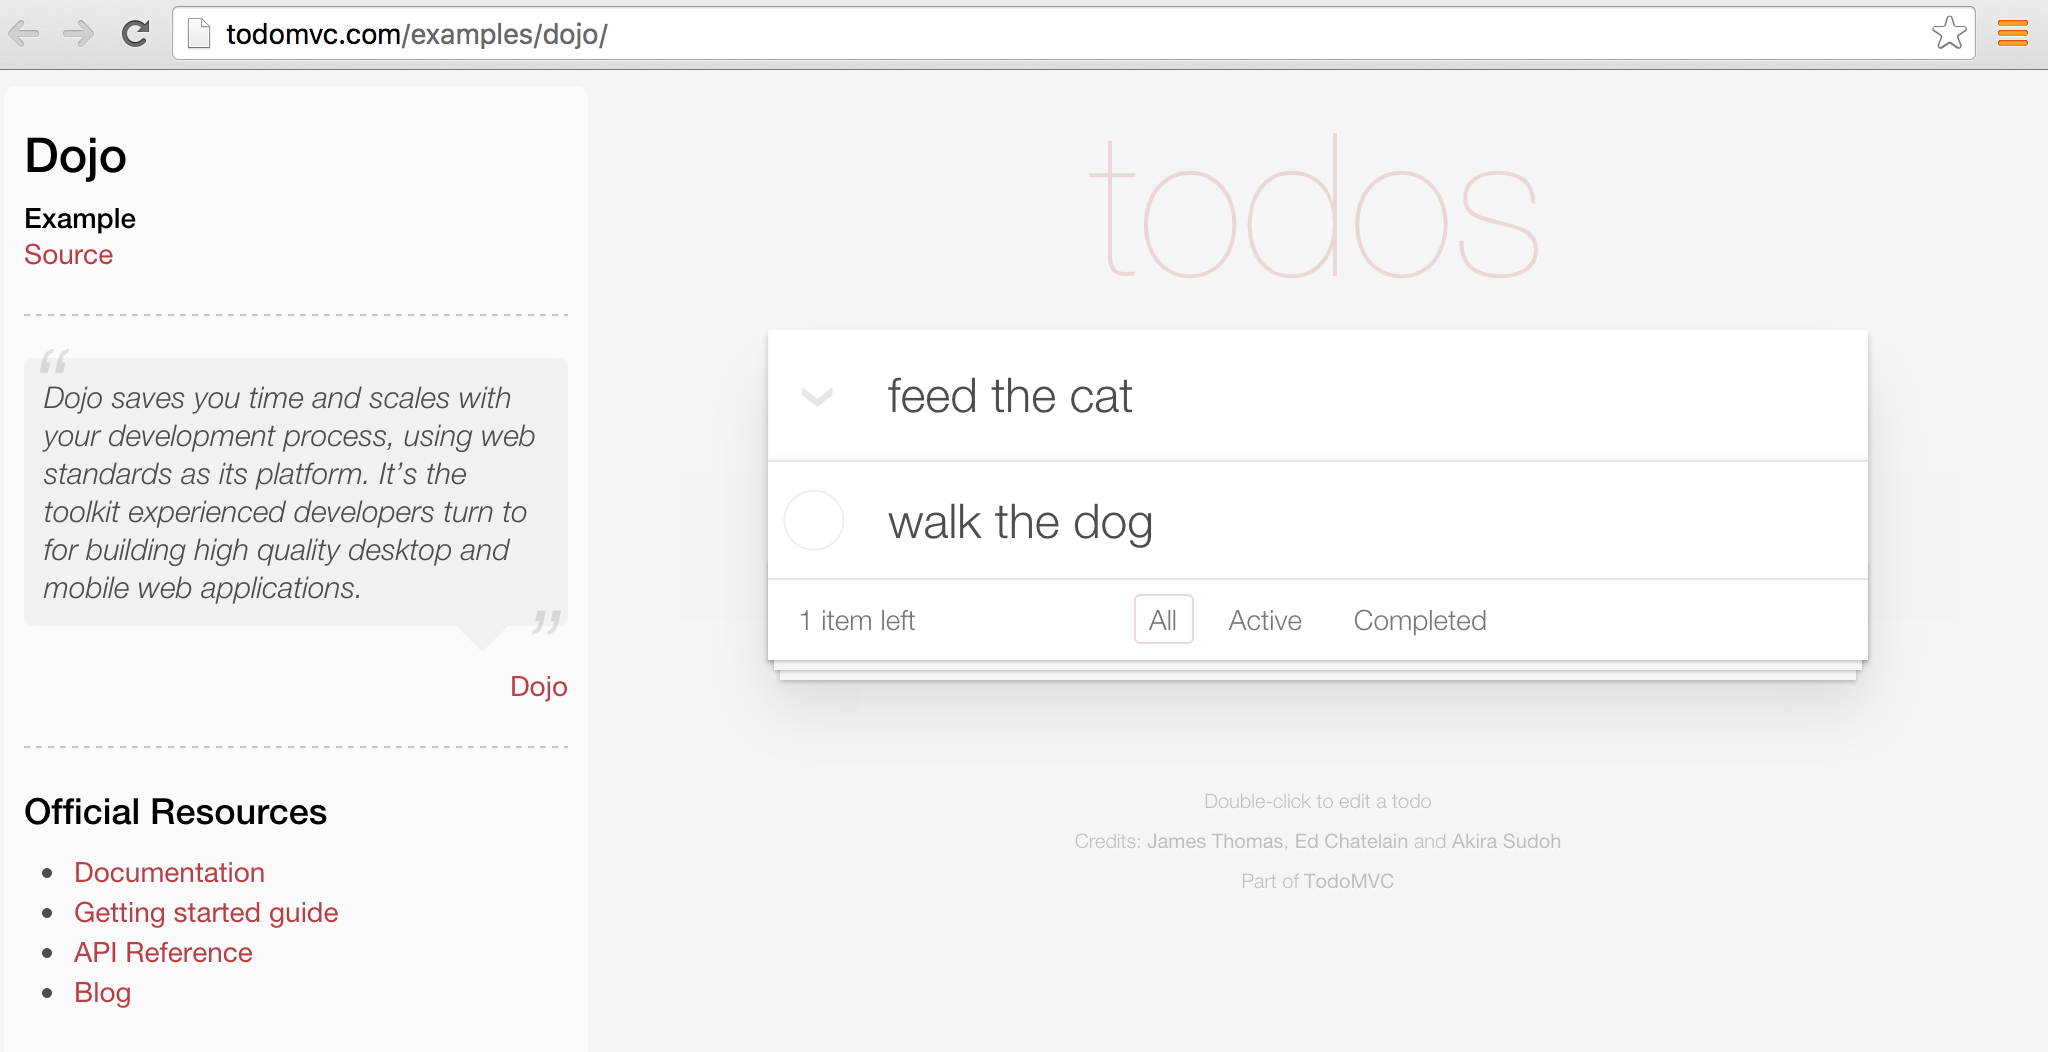
Serenity Screenplay adds a highly readable DSL to structure and express your tests in terms of business tasks. To see how this DSL in action, we are going to write some acceptance tests for the Dojo implementation of the TodoMVC application (see http://todomvc.com/examples/dojo/ ).
The first test we will write will simply check that when you add a new todo item to the list, it appears in the list.
Start off by creating a new package called record_items under the features package. This will represent the application capability to record todo items. Inside this package, create a new test class called AddItemsStory like the following:
@RunWith(SerenityRunner.class)                  (1)
public class AddItemsStory {
}| 1 | Tells JUnit that this is a Serenity test |
Next, we will add an actor to our scenario. We’ll call our actor Justin. Add the following line to your class to cast Justin as an actor in our scenario:
Actor justin = Actor.named("Justin"); (1)| 1 | Cast a new actor in the scenario called Justin. |
Now in this scenario we are testing a web application, so we need to give Justin a browser to use. (Other tests might need other abilities, such as the ability to query a web service or a database). Serenity manages the WebDriver lifecycle for us - all we need to do is to declare a variable for the browser in the test, and assign it to our actor:
@Managed
public WebDriver hisBrowser;                        (1)

@Before
public void justinCanBrowseTheWeb() {
    justin.can(BrowseTheWeb.with(hisBrowser));      (2)
}| 1 | This WebDriver instance will be automatically instantiated and shut down by Serenity |
| 2 | Whenever Justin accesses the web, he will use this browser |
Now we can write our first test. The aim of the test is to add a new item to the todo list, and verify that it appears in the list of items below. So we could write something like this.
@Test
public void should_be_able_to_add_an_item_to_the_todo_list() {

    givenThat(justin).wasAbleTo(StartWith.anEmptyTodoList());

    when(justin).attemptsTo(AddATodoItem.called("Feed the cat"));

    then(justin).should(seeThat(TheTodoItems.displayed(), hasItem("Feed the cat")));
}
This is certainly easy enough to read, but the most important classes ( StartWith, AddATodoItem, and TheTodoItems) exist for now only in our imagination. In fact, we are "writing the code we would like to have", and then implementing the classes for the tasks that we don’t already have. Fortunately, filling in the gaps is not difficult, and after a little practice, it becomes very natural. Let’s break this code down a little.
4.1. Given/When/Then
The code shown here uses words like "given", "when" and "then" to make the intent of the test more obvious. The givenThat(), when() and then() are static methods imported from the net.serenitybdd.screenplay.GivenWhenThen class. If your IDE doesn’t take care of this automatically for you, you can add the imports by hand as shown here:
import static net.serenitybdd.screenplay.GivenWhenThen.*;These methods are actually optional, and in some cases it makes sense to omit them entirely. For example, you can also write the second line shown above like this:
justin.attemptsTo(AddATodoItem.called("Feed the cat"));4.2. Business tasks
Serenity Screenplay uses layers of abstraction to make tests more readable and more maintainable. Serenity describes how a user interacts with an application in terms of three layers:
-
Goals that represent the high level business objectives;
-
Tasks that describe the high-level steps the user takes to achieve these goals; and
-
Actions that describe how the user interacts with the application to perform each step.
The Goal is represented by the test or scenario name (should_be_able_to_add_an_item_to_the_todo_list() for this test).
Tasks are represented by classes, such as StartWith and AddATodoItem in this test. We use readable class and method names that use domain language to make the tests as readable as possible.
4.2.1. Implementing a simple business task class
Task classes are easy to write. Let’s start off with StartWith:
givenThat(justin).wasAbleTo(StartWith.anEmptyTodoList());Create a new class called StartWith in the tasks package, and make it implement the net.serenitybdd.screenplay.Task interface. This interface implements a single method, performAs(), which is where the action happens:
public class StartWith implements Task {
    @Override
    public <T extends Actor> void performAs(T actor) {
    }
}
The actor methods attemptsTo() and wasAbleTo() take a list of Task objects and successively call the performAs() method for each task. We use static builder methods such as StartWith.anEmptyTodoList() to prepare the Task objects before they are executed, and pass in any variables the task may need. This helps make the code read more fluently. In this simple case, we don’t need to do anything special, so the anEmptyTodoList() static method just returns an instance the StartWith class. The only thing we do need to do is to add some Serenity instrumentation to the instance using the net.serenitybdd.screenplay.Tasks.instrumented() method, so that the task and underlying actions will appear in the Serenity reports:
public static StartWith anEmptyTodoList() {
    return instrumented(StartWith.class);
}
Now let’s come back to the performAs() method. An actor performs a task by either performing other smaller tasks or by interacting with the application in some way. In the case of the StartWith task, we just want to open the TodoMVC application. The implementation looks like this:
    TodoMvcApplicationHomePage todoMvcApplicationHomePage;              (1)

    @Override
    @Step("{0} starts with an empty todo list")                        (2)
    public <T extends Actor> void performAs(T actor) {
        actor.attemptsTo(
                Open.browserOn().the(todoMvcApplicationHomePage)        (3)
        );
}| 1 | Declare a Page Object that Serenity will automatically instantiate |
| 2 | What should this step look like in the test reports ({0} will be replaced with the name of the actor) |
| 3 | The actor performs this task simply by opening the web browser on the TodoMVC application homepage. |
The @Step annotation tells Serenity how this step should be written in the test reports. The {0} expression represents the Actor variable that is passed into the performAs() method. We will see later how we can personalize this message further.
4.2.2. Using Action classes
We interact with the web application using the Open Action class. Action classes are like Task classes, except that they interact with the application directly and are called from within a task, not directly from the test. Serenity comes with a number of built-in UI-related interaction classes to help interact with web pages, including Open, Click, Enter, Hit, Select and Scroll. The Open class opens the actor’s browser to the URL of a particular page, as shown here:
TodoMvcApplicationHomePage todoMvcApplicationHomePage;
...
    actor.attemptsTo(
        Open.browserOn().the(todoMvcApplicationHomePage)
    );
The page is represented by the TodoMvcApplication class. This is a simple Serenity Page Object, that at this stage needs nothing more than a @DefaultUrl annotation to indicate what URL should be used when we open the browser on this page:
@DefaultUrl("http://todomvc.com/examples/dojo/")
public class TodoMvcApplicationHomePage extends PageObject {
}
4.2.3. Implementing more complicated classes
We have now completed the implementation of the first step in the test. Let’s move on to the second:
when(justin).attemptsTo(AddATodoItem.called("Feed the cat"));Here, we have a task called AddATodoItem, which will add a todo item to our todo list. Create a class called AddATodoItem, once again in the tasks package, along the following lines:
public class AddATodoItem implements Task {

    private final String itemName;                          (1)

    @Step("{0} adds an item called '#itemName'")            (2)
    @Override
    public <T extends Actor> void performAs(T actor) {
        // TODO
    }

    public AddATodoItem(String itemName) {                  (3)
        this.itemName = itemName;
    }

    public static Task called(String itemName) {
        return Instrumented.instanceOf(AddATodoItem.class)  (4)
                           .withProperties(itemName);
    }

}| 1 | The itemName field stores the name of the todo item we want to add |
| 2 | We can refer to member variables like itemName in the @Step annotation using the # sign |
| 3 | We initialize the member variable in the constructor |
| 4 | Create an instrumented instance of the AddATodoItem and pass the itemName argument to the AddATodoItem constructor |
This class shows a more flexible type of Task, where we use a static method call (such as AddATodoItem.called("Feed the cat")) to create an instance of the task with a particular value. We will be able to use this value in the performAs() implementation later on. We still need to instrument the class instance, but this time we use the Instrumented.instanceOf() method to pass a parameter to the constructor.
As in the DisplayATodoListWith task, all the interesting stuff happens in the performAs() method. Here, we lay out the actions that the actor needs to do to add a todo item to the list. Adding a todo item is relatively straight-forward. The actor types the name of the todo item into the input field and hits the Return key. In the performAs() method, we can write something very similar:
@Step("{0} adds an item called '#itemName'")
@Override
public <T extends Actor> void performAs(T actor) {
    actor.attemptsTo(
            Enter.theValue(itemName).into(ToDoList.WHAT_NEEDS_TO_BE_DONE)
            .thenHit(Keys.RETURN)
    );
}
Here we are using one of the Serenity UI interaction classes (Enter) to enter a value into a given field, and then press the Return key. We do need to tell Serenity how to find the "What needs to be done" field, and we do this in the ToDoList class. The ToDoList class is responsible for knowing how to locate elements in the todo list, and looks like this:
import net.serenitybdd.screenplay.targets.Target;

public class TheTodoList {
    public static Target WHAT_NEEDS_TO_BE_DONE
        = Target.the("'What needs to be done?' field").locatedBy("#new-todo");
}
The Target class is a convenient way to associate a user-readable text ("what needs to be done") with a WebDriver location strategy. This way, it is the text that appears in the reports, and not the CSS selector, which makes the intent of the test clearer.
4.3. Asking Questions
The final step in our test is to check whether the todo item has actually appeared in the todo list. Once again, we consider the problem from the point of view of the actor - what would Justin expect to see, to know that the action has been successful? If we had to explain to a new tester what she should check for, we might say something like "you should see that the Feed the cat item now appears in the list of todo items", or "you should see that the todo items that are displayed now contains Feed the cat".
In Serenity, we use the Actor's should() method to write something very similar:
then(justin).should(seeThat(TheTodoItems.displayed()), hasItem("Feed the cat"));The should() method takes a list of Consequences that we expect to be true. You create a Consequence using the GivenWhenThen.seeThat static method, which takes two parameters:
-
a
Questionabout the state of the application, and -
a Hamcrest matcher
We will see how to implement a Question shortly, but in a nutshell, the Question returns a value about the state of the application, and the Hamcrest matcher describes what we expect this value to be.
The full test now look something like this:
import static net.serenitybdd.screenplay.GivenWhenThen.*;
import static org.hamcrest.Matchers.hasItems;

@Test
public void should_be_able_to_add_an_item_to_the_todo_list() {

    givenThat(justin).wasAbleTo(StartWith.anEmptyTodoList());

    when(justin).attemptsTo(AddATodoItem.called("Feed the cat"));

    then(justin).should(seeThat(TheTodoItems.displayed(), hasItem("Feed the cat")));
}
Now all that remains is to implement the TheTodoItems class.
4.3.1. Implementing a question class
A Question object answers a question about the state of the application, such as "what items are displayed in the todo list". Questions implement the parameterized Question interface. Create a new class called TheTodoItems in a questions package (next to the tasks package), along the following lines:
public class TheTodoItems implements Question<List<String>> {       (1)

    @Override
    public List<String> answeredBy(Actor actor) {                   (2)
        return null; // TODO
    }

    public static Question<List<String>> displayed() {              (3)
        return new TheTodoItems();
    }

}| 1 | Question classes implement the Question interface |
| 2 | We return the answer to the question in the answeredBy() method |
| 3 | A convenient static method used to create a new Question instance |
Now all that remains is to implement the answeredBy() method. If we need to, we can access the actor’s browser directly by calling BrowseTheWeb.as(actor), as shown here:
List<WebElement> itemLabels = BrowseTheWeb.as(actor)
                                          .findAll(By.cssSelector(".view label"));
However Serenity also provides a set of classes that can help query a web page more smoothly, and take care of boiler-plate code such as type conversions and list processing.
public List<String> answeredBy(Actor actor) {
    return Text.of(ToDoList.ITEMS)                  (1)
            .viewedBy(actor)                        (2)
            .asList();                              (3)
}| 1 | Return the list of text values from elements matching this locator target |
| 2 | Using the actor’s browser |
| 3 | And and convert them to a list of Strings |
The last piece of the puzzle is to add the ITEMS locator target to our ToDoList:
public class ToDoList {
public static Target WHAT_NEEDS_TO_BE_DONE
= Target.the("'What needs to be done?' field")
.locatedBy("#new-todo");
public static Target ITEMS
= Target.the("List of todo items")
.locatedBy(".view label");
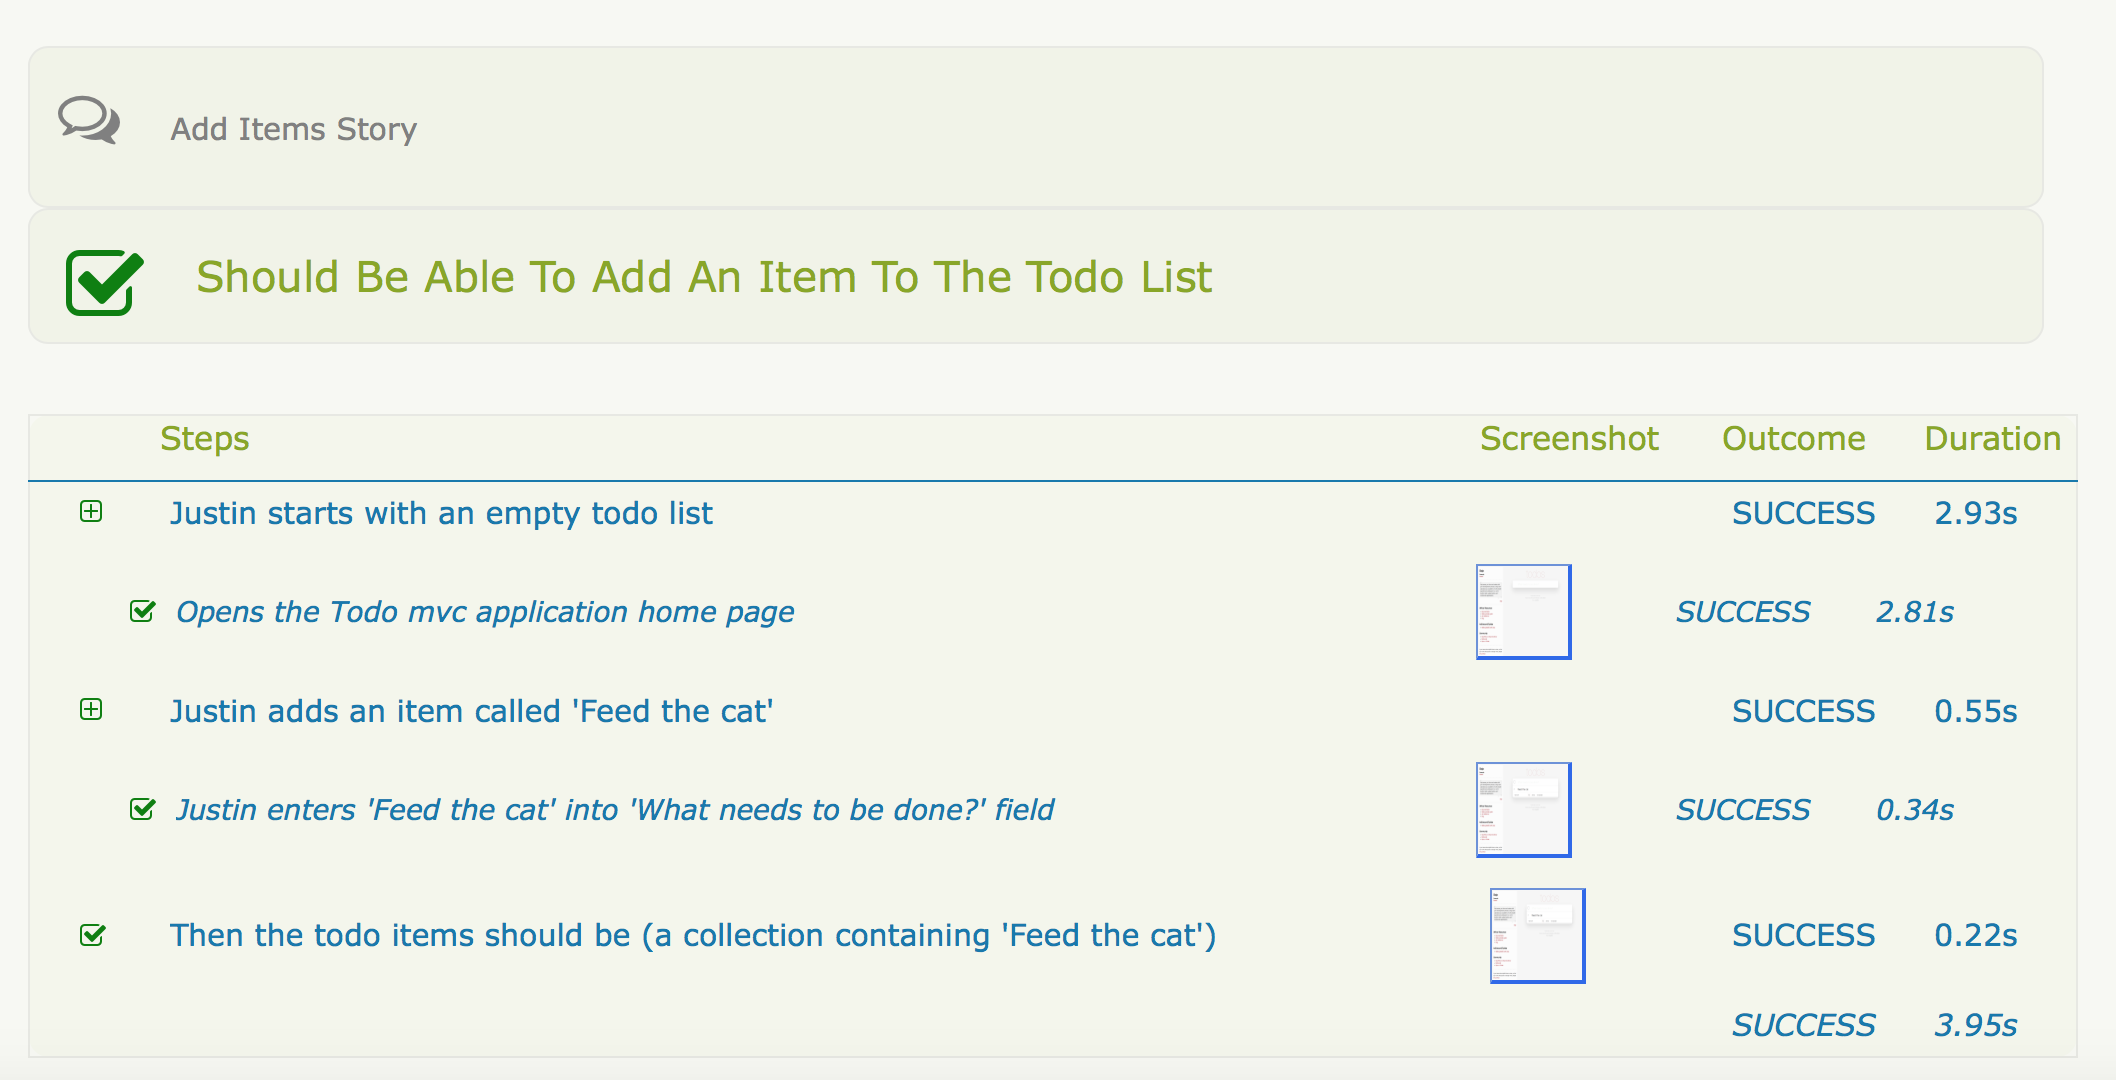
}We now should have a fully working test that produces a nice readable report like this one:
5. Reusing tasks - adding another test
Serenity Screenplay is designed to make tasks easy to reuse, and to make individual tasks as stable and reliable as possible. One way we do this is to make the tasks as small and focused as possible (conforming to the Single Responsibility Principle).
Let’s see this idea in action. Suppose, for example, we wanted to add another test to check that we can add new todo items to an existing list. The test might look like this:
@Test
public void should_be_able_to_add_additional_todo_items() {

    givenThat(justin).wasAbleTo(
        StartWith.aTodoListContaining("Feed the cat","take out the garbage")
    );

    when(justin).attemptsTo(AddATodoItem.called("Walk the dog"));

    then(justin).should(seeThat(TheTodoItems.displayed(),
                        contains("Feed the cat","take out the garbage","Walk the dog")));
}
As you can see, this test reuses the existing tasks like Start and AddATodoItem extensively: in fact, the only change we need to make is to add the aTodoListContaining() method to the Start class. We could make this change by modifying the logic in the current StartWith class, but this would add complexity to the existing class and risk affecting tests other than the one we are currently working on.
An alternative approach would be to create a new task dedicated to preparing a todo list with prepopulated items. This way, our original task remains untouched, and we can focus on adding a new, less complicated task implementation.
Let’s start by duplicating the existing StartWith class to a class called StartWithAnEmptyList, and remove the static factory method from the new class:
public class StartWithAnEmptyList implements Task {

    TodoMvcApplicationHomePage todoMvcApplicationHomePage;

    @Override
    @Step("{0} starts with an empty todo list")             (1)
    public <T extends Actor> void performAs(T actor) {
        actor.attemptsTo(
                Open.browserOn().the(todoMvcApplicationHomePage)
        );
    }
}
Next, we will refactor the StartWith to act as a Factory class, so that the anEmptyTodoList() method returns an instrumented instance of the StartWithAnEmptyList class:
public class StartWith {

    public static StartWithAnEmptyList anEmptyTodoList() {
        return instrumented(StartWithAnEmptyList.class);
    }
}
The behavior of the first test should not have been altered by this change (though you should rerun it just to be sure).
Now let’s add the aTodoListContaining() method to the StartWith class:
import com.google.common.collect.Lists;
import net.serenitybdd.core.steps.Instrumented;
import static net.serenitybdd.screenplay.Tasks.instrumented;

public class StartWith {

    public static StartWithAnEmptyList anEmptyTodoList() {
        return instrumented(StartWithAnEmptyList.class);
    }

    public static StartWithATodoListContaining aTodoListContaining(String... todos) {
        return Instrumented.instanceOf(StartWithATodoListContaining.class)
                           .withProperties(Lists.newArrayList(todos));
    }
}
Now, all we need to do is to implement the StartWithATodoListContaining class. A simple implementation might look like this:
public class StartWithATodoListContaining implements Task {

    private final List<String> todos;

    public StartWithATodoListContaining(List<String> todos) {
        this.todos = todos;
    }

    @Override
    @Step("{0} starts with a todo list containing #todos")                      (1)
    public <T extends Actor> void performAs(T actor) {
        actor.attemptsTo(StartWith.anEmptyTodoList());                          (2)
        todos.forEach(
                todoItem -> actor.attemptsTo(AddATodoItem.called(todoItem))     (3)
        );
    }
}| 1 | We can refer to member variables in the @Step annotation using the hash sign |
| 2 | Start with an empty todo list |
| 3 | Add each specified item to the list |
This will produce a report like this:

6. Conclusion
Hopefully you will now know enough to get started with Serenity Screenplay, and understand both the mechanics of using the pattern, as well as some of the ideas behind it. Serenity Screenplay has many additional features that we didn’t have time to go into here: learn more on the Serenity BDD site and in the User’s Manual.